
Installing Docker on Ubuntu 20.04 - Learn to install Docker on Ubuntu 20.04 and run Hello World Container
In this tutorial we are going to use our Ubuntu 20.04 desktop and then installer latest version Docker it. But, the steps given here also applies for the Ubuntu 2.04 server and you will be able to install Docker on server by following the steps given here. After installing we will explain you some commands to verify the installation of Docker. If you face any issue with the installation you can check our Docker questions and answers section.
We will show you how to start, stop and use the Docker installed on Ubuntu 20.04. After following this tutorial you will be able to install and use Docker on your Ubuntu 20.04 Desktop/Server. For this tutorial we are running the Ubuntu 20.04 in Oracle Virtualbox, but this tutorial applies for all other installation of Ubuntu 20.04 including server installation.
The tutorial below will give you an overview of Docker and then guide you step by step to help you in installing Docker successfully on Ubuntu 20.04. After the installation of Docker you will learn to use the Docker command-line interface (CLI) in Ubuntu 20.04, which helps in running the Docker images on your system. The tutorial assumes you already know the basic Linux command and you have a Ubuntu 20.04 desktop or VM installed to proceed with.

Docker prerequisites
You should have sudo access to your Ubuntu 20.04 desktop and have sufficient privileges to install software on your system. You should know how to use the apt-get package manager to install software on Ubuntu box. We are giving you all the steps of downloading, installing, configuring and using the Docker image on Ubuntu based operating system.
What is Docker?
Docker is a lightweight container-hosting service that lets developers push application code into a container and run on remote server. This is used by millions of developers around the world to package their application and run on the remote servers very efficiently. The application along with required dependency is packaged into a container called Docker container and can be run on any machine having Docker service. As with any other build tool, you can build applications as-is or create custom script to build your Docker image.
Installing Docker on Ubuntu 20.04
Now let's get started and install Docker on Ubuntu 20.04.
Step 1: Login to your Ubuntu 20.04 box and update
Enter username and password for your system and login to the box.
Step 2: Update the system
First of all you should update your system to include latest updates in the packages by running the following command:
sudo apt update
Here is the screen shot of updating the system:

Output:
deepak@deepak-VirtualBox:~/Desktop$ sudo apt update
Hit:1 http://in.archive.ubuntu.com/ubuntu focal InRelease
Hit:2 http://in.archive.ubuntu.com/ubuntu focal-updates InRelease
Hit:3 http://in.archive.ubuntu.com/ubuntu focal-backports InRelease
Get:4 http://security.ubuntu.com/ubuntu focal-security InRelease [107 kB]
Fetched 107 kB in 1s (78.9 kB/s)
Reading package lists... Done
Building dependency tree
Reading state information... Done
All packages are up to date.
Step 3: Installing the pre-requisite packages
Now we have to install the pre-requisit package necessary for Docker. Here is the command to install the pre-requisites packages:
sudo apt install apt-transport-https ca-certificates curl software-properties-common
Here is the screen shot of the step:

Output of the command:
deepak@deepak-VirtualBox:~/Desktop$ sudo apt install apt-transport-https ca-certificates curl software-properties-common
Reading package lists... Done
Building dependency tree
Reading state information... Done
ca-certificates is already the newest version (20190110ubuntu1.1).
ca-certificates set to manually installed.
software-properties-common is already the newest version (0.98.9.2).
software-properties-common set to manually installed.
The following package was automatically installed and is no longer required:
  libfprint-2-tod1
Use 'sudo apt autoremove' to remove it.
The following NEW packages will be installed:
  apt-transport-https curl
0 upgraded, 2 newly installed, 0 to remove and 0 not upgraded.
Need to get 163 kB of archives.
After this operation, 570 kB of additional disk space will be used.
Do you want to continue? [Y/n] y
Get:1 http://in.archive.ubuntu.com/ubuntu focal-updates/universe amd64 apt-transport-https all 2.0.2ubuntu0.1 [1,708 B]
Get:2 http://in.archive.ubuntu.com/ubuntu focal-updates/main amd64 curl amd64 7.68.0-1ubuntu2.2 [161 kB]
Fetched 163 kB in 1s (315 kB/s)
Selecting previously unselected package apt-transport-https.
(Reading database ... 143589 files and directories currently installed.)
Preparing to unpack .../apt-transport-https_2.0.2ubuntu0.1_all.deb ...
Unpacking apt-transport-https (2.0.2ubuntu0.1) ...
Selecting previously unselected package curl.
Preparing to unpack .../curl_7.68.0-1ubuntu2.2_amd64.deb ...
Unpacking curl (7.68.0-1ubuntu2.2) ...
Setting up apt-transport-https (2.0.2ubuntu0.1) ...
Setting up curl (7.68.0-1ubuntu2.2) ...
Processing triggers for man-db (2.9.1-1) ...
deepak@deepak-VirtualBox:~/Desktop$
The next step is to add the the GPG key of the official Docker repository in the system so that it will be able to download the files for installation of Docker. Run the following command on your system in terminal:
curl -fsSL https://download.docker.com/linux/ubuntu/gpg | sudo apt-key add -
Following screen shot show the output of above command:

Output of the command:
root@deepak-VirtualBox:/home/deepak/Desktop# curl -fsSL https://download.docker.com/linux/ubuntu/gpg | sudo apt-key add -
OK
root@deepak-VirtualBox:/home/deepak/Desktop#
Step 4: The next step is to update the system to discover Docker packages from the repo, run following command:
sudo apt update
You will get following output:

Here is the output of the above step:
root@deepak-VirtualBox:/home/deepak/Desktop# sudo apt update
Hit:1 http://in.archive.ubuntu.com/ubuntu focal InRelease
Hit:2 http://in.archive.ubuntu.com/ubuntu focal-updates InRelease
Hit:3 http://in.archive.ubuntu.com/ubuntu focal-backports InRelease
Hit:4 https://download.docker.com/linux/ubuntu bionic InRelease
Get:5 http://security.ubuntu.com/ubuntu focal-security InRelease [107 kB]
Fetched 107 kB in 2s (50.3 kB/s)
Reading package lists... Done
Building dependency tree
Reading state information... Done
All packages are up to date.
root@deepak-VirtualBox:/home/deepak/Desktop#
Step 5: Now we have to add the Docker repository to APT sources using following command: 0
sudo add-apt-repository "deb [arch=amd64] https://download.docker.com/linux/ubuntu
bionic stable"
Run the updates with following command:
sudo apt update
This command will update your system to use the newly added Docker repository:
 1
1
Step 5: Set docker-ce repository ad default
Run the following command to use docker-ce repository as default instead to Ubuntu repository:
apt-cache policy docker-ce
Here is the screen shot: 2

Output of the above command is given below:
root@deepak-VirtualBox:/home/deepak/Desktop# apt-cache policy docker-ce
docker-ce:
  Installed: (none)
  Candidate: 5:19.03.12~3-0~ubuntu-bionic
  Version table:
     5:19.03.12~3-0~ubuntu-bionic 500
        500 https://download.docker.com/linux/ubuntu bionic/stable amd64 Packages
     5:19.03.11~3-0~ubuntu-bionic 500
        500 https://download.docker.com/linux/ubuntu bionic/stable amd64 Packages
     5:19.03.10~3-0~ubuntu-bionic 500
        500 https://download.docker.com/linux/ubuntu bionic/stable amd64 Packages
     5:19.03.9~3-0~ubuntu-bionic 500
        500 https://download.docker.com/linux/ubuntu bionic/stable amd64 Packages
     5:19.03.8~3-0~ubuntu-bionic 500
        500 https://download.docker.com/linux/ubuntu bionic/stable amd64 Packages
     5:19.03.7~3-0~ubuntu-bionic 500
        500 https://download.docker.com/linux/ubuntu bionic/stable amd64 Packages
     5:19.03.6~3-0~ubuntu-bionic 500
        500 https://download.docker.com/linux/ubuntu bionic/stable amd64 Packages
     5:19.03.5~3-0~ubuntu-bionic 500
        500 https://download.docker.com/linux/ubuntu bionic/stable amd64 Packages
     5:19.03.4~3-0~ubuntu-bionic 500
        500 https://download.docker.com/linux/ubuntu bionic/stable amd64 Packages
     5:19.03.3~3-0~ubuntu-bionic 500
        500 https://download.docker.com/linux/ubuntu bionic/stable amd64 Packages
     5:19.03.2~3-0~ubuntu-bionic 500
        500 https://download.docker.com/linux/ubuntu bionic/stable amd64 Packages
     5:19.03.1~3-0~ubuntu-bionic 500
        500 https://download.docker.com/linux/ubuntu bionic/stable amd64 Packages
     5:19.03.0~3-0~ubuntu-bionic 500
        500 https://download.docker.com/linux/ubuntu bionic/stable amd64 Packages
     5:18.09.9~3-0~ubuntu-bionic 500
        500 https://download.docker.com/linux/ubuntu bionic/stable amd64 Packages
     5:18.09.8~3-0~ubuntu-bionic 500
        500 https://download.docker.com/linux/ubuntu bionic/stable amd64 Packages
     5:18.09.7~3-0~ubuntu-bionic 500
        500 https://download.docker.com/linux/ubuntu bionic/stable amd64 Packages
     5:18.09.6~3-0~ubuntu-bionic 500
        500 https://download.docker.com/linux/ubuntu bionic/stable amd64 Packages
     5:18.09.5~3-0~ubuntu-bionic 500
        500 https://download.docker.com/linux/ubuntu bionic/stable amd64 Packages
     5:18.09.4~3-0~ubuntu-bionic 500
        500 https://download.docker.com/linux/ubuntu bionic/stable amd64 Packages
     5:18.09.3~3-0~ubuntu-bionic 500
        500 https://download.docker.com/linux/ubuntu bionic/stable amd64 Packages
     5:18.09.2~3-0~ubuntu-bionic 500
        500 https://download.docker.com/linux/ubuntu bionic/stable amd64 Packages
     5:18.09.1~3-0~ubuntu-bionic 500
        500 https://download.docker.com/linux/ubuntu bionic/stable amd64 Packages
     5:18.09.0~3-0~ubuntu-bionic 500
        500 https://download.docker.com/linux/ubuntu bionic/stable amd64 Packages
     18.06.3~ce~3-0~ubuntu 500
        500 https://download.docker.com/linux/ubuntu bionic/stable amd64 Packages
     18.06.2~ce~3-0~ubuntu 500
        500 https://download.docker.com/linux/ubuntu bionic/stable amd64 Packages
     18.06.1~ce~3-0~ubuntu 500
        500 https://download.docker.com/linux/ubuntu bionic/stable amd64 Packages
     18.06.0~ce~3-0~ubuntu 500
        500 https://download.docker.com/linux/ubuntu bionic/stable amd64 Packages
     18.03.1~ce~3-0~ubuntu 500
        500 https://download.docker.com/linux/ubuntu bionic/stable amd64 Packages
root@deepak-VirtualBox:/home/deepak/Desktop#
Step 6: Install Docker on your system 3
Now are ready to install Docerk from the Docker repo. Run the following command to install Docker on your system:
sudo apt install docker-ce
Screen shot of the installation step:
 4
4
Out of the installation step of Docker:
root@deepak-VirtualBox:/home/deepak/Desktop# sudo apt install docker-ce
Reading package lists... Done
Building dependency tree
Reading state information... Done
The following package was automatically installed and is no longer required:
  libfprint-2-tod1
Use 'sudo apt autoremove' to remove it.
The following additional packages will be installed:
  aufs-tools cgroupfs-mount containerd.io docker-ce-cli git git-man liberror-perl pigz
Suggested packages:
  git-daemon-run | git-daemon-sysvinit git-doc git-el git-email git-gui gitk gitweb git-cvs
  git-mediawiki git-svn
The following NEW packages will be installed:
  aufs-tools cgroupfs-mount containerd.io docker-ce docker-ce-cli git git-man liberror-perl pigz
0 upgraded, 9 newly installed, 0 to remove and 0 not upgraded.
Need to get 90.7 MB of archives.
After this operation, 419 MB of additional disk space will be used.
Do you want to continue? [Y/n] y
Get:1 http://in.archive.ubuntu.com/ubuntu focal/universe amd64 pigz amd64 2.4-1 [57.4 kB]
Get:2 http://in.archive.ubuntu.com/ubuntu focal/universe amd64 aufs-tools amd64 1:4.14+20190211-1ubuntu1 [104 kB]
Get:3 http://in.archive.ubuntu.com/ubuntu focal/universe amd64 cgroupfs-mount all 1.4 [6,320 B]
Get:4 http://in.archive.ubuntu.com/ubuntu focal/main amd64 liberror-perl all 0.17029-1 [26.5 kB]
Get:5 http://in.archive.ubuntu.com/ubuntu focal/main amd64 git-man all 1:2.25.1-1ubuntu3 [884 kB]
Get:6 https://download.docker.com/linux/ubuntu bionic/stable amd64 containerd.io amd64 1.2.13-2 [21.4 MB]
Get:7 http://in.archive.ubuntu.com/ubuntu focal/main amd64 git amd64 1:2.25.1-1ubuntu3 [4,554 kB]
Get:8 https://download.docker.com/linux/ubuntu bionic/stable amd64 docker-ce-cli amd64 5:19.03.12~3-0~ub
Step
7: Checking Status of Docker
After completion of installation of Docker you can check its running status with following command: 5
sudo systemctl status docker
If Docker is running on your system then it will show following output which shows its running status:

Here is the status of the systemctl status docker command: 6
root@deepak-VirtualBox:/home/deepak/Desktop# systemctl status docker
 docker.service - Docker Application Container Engine
     Loaded: loaded (/lib/systemd/system/docker.service; enabled; vendor preset: enabled)
     Active: active (running) since Sun 2020-08-30 11:10:52 IST; 1min 16s ago
TriggeredBy:  docker.socket
       Docs: https://docs.docker.com
   Main PID: 5174 (dockerd)
      Tasks: 12
     Memory: 36.3M
     CGroup: /system.slice/docker.service
             └─5174 /usr/bin/dockerd -H fd:// --containerd=/run/containerd/containerd.sock

Aug 30 11:10:51 deepak-VirtualBox dockerd[5174]: time="2020-08-30T11:10:51.756683863+05:30" level=warni>
Aug 30 11:10:51 deepak-VirtualBox dockerd[5174]: time="2020-08-30T11:10:51.756707411+05:30" level=warni>
Aug 30 11:10:51 deepak-VirtualBox dockerd[5174]: time="2020-08-30T11:10:51.756739632+05:30" level=warni>
Aug 30 11:10:51 deepak-VirtualBox dockerd[5174]: time="2020-08-30T11:10:51.757096283+05:30" level=info >
Aug 30 11:10:52 deepak-VirtualBox dockerd[5174]: time="2020-08-30T11:10:52.088875824+05:30" level=info >
Aug 30 11:10:52 deepak-VirtualBox dockerd[5174]: time="2020-08-30T11:10:52.274728513+05:30" level=info >
Aug 30 11:10:52 deepak-VirtualBox dockerd[5174]: time="2020-08-30T11:10:52.768648955+05:30" level=info >
Aug 30 11:10:52 deepak-VirtualBox dockerd[5174]: time="2020-08-30T11:10:52.768866151+05:30" level=info >
Aug 30 11:10:52 deepak-VirtualBox dockerd[5174]: time="2020-08-30T11:10:52.914268680+05:30" level=info >
Aug 30 11:10:52 deepak-VirtualBox systemd[1]: Started Docker Application Container Engine.
lines 1-21/
Step 8: Getting Docker information
Now you can run the following command to see the docker information:
docker info
Above command will display the Docker information along with your system information. The docker info command will display following message: 7

Here is output of the docker info command :
root@deepak-VirtualBox:/home/deepak/Desktop# docker info
Client:
 Debug Mode: false

Server:
 Containers: 0
  Running: 0
  Paused: 0
  Stopped: 0
 Images: 0
 Server Version: 19.03.12
 Storage Driver: overlay2
  Backing Filesystem: extfs
  Supports d_type: true
  Native Overlay Diff: true
 Logging Driver: json-file
 Cgroup Driver: cgroupfs
 Plugins:
  Volume: local
  Network: bridge host ipvlan macvlan null overlay
  Log: awslogs fluentd gcplogs gelf journald json-file local logentries splunk syslog
 Swarm: inactive
 Runtimes: runc
 Default Runtime: runc
 Init Binary: docker-init
Step 9: Running your First container 8
Now we will run our first container which is actually distributed at Docker Hub and the image is pulled automatically from the Docker Hub. Here is command to run the "Hello World" Docker container:
docker run hello-world
Here is the screen shot:
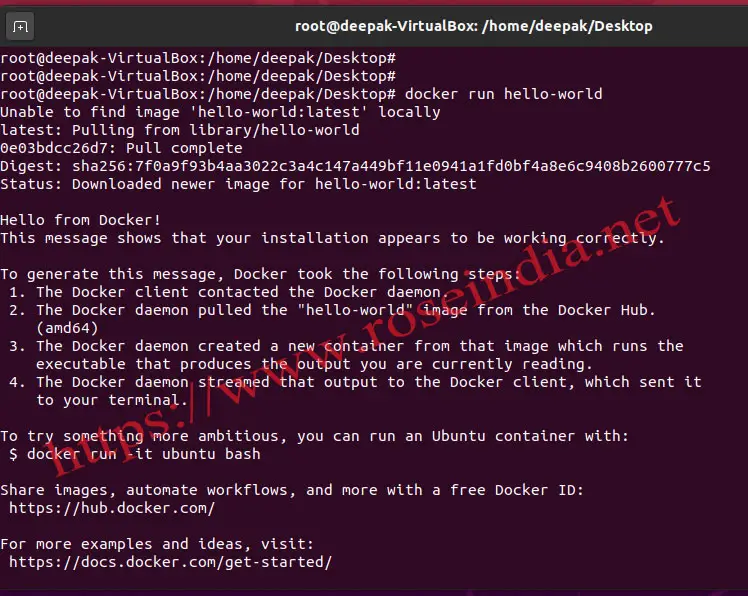
Output of the command:
root@deepak-VirtualBox:/home/deepak/Desktop# docker run hello-world
Unable to find image 'hello-world:latest' locally
latest: Pulling from library/hello-world
0e03bdcc26d7: Pull complete
Digest: sha256:7f0a9f93b4aa3022c3a4c147a449bf11e0941a1fd0bf4a8e6c9408b2600777c5
Status: Downloaded newer image for hello-world:latest

Hello from Docker!
This message shows that your installation appears to be working correctly.

To generate this message, Docker took the following steps:
 1. The Docker client contacted the Docker daemon.
 2. The Docker daemon pulled the "hello-world" image from the Docker Hub.
    (amd64)
 3. The Docker daemon created a new container from that image which runs the
    executable that produces the output you are currently reading.
 4. The Docker daemon streamed that output to the Docker client, which sent it
    to your terminal.

To try something more ambitious, you can run an Ubuntu container with:
 $ docker run -it ubuntu bash

Share images, automate workflows, and more with a free Docker ID:
 https://hub.docker.com/

For more examples and ideas, visit:
 https://docs.docker.com/get-started/

root@deepak-VirtualBox:/home/deepak/Desktop#
Above command runs the 'hello-world:latest' and displays "Hello from Docker!" on the console along with other information.
Step 10: How to restart Docker? 9
The systemctl command is used to stop, start and restart the docker service. Here is the command that you can run to restart Docker service on your Ubuntu 20.04:
sudo systemctl restart docker
Following is the output of restart command:
 0
0
Output of systemctl restart docker command:
root@deepak-VirtualBox:/home/deepak/Desktop# sudo systemctl restart docker
root@deepak-VirtualBox:/home/deepak/Desktop# systemctl status docker
 docker.service - Docker Application Container Engine
     Loaded: loaded (/lib/systemd/system/docker.service; enabled; vendor preset: enabled)
     Active: active (running) since Sun 2020-08-30 11:17:18 IST; 10s ago
TriggeredBy:  docker.socket
       Docs: https://docs.docker.com
   Main PID: 8135 (dockerd)
      Tasks: 12
     Memory: 36.2M
     CGroup: /system.slice/docker.service
             └─8135 /usr/bin/dockerd -H fd:// --containerd=/run/containerd/containerd.sock

Aug 30 11:17:17 deepak-VirtualBox dockerd[8135]: time="2020-08-30T11:17:17.308727583+05:30" level=warn>
Aug 30 11:17:17 deepak-VirtualBox dockerd[8135]: time="2020-08-30T11:17:17.308955028+05:30" level=warn>
Aug 30 11:17:17 deepak-VirtualBox dockerd[8135]: time="2020-08-30T11:17:17.309115998+05:30" level=warn>
Step 11: Checking Docker Container status
We have just run the Hello World image in a container and if you type docker ps -l command, Docker will display the list of exited Docker containers as shown below: 1

Above command gives following outptu:
root@deepak-VirtualBox:/home/deepak/Desktop# docker ps -l
CONTAINER ID        IMAGE               COMMAND             CREATED              STATUS                          PORTS               NAMES
2542540f7709        hello-world         "/hello"            About a minute ago   Exited (0) About a minute ago                       dreamy_wright
root@deepak-VirtualBox:/home/deepak/Desktop#
root@deepak-VirtualBox:/home/deepak/Desktop#
root@deepak-VirtualBox:/home/deepak/Desktop#
Step 12: Checking Docker images on the system 2
Since we run the hello world container, the Docker downloaded this image from Docker Hub before running it into container. You can run docker images command to see the list of images:

In this tutorial you learned to install Docker on Ubuntu 20.04 operating system then run first "Hello World" Docker container on newly installed Docker. 3
Here are more tutorials of Docker: