
Generative AI Training - Text to Video Generator Huggingface example - How to run on Google Colab?
In this section I will teach you to use one of the Huggingface text-to-video models to generate video from the text prompt. I will show you how you can run this on Google Colab. Google Colab is one of the environments which can be used for free to a certain extent. So, Google is providing this opportunity for the developers to learn Python and Machine learning programming by experimenting on the Google Colab for free. In this tutorial I will use my free Google Colab environment and connect to the GPU to run a text-to-video generation model.
Lets get started.
Step 1: Connect to Google Colab and create a new notebook
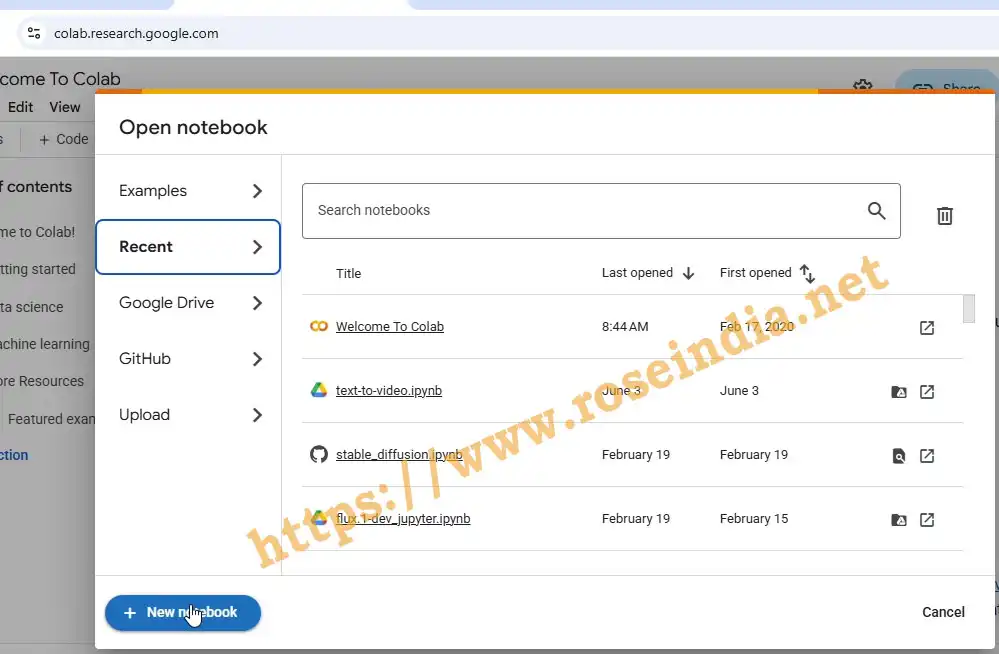
Login to your Google Gmail account and then search for Google Colab in Google search and you will find the link to visit Google Colab home page. Create a new notebook as shown below:
Step 2: Connect to Google Colab GPU runtime
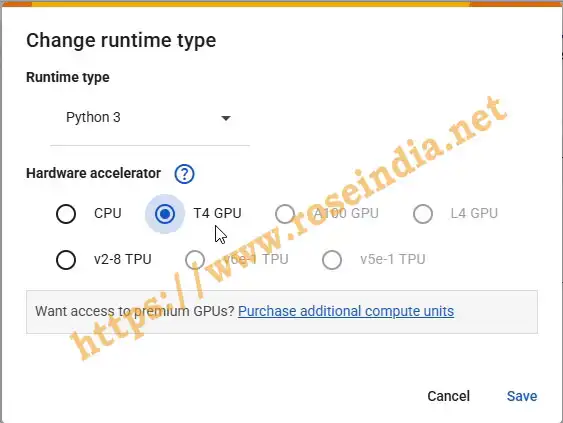
Next you should connect to a GPU runtime environment in Google Colab. I have used following configuration in my Google Colab Environment:
Step 3: Install required libraries
Run the following command in the shell to install required libraries:
!pip install diffusers transformers accelerate torch
Above command will install required python libraries in your environment.
Step 4: Import Libraries
Create a new cell and then add following code to import required libraries:
# Import libraries
import torch
from diffusers import DiffusionPipeline, DPMSolverMultistepScheduler
from diffusers.utils import export_to_video
from PIL import Image
We need all these libraries to load the model and generate video from text prompt.
Step 5: Download the model
We are going to use https://huggingface.co/ali-vilab/text-to-video-ms-1.7b model to generate video using a text prompt. Here is the code block that you should use to download the model:
pipe = DiffusionPipeline.from_pretrained("damo-vilab/text-to-video-ms-1.7b", torch_dtype=torch.float16)
pipe.enable_model_cpu_offload()
Run the cell to download model and supported files.
Step 6: Run the video generation pipeline (inference)
Now you can use following code to generate the video from text prompt:
pipe.unet.enable_forward_chunking(chunk_size=1, dim=1)

pipe.enable_vae_slicing()

prompt = "Spiderman is surfing"
video_frames = pipe(prompt, num_frames=24).frames[0]
video_path = export_to_video(video_frames, fps=10, output_video_path="vid-export.mp4")
Above generates the video and saves on the disk. Now we can view the video in following step.
Step 7: View video on Google Colab
You should use the following code to view the generated video on Google Colab:
from IPython.display import HTML
from base64 import b64encode
mp4 = open(video_path,'rb').read()
data_url = "data:video/mp4;base64," + b64encode(mp4).decode()
HTML("""
<video width=400 controls>
   <source src="%s" type="video/mp4">
</video>
""" % data_url)
Add the above code in a cell and then run the cell. You notebook should display the video generated.
Here is the detailed video instruction of all the steps:
Check more AI/ML Tutorials at AI Tutorials section.