Creating JavaServer Pages (JSP) files
You can create and edit a JSP file in Page Designer by adding your own text and images using JavaScript, HTML, or JSP tagging, including Java source code inside of scriptlet tags.
To create a new JSP file, do the following:
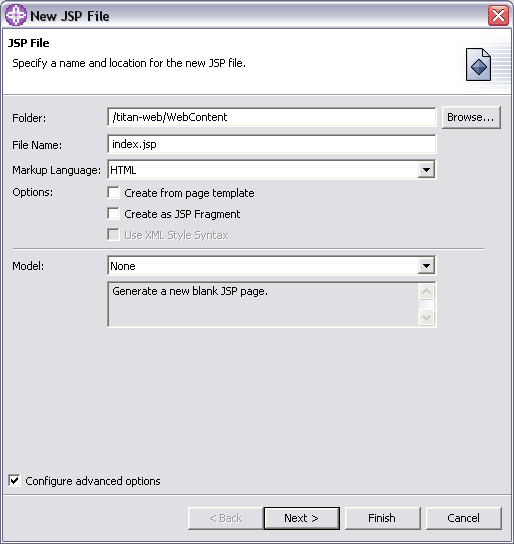
To launch the New JSP File wizard, select File > New > JSP File.
Select the appropriate container for the file from the list of project folders (and subfolders).
The folder that you choose should be under the Web content folder of the Web project. If a JSP file is not under this folder, then it will not be included in the WAR file that is deployed to the server. In addition, link validation will not encompass files that are not under the Web content folder.
Type a file name into the appropriate field (index.jsp).
Ensure that the appropriate option is displayed in the Markup Language drop-down list.
In addition, if you select the Create as JSP Fragment check box, this file will be created as a fragment that can be added to another JSP file. Other JSP files can include JSP fragments using a JSP include directive. Creating a fragment causes the resulting file to end in a .jspf or .jsf extension. You will not be prompted for DOCTYPE information, because a fragment cannot stand alone as a Web page, and it would invalidate any JSP file that included it.
Also, depending which markup language you select, you can select the Use XML Style Syntax option to create a JSP file that adheres to XML style tagging.
You have several options for proceeding:
If you want to accept the defaults associated with a new JSP file, leave Model as None and make sure the Configure advanced options is unchecked. The defaults associated with a new JSP file are explained where appropriate in the descriptions of the advanced options in the following steps.
If you want to create a JSP file that uses Struts architecture, select Struts JSP in the Model field and click Next. The Struts JSP model is not available for cHTML or WML markup languages.
If you want to apply a page template to your new file, select Page Template in the Model field and click Next. This model is only available for HTML and XHTML markup languages. If you want to use one of the sample templates provided, select Sample Page Template and then choose one of the templates shown in the Thumbnail box. If you want to use a template of your own, select User-defined Page Template and then click Browse to select the template from the file system.
If you want to specify or customize the file options, select the Configure advanced options checkbox and click Next.
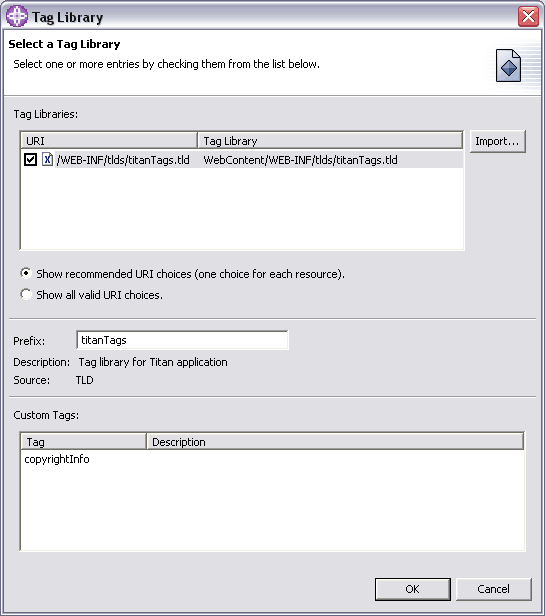
Click the Add button to locate a TLD file or a JAR file that contains a TLD file to can add tag libraries from a variety of sources.
Tag library Universal Resource Identifier (URIs) can be located in one of the following places:
Defined in the web.xml file
Within a JAR file located in the project lib directory that contains /META-INF/taglib.tld
Within a JAR file external to the project
In a "loose" TLD anywhere in the project
In the Select a tag library dialog, either select one of the available tag libraries, or click the Import button to locate and add a tag library to the list, and then select it. The dialog will automatically populate the informational fields that describe the tag library and its contents. You must specify a Prefix value (titanTags).
Click OK to add the tag library. As you add tag libraries, the Available Custom Tags window displays the declaration of the tag along with the tag library directive. If the selected TLD file hasn't been registered in the web.xml file, it will be added automatically.
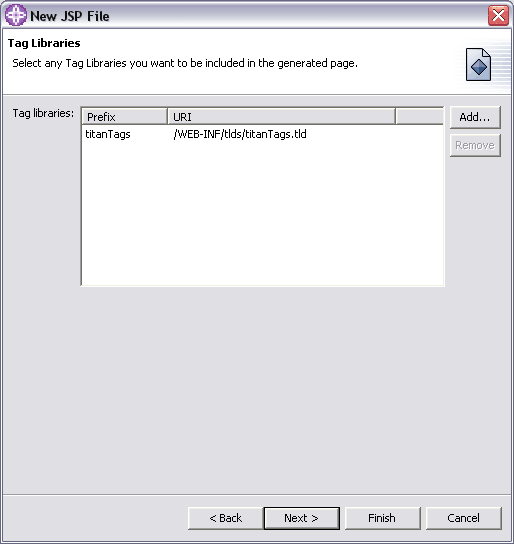
Click Next.
If you want to select an encoding type, deselect the Use workbench encoding check box to select a new encoding attribute. Select the appropriate encoding value to add to the file's HTML declaration from the Encoding drop-down list. The default is the value set in the HTML Files preferences page, which is accessed by selecting Window > Preferences, and then expanding the Web and XML Files preferences.
Ensure that the proper content type is selected in the Content Type drop-down list. The default depends on the markup language.
Select the Document Type that you wish to associate with the JSP file. The default depends on the markup language.
Specify a cascading style sheet (CSS) file to be referenced by the new JSP file. Typically, CSS files are located in the theme folder under the WebСontent folder. You can use Add to choose a style sheet from the file system. Use Remove to delete a style sheet from the list, or use the arrow buttons to rearrange the order in which the file references the style sheets. If a style sheet is already associated with the project in which you are creating the new file, that style sheet is the default.
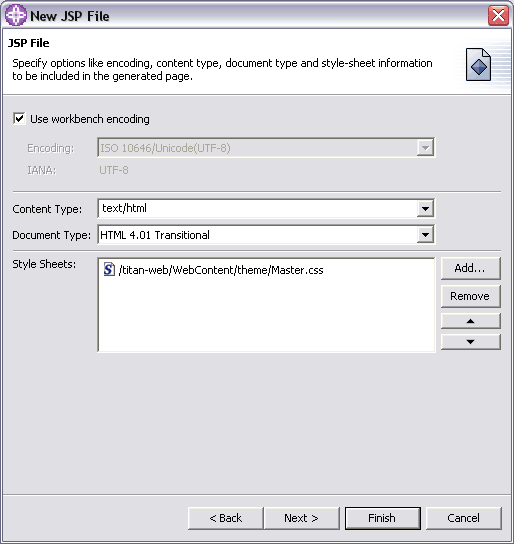
Click Next to select specific method stubs and add deployment information to the Web project's web.xml file.
Select any appropriate method stubs to be created in the servlet that is deployed for this JSP file. 0
If you select the Add to web.xml check box, the JSP file, along with its display name, and any URL mappings and initialization parameters associated with the JSP file will be automatically included in the Web project deployment descriptor file. Note that the File Name value provided in the first page of the wizard is automatically mapped to the Servlet Name value on this page, as well the URL Pattern mappings. These mappings are not updated if you change the original value in the File Name field.
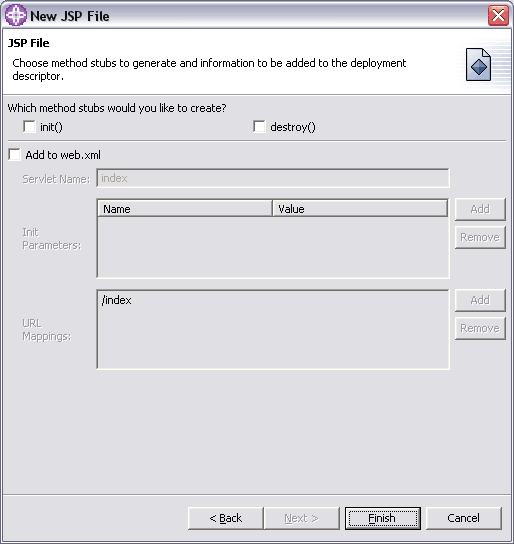
Click Finish to create the file in the project that you have selected:
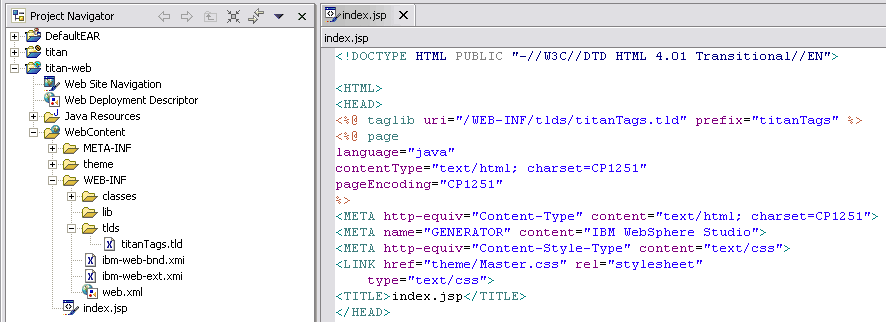
Add the following code to the index.jsp JSP: 1
<!DOCTYPE HTML PUBLIC "-//W3C//DTD HTML 4.01 Transitional//EN">
<HTML>
<HEAD>
<%@ taglib uri="/WEB-INF/tlds/titanTags.tld" prefix="titanTags" %>
<META http-equiv="Content-Type" content="text/html; charset=CP1251">
<META name="GENERATOR" content="IBM WebSphere Studio">
<META http-equiv="Content-Style-Type" content="text/css">
<LINK href="theme/Master.css" rel="stylesheet"
	type="text/css">
<TITLE>index.jsp</TITLE>
</HEAD>
<BODY>
<FORM action="/titan-web/ReservationController" method="post">
First name : <INPUT type="text" name="firstName"><BR>
Last name : <INPUT type="text" name="lastName"><BR>
Cruise : <SELECT name="cruise">
	<OPTION value="Caribbean">Caribbean</OPTION>
	<OPTION value="Mexico">Mexico</OPTION>
	<OPTION value="Alaska">Alaska</OPTION>
	<OPTION value="Hawaii" selected>Hawaii</OPTION>
</SELECT>
<BR>
<INPUT type="submit" name="submit" value="Make a reservation">
</FORM>
<titanTags:copyrightInfo/>
</BODY>
</HTML>
Testing JSP files on a server
You can test your JSP pages on an existing server or you can create a new server automatically for testing.
In the Project Navigator view, find the JSP page you want to test. It should be in the Web content folder under your Web project. 2
Right-click the JSP page name (index.jsp) to open the pop-up menu.
Select Run on Server. The Server selection wizard opens.
You can use an existing server or create a new server: 3
If the test server is already configured for this project, ensure that it is selected under Use an existing server.
If no test server is configured for the project, select Create a new server. Select the server type, for example WebSphere version 5.1 test environment.
Click Finish. This launches your test server to run the JSP page. The server tools automatically do the following tasks for you: 4
Creates a server project with Servers as the default name.
Creates the server.
Adds the EAR project containing your Web project to the server. 5
Starts the server. (This may take time to start depending on the server settings.)
Displays the file in the Web browser.
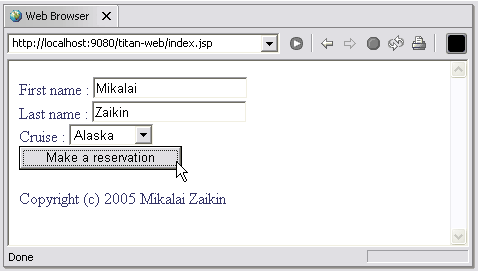
Submit the form, the following text will appear in server's console: 6
[17.08.05 17:16:07:765 EEST]   126535 SystemOut     O TravelAgentBean: Cruise reservation sent
[17.08.05 17:16:07:780 EEST]  7a0a535 SystemOut     O ReservationProcessor: Customer: Mikalai Zaikin
[17.08.05 17:16:07:780 EEST]  7a0a535 SystemOut     O ReservationProcessor: Cruise: Alaska
[17.08.05 17:16:07:780 EEST]   126535 SystemOut     O LoggingFilter: request to : /ReservationController took 0.031 seconds
