
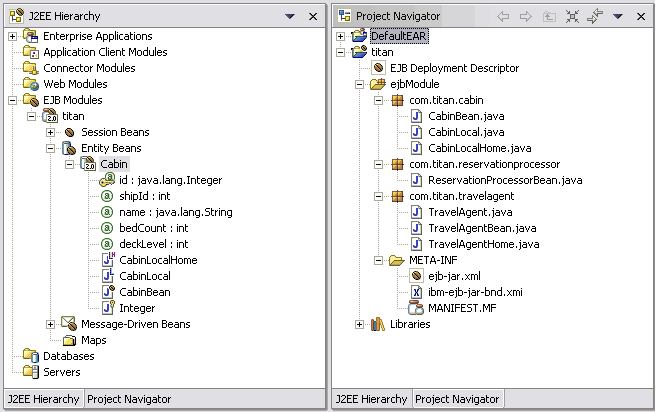
| Design and develop entity EJBs | ||
|---|---|---|
| Prev | Chapter 1. Design, build and test reusable enterprise components | Next |
Creating entity beans with container-managed persistence (CMP)
Container-managed persistence (CMP) beans are those where the bean container manages the persistence. The good thing about CMP is that it requires relatively little thought on your part to make an actual connection with your database. With CMP, you can leave your implementation class's ejbCreate(), ejbRemove(), ejbLoad(), and ejbStore() methods empty.
Another ease-of-use advantage of CMP is portability. When you use CMP, you are working with an object that represents a business object and is independent of your server and data source. The biggest drawback with CMP however, is that it generally limits you to relational databases. If you need to access legacy data, or proprietary sources, you'll have to write some code. CMP is slower in high volume transaction situations. So if your database access requires custom tweaking, you will need bean-managed persistence (BMP).
You can use the Create an Enterprise Bean wizard to create a CMP entity bean.
To create an enterprise bean, you must first have an EJB project defined.
Restriction: When setting up inherited CMP entity beans, children beans cannot have CMP attributes with the same name as those defined anywhere in their ancestry chains. For example, Parent is a CMP entity bean that contains an attribute id of type int. If you create a CMP bean called Child using the wizard and specified Parent as its super type and attempted to add an attribute id of type int, the id attribute would not be added because it would inherit Parent's id attribute. If Child2, another unrelated CMP Bean, contained an attribute id of type java.lang.String and had its inheritance structure changed through the Deployment Descriptor Editor to inherit from Parent, Child2's id attribute of type java.lang.String would be removed because it would inherit Parent's id attribute and there may be validation errors due to type conflicts.
To create an entity bean with container-managed persistence (CMP):
In the J2EE perspective, click File > New > Enterprise Bean. The Create an Enterprise Bean wizard appears.
Select the EJB project that you want to add the bean to.
Select Entity bean with container-managed persistence (CMP) fields from the radio button list.

If you are working in a 2.0 EJB project, select CMP 1.1 Bean or CMP 2.0 Bean. A 1.1 Bean can go in either a 1.1 or 2.0 EJB project. A 2.0 Bean must go in an EJB 2.0 project.
In the Bean name field, type in the name that you want to assign to the enterprise bean. When you type the Bean name, the Bean class field, the Home interface field, and Remote interface field are updated. For example, if you type "Cabin" in the Bean name field, the Bean class field is updated with "CabinBean". You may choose to override the default entries. These fields are on the next page of the wizard. The Bean name should begin with a capital letter.
Note: You can use Unicode characters for the bean's name, but Unicode characters are not supported for enterprise bean packages/classes associated with enterprise beans.
Select the Source folder for you enterprise bean. Do one of the following:
If the folder that appears in the Source folder field is the folder that you want to use, then accept the source folder location without modification.
Alternatively, you can click Browse to select a different source folder from a list.
The Default package field shows the name of the current root directory that is associated with the selected EJB project. Do one of the following:
If the package that appears in the Source folder field is the package that contains (or will contain) the enterprise bean class, then accept the package name without modification. If you define a different package root, but use package names that already exist in the project, the classes will be created in those packages. Packages cannot be defined in two package roots. Type new package name - com.titan.cabin.
Alternatively, you can click Browse to select the package from a list of those packages that reside in the specified project.
Click Next to specify additional information for the new bean.
If you want the new bean to inherit from an existing bean in the same EJB project, select a Bean supertype. The Bean supertype drop-down box is enabled if other CMP beans exist in the EJB project. Selecting a Bean supertype will disable the Key class field since subtypes must have the same key class as the supertype.
In the Bean class field, enter the desired Package or Class. By default, the Bean class package takes on the name of the Bean name (as well as the Home interface package and the Remote interface package). A bean class can be a new class (class will be generated), or an existing class in the project class path. Click the Class button to open a dialog that lists the classes in the project that correspond to the Bean type. The name of the bean class appears blue for existing classes with source. The name of the bean class appears red for existing binary classes.
The EJB binding name field is updated with the home interface name of the selected client view. The remote client view takes precedence over local client view if both client views are selected. You may choose to override the default entry.
For 2.0 CMP beans, select either Local client view or Remote client view or both. You must select at least one interface. By default, local client view is selected for 2.0 CMP beans.
For 2.0 CMP beans that are using a local client view, in the Local home interface and Local interface fields, select the desired Package or Class. By default, the Home interface class package takes on the name of the default package and Bean name.
For 1.1 CMP beans and 2.0 CMP beans that are using a remote client view, in the Remote home interface and Remote interface fields, select the desired Package or Class. By default, the Remote interface class package takes on the name of the default package and Bean name.
In the Key class field, select the desired Package or Class. By default, the Key class package takes on the name of the Bean name (as well as the Home interface package and the Remote interface package).
NOTE: The defaulted key class that will be created is a new compound key class. If you add one CMP attribute that is a key attribute and its type is a valid primkey-field (e.g., java.lang.Integer), then the Use the single key attribute type for the key class will be selected. This causes that one key attribute's type to be set as the key class of the new CMP bean (e.g., java.lang.Integer) instead of creating a compound key class. You can overwrite this default option.
Do one of the following:
If you want to accept the default names that will be assigned to the home and remote interfaces and key class, and you do not want to add, change, or remove any CMP fields, superinterfaces, or import statements, click Finish to immediately generate the enterprise bean. The new enterprise bean appears under the selected EJB project.
NOTE: If you do not define at least one key CMP attribute, errors will exist for the new enterprise bean.
If you want to add or remove super interfaces or import statements, click Next to go to the next page of the wizard. The EJB Java Class Details page appears.
NOTE: You will not be able to add fields for an existing bean class.
To add a CMP attribute or field, click the Add... button next to the CMP attributes list box. The Create CMP attributes dialog opens. When you finish creating CMP attributes, click Close.

NOTE:
To remove a CMP field, select the CMP field in the CMP attributes list box, and click Remove.
A key is required if the bean is not inherited. If one is not defined, the bean will be created with validation errors.
You can add a key attribute after you create your bean or make an existing attribute the key after creation.
You will not be able to add fields to an existing bean class. The EJB creation wizard reflects the existing public properties. If you remove fields, they will not be recorded in the deployment descriptor. No changes to the bean class will be made. Also note that if a relationship exists between one or more CMP beans, changing the key shape of one CMP may result in the related CMPs being regenerated.
Do one of the following:
If you want to accept the default names that will be assigned to the home and remote interfaces and key class, and you do not want to add, change, or remove any CMP fields, superinterfaces, or import statements, click Finish to immediately generate the enterprise bean. The new enterprise bean appears under under the selected EJB project.
If you want to add or remove super interfaces or import statements, click Next to go to the next page of the wizard. The EJB Java Class Details page appears.
You will not be able to add fields for an existing bean class.
In the Bean superclass field, type or select the desired class.
If you want to add an interface for the remote interface to extend, or if you want to remove an interface that is extended by the remote interface, do one of the following:
If you want to add an interface for the remote interface to extend, then beside the Which interfaces should the remote interface extend? list box, click Add and select the interface that you want to extend.
If you want to remove an interface that the remote interface extends, then in the Which interfaces should the remote interface extend? list box, select the interface that you want to remove and click Remove.
Click Finish. The new enterprise bean appears under the selected EJB project.
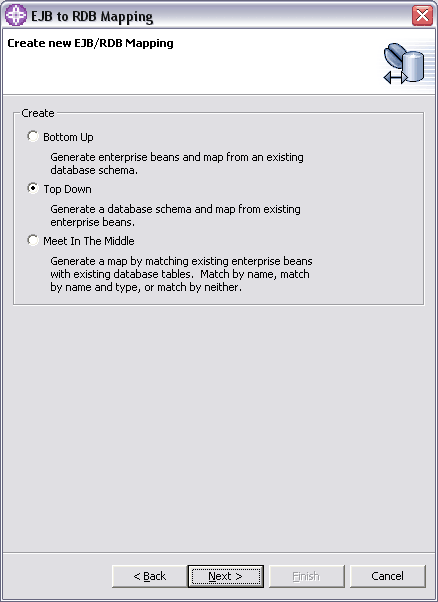
Generating a top-down mapping
In the top-down mapping approach, you generate a default database schema and mapping based on one or more existing enterprise beans.
In EJB 2.0, your mapping and schema files make up a backend for EJB 2.0 projects. You can have multiple backend folders for each project (for example, one DB2 and one Oracle backend). Only one database backend is used as the default, but you can define as many as you need. So, the first page in the EJB 2.0 mapping wizard asks you to specify whether you want to create a new backend, in which case you then proceed as outlined here, or you can use an existing backend, like for meet-in-the-middle or bottom-up where only the schema exists in the backend (no map file). If you have previously generated a mapping, you can choose to create and map unmapped elements or open the mapping editor to manually make changes.
To generate a schema and map from existing enterprise beans using the top-down mapping approach:
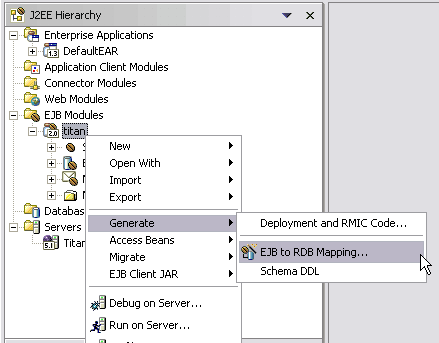
In the J2EE perspective, right-click the EJB project and select Generate > EJB to RDB Mapping. This option will not be available if you have the mapping editor open.
For EJB 2.0 projects, select whether to Create a new backend folder or to Use an existing backend folder. If you choose to use an existing backend, and if you have previously generated a mapping, you must choose one of the following options at this point:

Create and map unmapped elements: use this option if you have made changes to the backend or to the enterprise beans and want to create the new elements and update the map accordingly.
Open mapping editor on selected backend map: use this option to open the mapping editor, where you can make manual updates to the mapping.
Click Finish to perform the action and exit the wizard.
If you choose to create a new backend folder, click Next to continue creating your initial top-down mapping.
Select Top Down, and click Next.
Select a Target Database.

Type the Database name (TITANDB) and Schema name (MZ).
Optional: You can select one or both of the following check boxes:
Generate DDL
WebSphere 3.x Compatible - only select this option if you are migrating from WebSphere Application Server 3.x deployments.
Click Finish to create the top-down mapping, or click Next to further define inheritance.
If inheritance exists, select additional enterprise beans from the list to add a leaf table for each checked bean that joins with the parent table, then click Finish.
The EJB mapping tools create tables, columns, and constraints relating to a CMP bean and its fields, as well as a map of each CMP field to a column. You can then make any required changes to these maps using the Mapping editor. Use the relational database tools to modify the tables and columns:
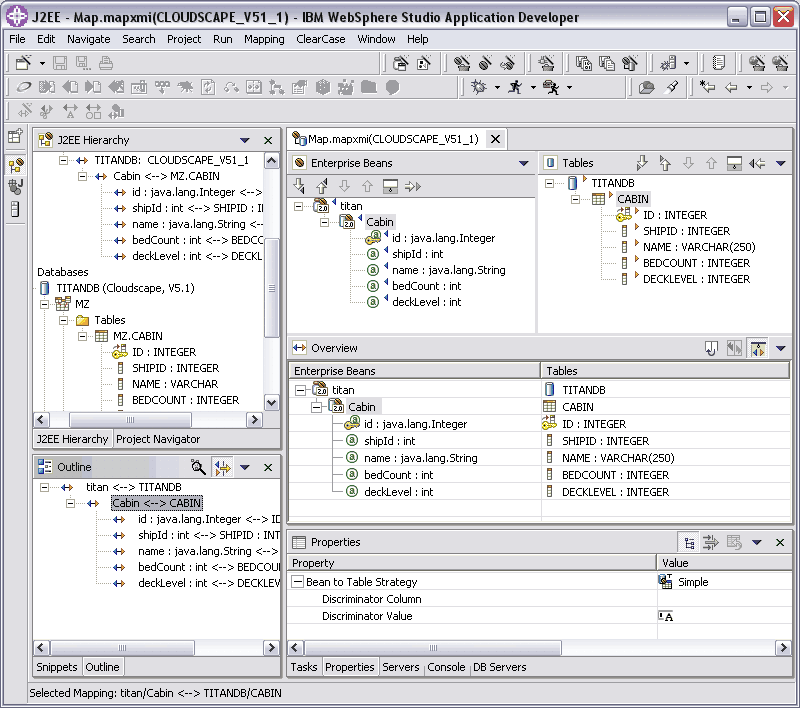
You can view Table.ddl in the \META-INF\backends\CLOUDSCAPE_V51_1\ folder:
CREATE SCHEMA MZ;

CREATE TABLE MZ.CABIN
  (ID INTEGER NOT NULL,
   SHIPID INTEGER NOT NULL,
   NAME VARCHAR(250) NULL,
   BEDCOUNT INTEGER NOT NULL,
   DECKLEVEL INTEGER NOT NULL);

ALTER TABLE MZ.CABIN
  ADD CONSTRAINT PK_CABIN PRIMARY KEY (ID);
Creating entity beans with bean-managed persistence (BMP)
The great advantage of bean-managed persistence (BMP) is its flexibility in accessing just about any data source. Once all of the unique access attributes are coded and tested, the bean user's job is pretty much plug-and-play. BMP beans can be used to access legacy databases, text file data sources, open interfaces with other software packages, and customized JDBC calls.
Using BMP requires writing custom code for the ejbCreate(), ejbRemove(), ejbLoad(), ejbStore(), and ejbFindXXX() methods. Even with BMP, you will not be fully giving up container assistance. In fact, it is the container that makes the calls to these callback methods at the appropriate times. You are simply providing the behaviors for these events rather than accepting the default provided by the container in CMP.
BMPs can outperform comparable CMPs in optimizing calls to the database. Each EJB container is different in terms of performance, and that weighs heavily in decision to code with BMP.
BMP can also be used to access data that is spread across multiple tables or databases. But if business objects that are modeled by the beans are not closely mirrored in the data sources, then BMP will be required to generate the SQL joins that are needed to load and store the bean.
Bean-managed persistence is not without it drawbacks. First, once coded, the bean is pretty much slated for a life of serving a single-type data source. Remember, the code has been custom-written to serve that data source. Secondly, the bean programmer needs to have knowledge beyond that of the business domain, including at least a fair level of SQL understanding as well as a sound understanding of what it takes to get data into the database. Thirdly, there is little advantage of using BMP if you are simply replicating what the container is doing for you in a comparable CMP entity bean.
You can use the Create an Enterprise Bean wizard to create an entity bean that will manage its own persistence.
To create an enterprise bean, you must first have an EJB project defined.
As opposed to entity beans with container-managed persistence (CMPs), where the code for persisting serializable data is included in the container, entity beans with bean-managed persistence include the code for any persistence mechanism. For example, any JDBC code that you require to manage persistence needs to be manually coded in the entity bean class or in helper classes.
A BMP entity bean can also be used where data exists in an application rather than a database. In other words, if the data source is not supported by CMP entity beans, it is likely that a BMP would be an appropriate alternative, which would allow you to use non-JDBC databases and stored procedures.
To create an entity bean with bean-managed persistence (BMP):
In the J2EE perspective, click File > New > Enterprise Bean. The Create an Enterprise Bean wizard appears.
Select the EJB project that you want to add the bean to.
Select Entity bean with bean-managed persistence (BMP) fields from the radio button list.
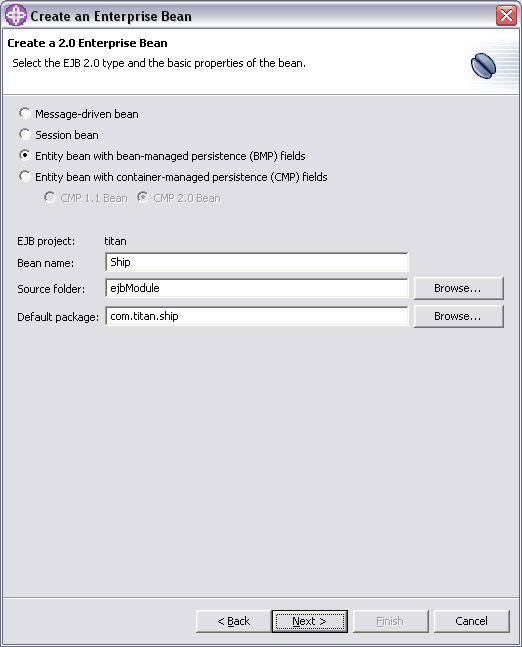
In the Bean name field, type in the name that you want to assign to the enterprise bean. When you type the Bean name, the Bean class field, the Home interface field, and Remote interface field are updated. For example, if you type Ship in the Bean name field, the Bean class field is updated with ShipBean. You may choose to override the default entries. These fields are on the next page of the wizard. The Bean name should begin with a capital letter.
NOTE: You can use Unicode for the bean's name, but Unicode characters are not supported for enterprise bean packages/classes associated with enterprise beans.
Click Next to specify additional information for the new bean, or you can click Finish to create an enterprise bean with default settings.
Select the Source folder for you enterprise bean. Do one of the following:
If the folder that appears in the Source folder field is the folder that you want to use, then accept the source folder location without modification.
Alternatively, you can click Browse to select a different source folder from a list.
The Default package field shows the name of the current root directory that is associated with the selected EJB project. Do one of the following:
If the package that appears in the Source folder field is the package that contains (or will contain) the enterprise bean class, then accept the package name without modification. If you define a different package root, but use package names that already exist in the project, the classes will be created in those packages. Packages cannot be defined in two package roots. Type new package name - com.titan.ship.
Alternatively, you can click Browse to select the package from a list of those packages that reside in the specified project.
Click Next to specify additional information for the new bean, or click Finish to create an enterprise bean with default settings.
The Bean supertype drop-down box displays other BMP beans that can be used as the supertype.
In the Bean class field, enter the desired Package or Class. By default, the Bean class package takes on the name of the Bean name (as well as the Home interface package and the Remote interface package). A bean class can be a new class (class will be generated), or an existing class in the project class path. Click the Class button to open a dialog that lists the classes in the project that correspond to the Bean type. The name of the bean class appears blue for existing classes with source. The name of the bean class appears red for existing binary classes.
The EJB binding name field is updated with the home interface name of the selected client view. The remote client view takes precedence over local client view if both client views are selected. You may choose to override the default entry.
For EJB 2.0 beans, the Local client view check box is selected by default. If you do not want to specify a local home interface and local interface, clear this check box.
For EJB 2.0 beans, in the Local home interface and Local interface fields, select the desired Package or Class. By default, the Home interface class package takes on the name of the default package and Bean name.
The Remote client view check box is not selected by default. If you do not want to specify a local home interface and local interface, select this check box.
In the Remote home interface and Remote interface fields, select the desired Package or Class. By default, the Remote interface class package takes on the name of the default package and Bean name.
In the Key class field, select the desired Package or Class. By default, the Key class package takes on the name of the Bean name (as well as the Home interface package and the Remote interface package).

Click Next to specify additional information for the new bean, or you can click Finish to create an enterprise bean with default settings.
In the Bean superclass field, type or select the desired class. This field is disabled if bean supertype is selected.
If you want to add an interface for the remote interface to extend, or if you want to remove an interface that is extended by the remote interface, do one of the following:
If you want to add an interface for the remote interface to extend, then beside the Which interfaces should the remote interface extend? list box, click Add and select the interface that you want to extend.
If you want to remove an interface that the remote interface extends, then in the Which interfaces should the remote interface extend? list box, select the interface that you want to remove and click Remove.
If you want to add an interface for the locale interface to extend, or if you want to remove an interface that is extended by the local interface, do one of the following:
If you want to add an interface for the local interface to extend, then beside the Which interfaces should the local interface extend? list box, click Add and select the interface that you want to extend.
If you want to remove an interface that the local interface extends, then in the Which interfaces should the local interface extend? list box, select the interface that you want to remove and click Remove.
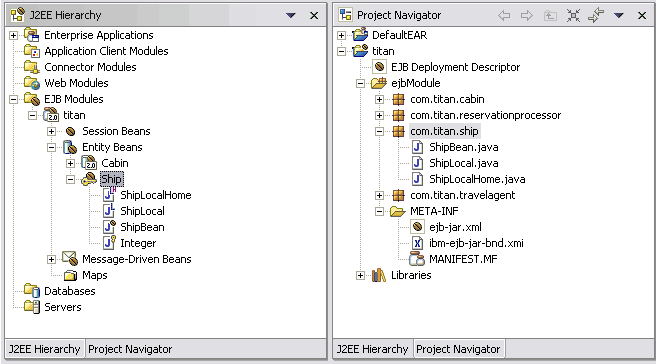
Click Finish. The new enterprise bean appears under the selected EJB module.
Add the following code to com.titan.ship.ShipLocal:
public String getName();
public void setName(String name);
public void setCapacity(int cap);
public int getCapacity();
public double getTonnage();
public void setTonnage(double tons);
Update the "create" method in the com.titan.ship.ShipLocalHome:
public com.titan.ship.ShipLocal create(Integer id, String name)
	throws javax.ejb.CreateException;
Update the com.titan.ship.ShipBean class:
public Integer id;
public String name;
public int capacity;
public double tonnage;
private DataSource ds = null; // cached data source
final String dbDatasource = "java:comp/env/jdbc/TitanDS";
public void ejbLoad() {
	Integer primaryKey = (Integer) myEntityCtx.getPrimaryKey();
	Connection con = null;
	PreparedStatement ps = null;
	ResultSet result = null;
	try {
		con = getConnection();
		ps =
			con.prepareStatement(
				"SELECT NAME, CAPACITY, TONNAGE FROM MZ.SHIP WHERE ID = ?");
		ps.setInt(1, primaryKey.intValue());
		result = ps.executeQuery();
		if (result.next()) {
			id = primaryKey;
			name = result.getString("NAME");
			capacity = result.getInt("CAPACITY");
			tonnage = result.getDouble("TONNAGE");
		} else {
			throw new NoSuchEntityException();
		}
	} catch (SQLException se) {
		throw new EJBException(se);
	} finally {
		try {
			if (result != null)
				result.close();
			if (ps != null)
				ps.close();
			if (con != null)
				con.close();
		} catch (SQLException se) {
			se.printStackTrace();
		}
	}
	System.out.println("ShipBean: ejbLoad");
}
public void ejbRemove() throws javax.ejb.RemoveException {
	Connection con = null;
	PreparedStatement ps = null;
	try {
		con = getConnection();
		ps = con.prepareStatement("DELETE FROM MZ.SHIP WHERE ID = ?");
		ps.setInt(1, id.intValue());
		if (ps.executeUpdate() != 1) {
			throw new EJBException("ejbRemove");
		}
	} catch (SQLException se) {
		throw new EJBException(se);
	} finally {
		try {
			if (ps != null)
				ps.close();
			if (con != null)
				con.close();
		} catch (SQLException se) {
			se.printStackTrace();
		}
	}
	System.out.println("ShipBean: ejbRemove");
}
public void ejbStore() {
	Connection con = null;
	PreparedStatement ps = null;
	try {
		con = getConnection();
		ps =
			con.prepareStatement(
				"UPDATE MZ.SHIP SET NAME = ?, CAPACITY = ?, "
					+ "TONNAGE = ? WHERE ID = ?");
		ps.setString(1, name);
		ps.setInt(2, capacity);
		ps.setDouble(3, tonnage);
		ps.setInt(4, id.intValue());
		if (ps.executeUpdate() != 1) {
			throw new NoSuchEntityException("ejbStore");
		}
	} catch (SQLException se) {
		throw new EJBException(se);
	} finally {
		try {
			if (ps != null)
				ps.close();
			if (con != null)
				con.close();
		} catch (SQLException se) {
			se.printStackTrace();
		}
	}
	System.out.println("ShipBean: ejbStore");
}
public java.lang.Integer ejbCreate(Integer id, String name)
	throws javax.ejb.CreateException {

	this.id = id;
	this.name = name;
	this.capacity = 0;
	this.tonnage = 0;
	Connection con = null;
	PreparedStatement ps = null;
	try {
		con = getConnection();
		ps = con.prepareStatement(
				"INSERT INTO MZ.SHIP (ID, NAME, CAPACITY, TONNAGE) "
					+ "VALUES (?,?,?,?)");
		ps.setInt(1, id.intValue());
		ps.setString(2, name);
		ps.setInt(3, capacity);
		ps.setDouble(4, tonnage);
		if (ps.executeUpdate() != 1) {
			throw new CreateException("Failed to add Ship to database");
		}
		System.out.println("ShipBean: ejbCreate : [id = " + id +"]");
		return id;
	} catch (SQLException se) {
		throw new EJBException(se);
	} finally {
		try {
			if (ps != null)
				ps.close();
			if (con != null)
				con.close();
		} catch (SQLException se) {
			se.printStackTrace();
		}
	}
}
public void ejbPostCreate(Integer id, String name)
	throws javax.ejb.CreateException {
}
When using BMP you must implement all finder methods declared in the home interface.
In our example we have method findByPrimaryKey. When the bean implements this method it
becomes ejbFindByPrimaryKey.
It returns a primary key (java.lang.Integer).
Find methods do not load the objects fields.
With a find method returning a single value - ejbFindByPrimaryKey for example - you pass in a
value or values as parameters and the key is returned. The purpose of the find is to locate a
single record and throw an exception if it cannot be found:
public java.lang.Integer ejbFindByPrimaryKey(java.lang.Integer primaryKey)
	throws javax.ejb.FinderException {
	Connection con = null;
	PreparedStatement ps = null;
	ResultSet result = null;
	try {
		con = this.getConnection();
		ps = con.prepareStatement("SELECT ID FROM MZ.SHIP WHERE ID = ?");
		ps.setInt(1, primaryKey.intValue());
		result = ps.executeQuery();
		if (!result.next()) {
			throw new ObjectNotFoundException(
				"Cannot find Ship with id = " + id);
		}
	} catch (SQLException se) {
		throw new EJBException(se);
	} finally {
		try {
			if (result != null)
				result.close();
			if (ps != null)
				ps.close();
			if (con != null)
				con.close();
		} catch (SQLException se) {
			se.printStackTrace();
		}
	}
	return primaryKey;
}
public String getName() {
	return name;
}

public void setName(String n) {
	name = n;
}

public void setCapacity(int cap) {
	capacity = cap;
}

public int getCapacity() {
	return capacity;
}

public double getTonnage() {
	return tonnage;
}

public void setTonnage(double tons) {
	tonnage = tons;
}
private Connection getConnection() throws SQLException {
	if (ds == null) {
		try {
			InitialContext ctx = new InitialContext();
			ds = (DataSource) ctx.lookup(dbDatasource);
		} catch (NamingException e) {
			throw new SQLException(e.getMessage());
		}
	}
	return ds.getConnection();
}
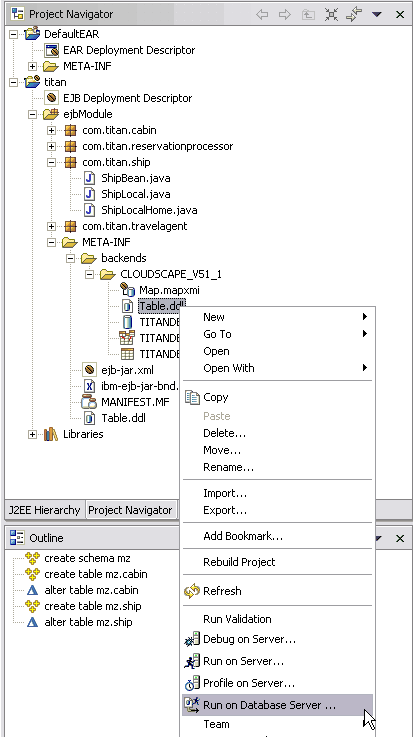
Update DDL file
Open file Table.ddl in the \META-INF\backends\CLOUDSCAPE_V51_1\ folder:
CREATE SCHEMA MZ;

CREATE TABLE MZ.CABIN
  (ID INTEGER NOT NULL,
  ...
Add the following table definition for Ship BMP bean:
CREATE TABLE MZ.SHIP
  (ID INTEGER NOT NULL,
   NAME VARCHAR(30) NULL,
   TONNAGE DECIMAL (8,2) NOT NULL,
   CAPACITY INTEGER NOT NULL);

ALTER TABLE MZ.SHIP
  ADD CONSTRAINT PK_SHIP PRIMARY KEY (ID);
Connecting to Cloudscape
Use the New Database Connection wizard to create a JDBC connection to a Cloudscape driver.
Restriction: Multiple connections to a single Cloudscape database are not supported due to a Cloudscape configuration limitation. Attempting to connect to the same database more than once within this product may cause the workbench to hang.
If you want to choose Cloudscape as your database system, follow these steps:
Access the DB Servers view via the Data perspective (Window > Open Perspective > Data).
Anywhere in the empty area of the DB Server view, click New Connection to open the New Database Connection wizard.
Type the name of the database connection the Connection name field (TitanConnection).
Type the name of the database that you want to connect to in the Database field (TITANDB).
If required, type the user ID and password.
Select Cloudscape, V5.1 from the Database vendor type pull-down list.
Select Cloudscape Embedded JDBC Driver from the JDBC driver pull-down list.
The JDBC driver class field is pre-filled with com.ibm.db2j.jdbc.DB2jDriver. This field is disabled. However, if Other Driver was selected from JDBC driver pull-down list, then the JDBC driver class field is enabled allowing you to either type or select the appropriate JDBC driver class in the JDBC driver class field.
If connecting to an existing Cloudscape database, type the fully qualified location of the Cloudscape database in the Database location field. To create an empty Cloudscape database used to test your applications, type: Cloudscape_dbdir\database_name;create=true (where Cloudscape_dbdir is the directory on your file system where you want the Cloudscape database to be located, database_name is the name of database that you provided in step 2, and create=true creates the Cloudscape database).
Database location: c:\titandb;create=true
Type the class location containing the JDBC driver in the Class location field. For example, WS_instdir\runtimes\base_v5\lib\db2j.jar (where WS_instdir is the path where you have installed this product). If Other Driver was selected from JDBC driver pull-down list, then the Class location field is enabled allowing you to either type or select the appropriate driver class location.
The Connection URL field is pre-filled and disabled with the URL connection. This URL is in the form of jdbc:db2j:subsubprotocoldatabase_name (where database_name is the name of database that you provided in step 2 and subsubprotocol is the location where Cloudscape looks for a database, such as in a directory, in a class path, or in a jar file). However, if Other Driver was selected from JDBC driver pull-down list, then the Connection URL field is enabled allowing you to either type or select the appropriate URL connection.
The New Database Connection wizard may look similar to this one:

Click Filters to limit the database schemas that are loaded.
Click Finish to create the database connection. The database meta data is collected and used to create a transient model. This model can be viewed in the DB Servers view. You can expand the folders under the database to browse its design.
Applying DDL scripts to a remote database
You can apply the statements defined in an SQL DDL file by running the script against a remote database.
Switch to the Data perspective's Data Definition view.
Locate the SQL DDL script that you want to apply.
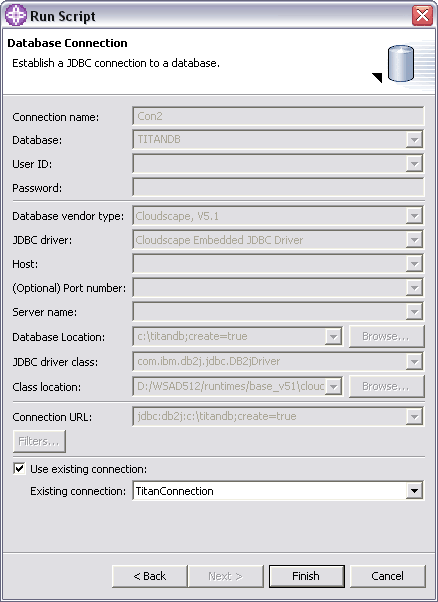
From the script's pop-up menu, click Run on Database Server to open the Run Script wizard.
Select the options statements that you want to execute against the remote database.
Click Next to open the Run Script Options wizard.
Select the options to be used when running the script.
Click Next to switches to the Database Connection page of the wizard.
Complete the required fields needed to establish a JDBC connection to the remote database you wish to apply the DDL to.
Click Finish.
Visit http://java.boot.by for the updates.
| Prev | Up | Next |
| Design and develop message-driven EJBs | Home | Access container and server services from enterprise components |