Adding message queues and topics
The Java Message Service (JMS) programming interface provides a common way for Java programs to create, send, receive, and read asynchronous requests as JMS messages. Messages are sent to and received from queues or topics. For example, a Java program sends a message to a queue, the queue processes the request and then returns a message in another queue. Message-driven beans, listening for the response from the second queue, get the message and the cycle is complete. In a nutshell, JMS allows transactions to take place asynchronously.
A message queue, used in a Point-to-Point messaging system, receives messages from many senders and puts them in one queue to one receiver. That receiver might be, for example, an EIS system. A topic, used in a Publish-Subscribe messaging system, receives messages from many senders and sends them to many receivers, which subscribe to the topic.
This section tells you how to add queues and topics to your test environment or server so your program can access them at run time. Accessing a queue or topic is similar to accessing any resource needed by your program. You need to have a connection factory to generate a connection at run time and that connection needs to know the location of the queue or a topic (that is, the destination of the connection).
Adding queues and topics to your server configuration are done through the WebSphere JMS Provider Options page. You will find it as a JMS tab when you open a WebSphere V5.x server.
Note that the WebSphere JMS Provider Options page reflects the settings of IBM's internal WebSphere JMS server.
To add a message queue or topic to your server, follow these steps:
In the Server Configuration view, expand Servers.
Double-click on the TitanServer server. The server editor opens.
Click the JMS tab at the bottom of the editor.
Select the scope for the queue or topic you want to add. The scopes, from largest to smallest, are: cell, node and server. The relationship of the scopes is that a cell can contain many nodes and a node can contain many servers.
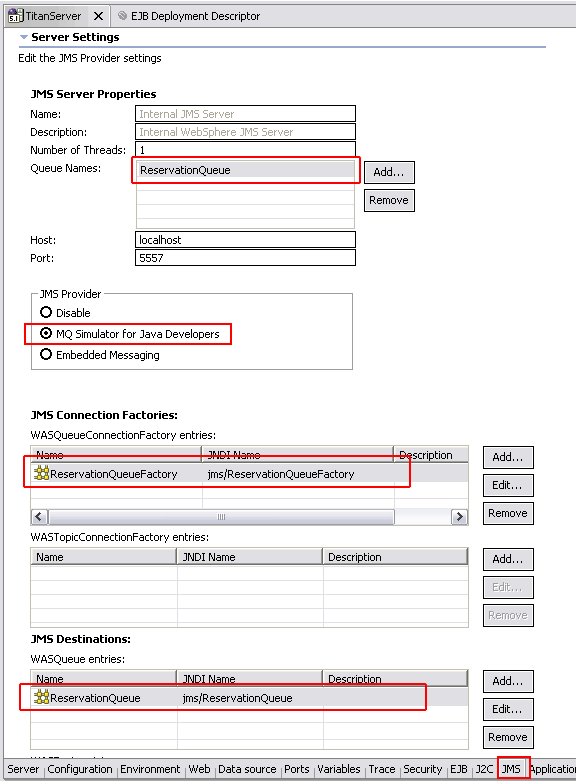
In the JMS Server Properties section, click the Add button beside the Queue Names list box and add the names of any queues that you will specify in the JMS Connection Factories or JMS Destinations sections. The names must match.
Queue name: ReservationQueue
In the JMS provider section, select one of the following radio buttons:
Disable - Specifies that the initial state of the JMS server is not started.
MQ Simulator for Java Developers - MQ Simulator for Java Developers is an in-process MQ JMS service provider. It can be used to easily unit test message-driven beans and JMS applications within the WebSphere test environment. It does not support persistence or communication between processes.
Embedded Messaging - Embedded Messaging allows you to fully test and publish your applications within a JMS runtime environment. It is recommended that you install Embedded Messaging with the WebSphere Studio installer. You may need to perform some additional configuration steps if you have installed Embedded Messaging with the WebSphere Application Server installer.
If you have selected Embedded Messaging, you will need to add the embedded messaging Java implementation classes. Click the Environment tab at the bottom of the editor. In the ws.ext.dirs section, click the Add External Folder button and add the directory containing the classes. The default value is: C:\Program Files\IBM\WebSphere MQ\java\lib.
Beneath the JMS Connection Factories section, click the Add button beside the WASQueueConnectionFactory entries list table or the WASTopicConnectionFactory entries list table. In the pop-up dialog box, fill in the values for the connection factory. They are similar to the connection factory values you would fill in for any resource using the Java Naming and Directory Interface (JNDI). Some default values are provided for some properties such as number of connections and connection timeout. Other values may be selected from drop-down lists, where items have already been created. You will need to specify an alias name if for security reasons your application requires component-managed or container-managed authentication. A name for the connection factory and its JNDI name must be specified. For more information about any of the fields on this dialog box, select the field and then press F1.
JMS Connection Factory: Name - ReservationQueueFactory, JNDI Name - jms/ReservationQueueFactory
Beneath the JMS Destinations section, click the Add button beside the WASQueue entries list table or the WASTopic entries list table. Specify the destination values for the connection factory you just created. The name for the destination and its JNDI name must be specified.
JMS Destinations: Name - ReservationQueue, JNDI Name - jms/ReservationQueue

Save and close the server editor.
Adding listener ports to a server
Listener ports are used by message-driven beans associated with the port to retrieve messages. They simplify administration of the association between a connection factory, JMS destination, and deployed message-driven bean. When a message arrives at the destination, the listener passes the message to a new instance of a message-driven bean for processing.
Note: Listener ports can only be added to a WebSphere v5.x test environment or server.
To add a listener port, follow these steps:
Expand Servers in the Server Configuration view.
Double-click TitanServer WebSphere test environment. The server editor opens.
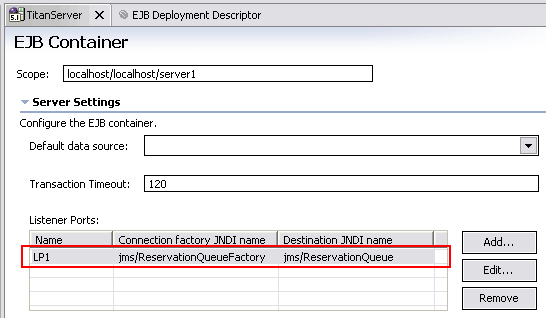
Click the EJB tab at the bottom of the editor. 0
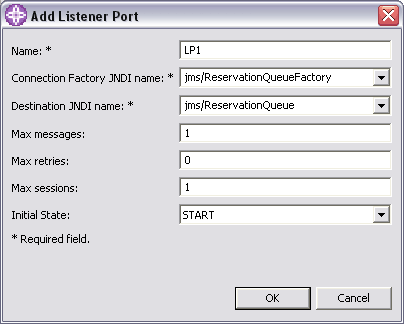
Click the Add button beside the Listener ports list table. The Add Listener Port dialog box opens.
In the dialog box, fill in the values for the listener port (LP1). Some default values are provided for some properties such as maximum messages and maximum retries. Other values may be selected from drop-down lists, where items have already been created, such as connection factory JNDI name, and destination JNDI name. For more information about any of the fields on this dialog box, select the field and then press F1. Click OK.

Save your changes and close the editor. 1

