
Simple Spring Boot Example - First example of Spring Boot for counting no of beans
Spring Boot Simple Example, writing and running the first example code in Spring boot to understand the steps of running spring boot project.
In this tutorial we are going to create a very simple and first Spring Boot Application that simply finds out the number of beans created when a very small Spring Boot program is started in Eclipse IDE.
In the application Spring Boot takes the responsibility of constructing all the processes to run the application, so that programmers concentrate on the business application development. In this example you will learn to create and run your first application in Eclipse IDE.
Spring Boot comes with the pre-configured environment which can be used by the developers to write their own applications. Spring Boot can be used to create stand-alone and web-based production grade applications out of the box.
Spring Boot is highly configurable framework which is designed to come with
the preconfigured infrastructure like JMS, JDBC, JPA, RabbitMQ, Web Services,
Spring Security, Spring Cloud
and many more. Spring Boot is a well-designed framework that comes with the
auto-configurable environment for working with Spring Integration, Spring Batch,
Spring Security, Spring Cloud, Spring JDBC and others. Developers can use any of
the pre-configured environments in their application, and spring boot
automatically provides the dependencies and auto wiring for the used service.
Steps to write Simple Spring Boot Example
Step 1: Create Maven Project Eclipse
First of all you have to create a maven project in Eclipse to add the Spring Boot dependency and writing the Java code. For simplicity download Eclipse of project of this example and import in Eclipse IDE.
If you don't know the steps to import an Eclipse Project then check out our tutorial: How to import existing maven project in Eclipse?
Step 2: Add Spring Boot Dependency in pom.xml file
The next step is to add the Spring Boot maven dependency in your project, for this open the pom.xml file of your project and then add:
<parent>
	<groupId>org.springframework.boot</groupId>
	<artifactId>spring-boot-starter-parent</artifactId>
	<version>2.2.4.RELEASE</version>
	<relativePath/>
</parent>
The above coding is for using the spring-boot-starter-parent application, which is the pre-configured spring boot project for creating a starter console based application in Spring Boot. This is the easiest way to use create a Spring Boot application by choosing the spring-boot-starter-parent as parent of your application.
The next step is to add the dependency need in the project's pom.xml file. For this example we will add the spring-boot-starter dependency in our pom.xml file as shown below:
<dependency>
	<groupId>org.springframework.boot</groupId>
	<artifactId>spring-boot-starter</artifactId>
</dependency>
You can see there is no version in the dependency, this is because the spring-boot-starter-parent defines the version to be used in the given release of Spring Boot. So, Spring Boot also maintain the list of libraries and its versions to be used in the project. This is one of the best features of Spring Boot framework which take care of library dependencies in terms of jar version of to be used in the project.
Here is the complete code of pom.xml file used in our project:
<?xml version="1.0" encoding="UTF-8"?>
<project xmlns="http://maven.apache.org/POM/4.0.0"
	xmlns:xsi="http://www.w3.org/2001/XMLSchema-instance"
	xsi:schemaLocation="http://maven.apache.org/POM/4.0.0 https://maven.apache.org/xsd/maven-4.0.0.xsd">
	<modelVersion>4.0.0</modelVersion>

	<parent>
		<groupId>org.springframework.boot</groupId>
		<artifactId>spring-boot-starter-parent</artifactId>
		<version>2.2.4.RELEASE</version>
		<relativePath />
	</parent>

	<groupId>net.roseindia</groupId>
	<artifactId>SpringBootSimpleExample</artifactId>
	<version>0.0.1-SNAPSHOT</version>
	<name>SpringBootSimpleExample</name>
	<description>Spring Boot Simple Example</description>

	<properties>
		<java.version>1.8</java.version>
	</properties>

	<dependencies>

		<dependency>
			<groupId>org.springframework.boot</groupId>
			<artifactId>spring-boot-starter</artifactId>
		</dependency>

	</dependencies>

	<build>
		<plugins>
			<plugin>
				<groupId>org.springframework.boot</groupId>
				<artifactId>spring-boot-maven-plugin</artifactId>
			</plugin>
		</plugins>
	</build>

</project>
Here is the screen shot of our pom.xml file from the Eclipse project:
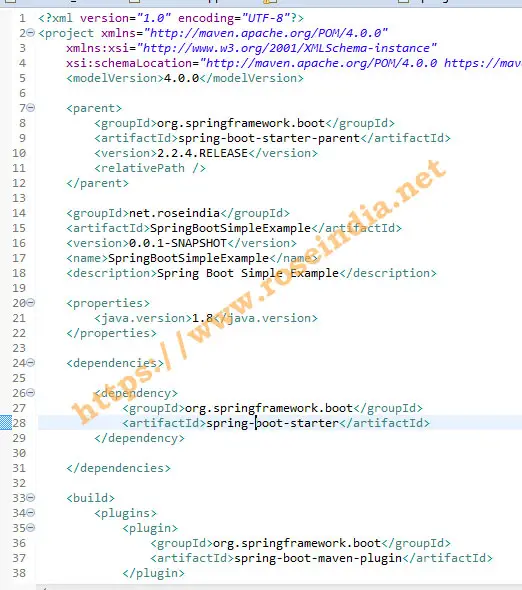
Above configuration in pom.xml file completes the configuration in our program.
Step 3: Write Spring Boot example code
Now we will write our Java class for the application. In the main method of the application we are creating the Spring application context by passing the our class file name as parameter to the run method of SpringApplication class. Then from the spring context we can get the list of beans registered by name and print on the console. Here is the complete code of the Java class:
package net.roseindia;

import java.util.Arrays;

import org.springframework.boot.SpringApplication;
import org.springframework.boot.autoconfigure.EnableAutoConfiguration;
import org.springframework.context.ConfigurableApplicationContext;
import org.springframework.context.annotation.ComponentScan;
import org.springframework.context.annotation.Configuration;

@Configuration
@EnableAutoConfiguration
@ComponentScan
public class SpringBootSimpleApplication {

public static void main(String[] args) throws Exception {

	ConfigurableApplicationContext ctx =
			SpringApplication.run(SpringBootSimpleApplication.class, args);

	System.out.println("Beans count: " + ctx.getBeanDefinitionCount());

	String[] names = ctx.getBeanDefinitionNames();
	Arrays.sort(names);

	System.out.println("Names of the Beans:");

	Arrays.asList(names).forEach(System.out::println);

}

}
If you run the program you will get following results:
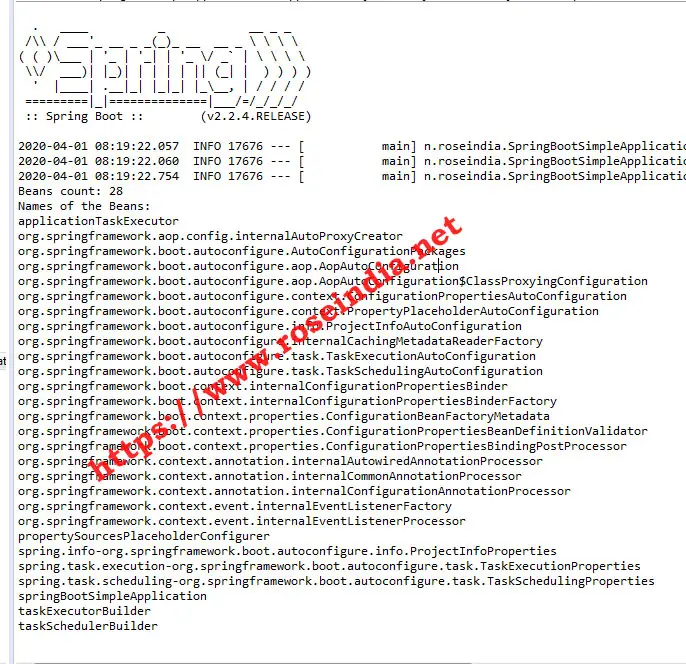
Here is the out of the program execution:
  .   ____          _            __ _ _
 /\\ / ___'_ __ _ _(_)_ __  __ _ \ \ \ \
( ( )\___ | '_ | '_| | '_ \/ _` | \ \ \ \
 \\/  ___)| |_)| | | | | || (_| |  ) ) ) )
  '  |____| .__|_| |_|_| |_\__, | / / / /
 =========|_|==============|___/=/_/_/_/
 :: Spring Boot ::        (v2.2.4.RELEASE)

Beans count: 28
Names of the Beans:
applicationTaskExecutor
org.springframework.aop.config.internalAutoProxyCreator
org.springframework.boot.autoconfigure.AutoConfigurationPackages
org.springframework.boot.autoconfigure.aop.AopAutoConfiguration
org.springframework.boot.autoconfigure.aop.AopAutoConfiguration$ClassProxyingConfiguration
org.springframework.boot.autoconfigure.context.ConfigurationPropertiesAutoConfiguration
org.springframework.boot.autoconfigure.context.PropertyPlaceholderAutoConfiguration
org.springframework.boot.autoconfigure.info.ProjectInfoAutoConfiguration
org.springframework.boot.autoconfigure.internalCachingMetadataReaderFactory
org.springframework.boot.autoconfigure.task.TaskExecutionAutoConfiguration
org.springframework.boot.autoconfigure.task.TaskSchedulingAutoConfiguration
org.springframework.boot.context.internalConfigurationPropertiesBinder
org.springframework.boot.context.internalConfigurationPropertiesBinderFactory
org.springframework.boot.context.properties.ConfigurationBeanFactoryMetadata
org.springframework.boot.context.properties.ConfigurationPropertiesBeanDefinitionValidator
org.springframework.boot.context.properties.ConfigurationPropertiesBindingPostProcessor
org.springframework.context.annotation.internalAutowiredAnnotationProcessor
org.springframework.context.annotation.internalCommonAnnotationProcessor
org.springframework.context.annotation.internalConfigurationAnnotationProcessor
org.springframework.context.event.internalEventListenerFactory
org.springframework.context.event.internalEventListenerProcessor
propertySourcesPlaceholderConfigurer
spring.info-org.springframework.boot.autoconfigure.info.ProjectInfoProperties
spring.task.execution-org.springframework.boot.autoconfigure.task.TaskExecutionProperties
spring.task.scheduling-org.springframework.boot.autoconfigure.task.TaskSchedulingProperties
springBootSimpleApplication
taskExecutorBuilder
taskSchedulerBuilder
In this first example of Spring Boot we have developed a simple spring boot example which shows you to run the example from Eclipse.
You can also package the executable as jar file and then run from command line. Spring project is packaged into jar file by running the mvn package command on terminal or running the same in eclipse IDE.
Step 4: Creating Spring Boot executable jar file
You can create the jar executable file of the project by running the mvn package command in the terminal. This functionality is also available in Eclipse IDE and we will create jar file from the Eclipse IDE.
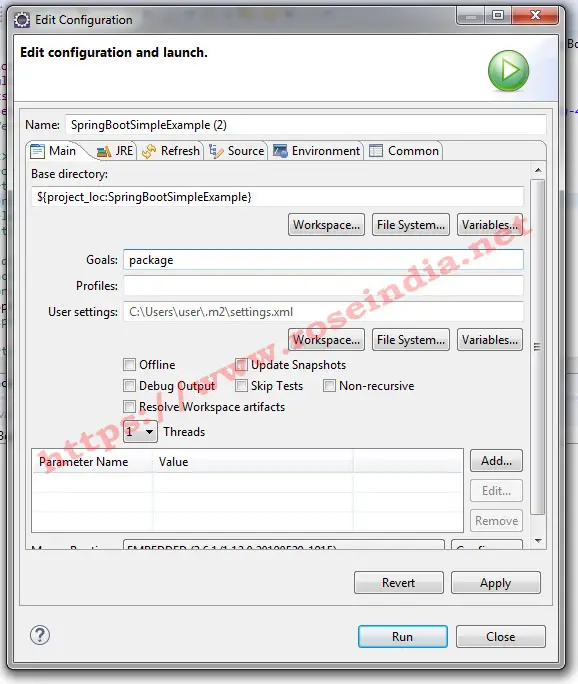
Right click on the project in the project explorer window in Eclipse and then select Run As -> Maven Build as shown below:

In the Edit configuration and launch window you have to add the Goals to "package" as shown below: 0
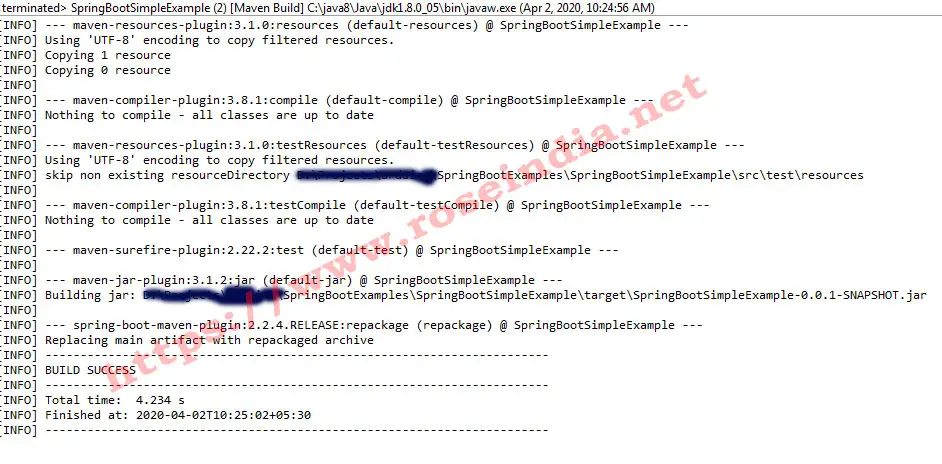
Then click on the run button. Eclipse will run maven package command for you. Here is out put of the command:
 1
1
This will build SpringBootSimpleExample-0.0.1-SNAPSHOT.jar. You can run this jar file from the command prompt with following command:
java -jar SpringBootSimpleExample-0.0.1-SNAPSHOT.jarThe above command will run the example program. You can download Eclipse of project of this example and test on your machine.
In this tutorial you learned to write, package and run your first Spring Boot Simple example. 2
Check more tutorial at: