How to design a flower


You can design a follower by using this example in the photoshop so get ready to learn.
New File: Take a new file and adjust the size as you want.
Gradient Overlay: Go to Layer Menu > Layer Style > Gradient Overlay and
use these settings as given below.

You will get it.

Pen Tool: Choose Pen Tool (P key) and point your mouse pointer as given below.

Another One: Hold Alt key + scroll your mouse, a new same shape will appear as given below. Use this same steps to make more.


Ellipse Tool: Choose Ellipse Tool (U key) and draw a circle middle of the flower with any color. Now go to Layer menu > Layer Style > Stroke, Inner Glow and use these setting as given below.


Your image will look like this.

Pen Tool: Choose Pen Tool (P key) and make this shape as given below.
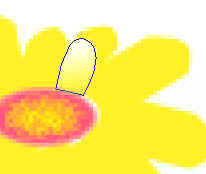
Gradient Overlay: Go to Layer Menu > Layer Style > Gradient Overlay and use these setting as I have done here.

Your image will look similar.

Brush: Choose Brush (B key) and control the size according to you. Take a new layer draw with you brush tool. Select pen tool and make a leaf shape with dark green as given below.

Use same step to make another leaf as I have done here.