
Eclipse flex ant coding example


Inside the tutorial, demonstration regarding using
eclipse as an editor for creating flex and ant projects is given. Also,
the coding of flex and apache ant applications and compiling flex
application with ant build.xml file is illustrated very nicely inside the
tutorial. Along with compiling, you will also know how to execute the output file that has extension .swf
with either web browser or adobe flash player, using the ant build.xml
file.
Coding flex action script code on eclipse, needs java run time environment, to be
installed on the
system. And for using ant build tool, apache ant run time environment is
required to be installed on the
system.
For generating java environment visit to
url : http://www.roseindia.net/java/learn-java-in-a-day/download-and-install-java.shtml
And for establishing apache ant environment on your system visit to
url: http://www.roseindia.net/flex/downloading-installing-flex.shtml.
And for getting flex sdk visit the same above url again.
Now after all this, download eclipse from eclipse official website that has apache ant
technology as an inbuilt plugin installed.
For getting the above stuff visit to
url: www.eclipse.org/downloads/download.php?file=/eclipse/downloads/drops/R-3.4.1-200809111700/eclipse-SDK-3.4.1-win32.zip
On the above url page, select any nation or continent mirror of eclipse
classic. After clicking on any mirror you will get a window shown below.
On this click on ok button.

After the download finishes you will get a zip file. That zip file you have
to extract somewhere. Your system C: drive will be best, so extract the
zip file in your c-drive, and after extracting you will get a folder in your
c-drive or in the place where you extracted the zip file. Following shown screen
shots will teach you this.

After dragging and dropping the zip setup file in c-drive extract it
there and after extracting it, a folder with name eclipse will be there in your
c-drive. This step is shown below.

After this open the eclipse folder and double click or open
the eclipse.exe
file. This step shown below.

After opening the eclipse.exe file, following window appears as shown below.

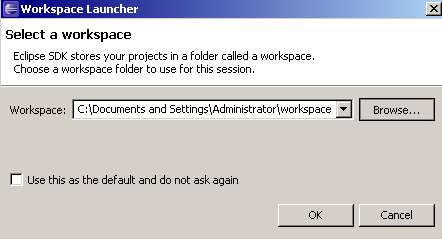
After this a window asking for selecting the work space comes. This is shown
below.
In this select the place you like to make it your eclipse work space. This work
space is the place where the files and application you create
on eclipse are stored. This work space is the memory path of all the programming
or any other stuff you create on eclipse.

Here my work space path is C:\baadshah\IDE and i have mark this as my default work space. This is shown below.


When the workspace creating process finishes, eclipse
IDE opens.

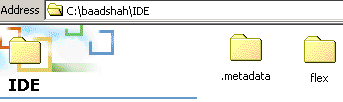
If you want you can also see your work space. Screen shot shown below is my work space folder IDE that contains a folder name .metadata.

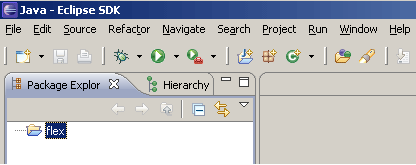
Now you will be taught to create an ant project and a flex project. For creating the project, first on the welcome window of eclipse click on workbench as shown below.

After clicking on workbench you will be on the default view of eclipse IDE, as
shown below. Later you will learn, how to change the view of your eclipse
default window.

Now for creating a project go on clicking as directed: File -> new -> project -> general->project or File -> new -> other -> general -> project.

Expand General and click on Project and then click on Next
button.

After this you will get a window, asking for the project name. Here we will create flex project
first. So write flex in the Project name
column. This project is created on your workspace you selected earlier. Here workspace path
of my project is C:/baadshah/IDE.
After giving project name click on Finish button.
 0
0
After creating this flex project you can see a project with name flex is visible on the eclipse Package Explorer and a folder with name flex is created in your workspace.
 1
1
Now inside this flex project we can now code flex application. So lets start coding flex on eclipse. Right click on your flex project and then switch to new and then switch to file, as shown below.

After this a window opens asking for giving a file name. Here we are going to code a simple flex application to generate a Button, a ComboBox on the Panel background of application. Here i have used file name as rachel with extension mxml. .mxml is the source file extension of flex. After providing the file name with .mxml extension, click on Finish. 2

After this you will get the following window, on this we will code our flex application.
 3
3
Double click or drag or drop the rachel.mxml file.

4

I prefer to close the Outline, Problems, Javadoc and Declaration tabs. This will provide you, wide coding space. Also if you want more space, minimize your Package Explorer. 5


6
After closing the above mention tabs you will get the
following window.

Now start coding for creating a Button, and ComboBox.
Here, below i have provided the code.
7
<?xml version = '1.0' encoding = 'utf-8'?>
|
Your code will look like this.

Now for compiling this flex file, flex mxmlc compiler is required, that i told you in the beginning. So i assumed that you have downloaded flex sdk zip file of latest version and extracted in C: drive, as shown below. 8

Now on eclipse maximize your Package Explorer and select your flex project and right click on it and open a new file by clicking on New and then file.
9

In New File window go to File name: column and type build.xml. This build.xml is the name of your ant build file.
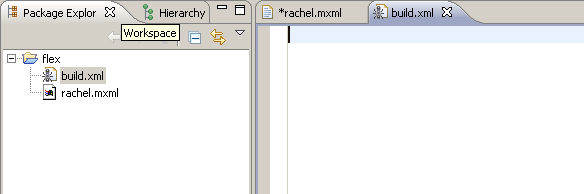 0
0
Now below table is the code provided for the build.xml file so if you want you can copy and paste it in to your build.xml file.
<project name='Flex' default='mxml'>
|
Your build file will look like this. 1

Let me give you a description about the build.xml
file. This build.xml file is an ant built tool with which here
on eclipse we compile our flex application by calling the flex mxmlc
compiler located in c-drive. To trigger this tool press ctrl
+ f11 or just f11 or right click and
switch to Run As and click ![]() 1 Ant Build. .
1 Ant Build. .
 2
2
After this a Debug As window comes, in which your have to
select ![]() Ant build and and click on ok button as shown below.
Ant build and and click on ok button as shown below.

After this a console window comes showing processes and finally shows the
results.
3

BUILD SUCCESSFUL means your flex rachel.swf is compiled successfully
and the result output swf file is created in your workspace location as rachel.swf.
For running the swf file just drag and drop the swf file in to the
web
browser that has adobe flash player plug in installed in it. or also you can
right click on your swf file and select open with and then
click on your default browser name.
4


Also you can drag and drop your swf file in to Adobe Flash
Player10, as shown below. For this you should have Adobe Flash Player10
Application installed on your system.
This Adobe Flash Player 10 i got with the flex builder i downloaded from
the adobe site.
 5
5
Now you can code any number of flex applications in your flex project with eclipse but before deploying the application through ant build.xml file, mention the name of the file inside the build.xml file. 6
Note: Name of the file you are compiling should be mentioned in build.xml file. Illustration of this is shown below.
File name rachel.mxml
<project name='Flex' default='mxml'>
|
7
File name neo.mxml
<project name='Flex' default='mxml'>
|
So you see, name of every new file should be mentioned in the build.xml file. Changing the output swf file name in the build.xml file will make no error so its our choice.
8