Spring Boot Thymeleaf Hello World Application - Developing First Thymeleaf Application Displaying Hello World Message
In this tutorial we are going to create the first Thymeleaf Hello World Application that prints welcome on the web browser. This tutorial will explain how to add Spring Boot Thymeleaf dependency and then write an html file using this library.
What is Thymeleaf?
Thymeleaf is a Java based template engine that runs on server-side and used for the generation of HTML, XML, JavaScript, CSS, and text based on the input given to the template file. This template engine can be used for both web and standalone applications.
Thymeleaf is a modular template engine that generates the HTML web pages (in case of web applications) which can be correctly displayed on the web browsers. This framework can also be used as static prototypes which enhances the project collaboration among the stakeholders in the project.
The Thymeleaf template engine integrates well with the Spring Framework and Spring Boot frameworks. This engine is used by the developers for developing HTML5 based web applications. Thymeleaf is used for the generation of view and sits in the view layer of MVC-based web applications
Here is video instruction of creating first Hello World Application in Spring Boot Thymeleaf:
About Spring Boot Thymeleaf Hello World Application
This application is the first Spring Boot Thymeleaf Hello World Application that uses Thymeleaf to generate "Hello World" messages using this template engine. We have developed a controller and inside the controller we are setting the message to be displayed on the screen. The Thymeleaf template file is used to render the view in this application. In this application you will learn to configure and use the Thymeleaf template in your Spring Boot Project.
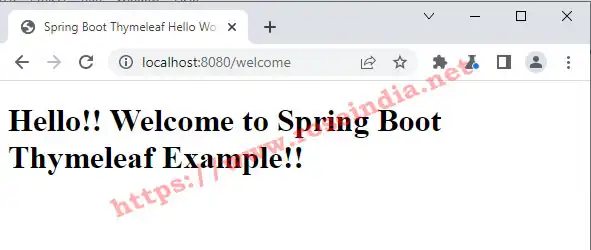
Here is the output of our program:
Here is the steps to make Hello World application in Thymeleaf.
Step 1: Add Thymeleaf in dependency in pom.xml
In the pom.xml file add following code if its not present in your Spring Boot Project's pom.xml file:
<dependency>
	<groupId>org.springframework.boot</groupId>
	<artifactId>spring-boot-starter-thymeleaf</artifactId>
</dependency>
Above dependency downloads Thymeleaf and its dependent libraries. After adding the dependency we will add controller to map the web request to class method.
Step 2: Create Controller Class
We are going to add the controller class in WebappApplication.java source file. Here is the code that you should add to WebappApplication.java source file:
@Controller
class Welcome{
	@GetMapping("/welcome")
	public String welcome(Model model) {
		model.addAttribute("message","Hello!! Welcome to Spring Boot Thymeleaf Example!!");

		return "welcome";
	}
}
In this above controller class we have mapped "/welcome" request to the welcome() method of class. In the model object we are setting an attribute "message" value which we will display in the view page. The above method returns "welcome", which is a view and in this call Thymeleaf will use wecome.html to render the view.
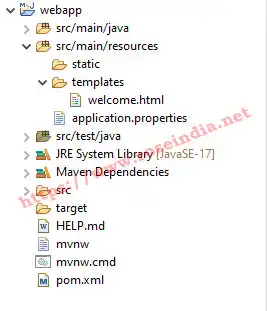
Step 3: Create HTML Thymeleaf page
Now inside the templates directory create welcome.html file as shown below:
Now inside the welcome.html file add following code:
<!DOCTYPE html>
<html xmlns:th="http://www.thymeleaf.org">
<head>
<meta charset="ISO-8859-1">
<title>Spring Boot Thymeleaf Hello World Application</title>
</head>
<body>
    <h1 th:text="${message}"> </h1>
</body>
</html>
In the above code we have used:
<h1 th:text="${message}"> </h1>
to display the message attribute from Model object.
Now we are ready with our application and run the code in Eclipse. You can browser the page at http://localhost:8080/welcome.
Source Code: Download Spring Boot Thymeleaf Hello World Application
In this tutorial I showed you to make your first Thymeleaf application in Spring Boot.
Related Tutorial