
Create First Spring Boot Web Application - Creating and Running First Spring Boot Web Application in Eclipse IDE
In this tutorial we are going to create our first Spring Boot 3.4 web application that uses the latest Spring Boot dependencies and other third-party libraries. We will create this application and run in the Eclipse IDE, which makes application development much faster and enhances developers productivity. We will use this project to add new features in next projects to make it a full fledged Spring Boot based web application. This Spring Boot 3.4 Tutorial series will help you learn and master the Spring Boot 3.4 framework.
What is Spring Boot?
Spring Boot is another over the Spring Framework, which simplifies the development of enterprise applications by providing an integrated development environment for easy application development. Spring Boot uses Spring Framework and other open-source projects to provide a pre-configured environment for building robust, production-ready applications. Spring Boot applications can be configured by changes as minimal configuration. The Spring Boot framework is developed with the aim to provide accelerated development for building enterprise applications quickly and with minimal annotation-based configuration.
We have recorded the instruction of Creating First Spring Boot Web application. Here is the video:
Required Software
Following software is required on your system, if it is not install then install these on your system.
Java: You should have Java 17 installed on your computer to run Spring Boot 3.4 examples explained here. If you don?t have Java/JDK installed then check our tutorial Installing JDK 22.
Maven: Maven build tool is used for building this application, so you should have Maven installed on your system. You can check Maven Tutorials for installing and using Maven.
Eclipse IDE: We are using Eclipse for development of
applications, so you should install Eclipse IDE on your system.
After installing these softwares on your system you should follow these steps to
develop first Spring Boot Web Application.
Creating Spring Web Application
The first step is to create a skeleton project using the Spring Initializer, which is an official web-based tool for creating the skeleton of Spring Boot based applications easily. The Spring Initializer tool provides the list of all previous and latest versions of Spring Boot releases, so that you can choose the version you are interested in. So, with this web application we will set up a new Spring Boot project with ease and as per our configuration requirements.
Here are the steps to create skeleton Spring Boot Web Application:
a) Visit Spring Initializer: First of all visit the Spring Initializer web application at https://start.spring.io/. Here
Here is the screen shot of the website:
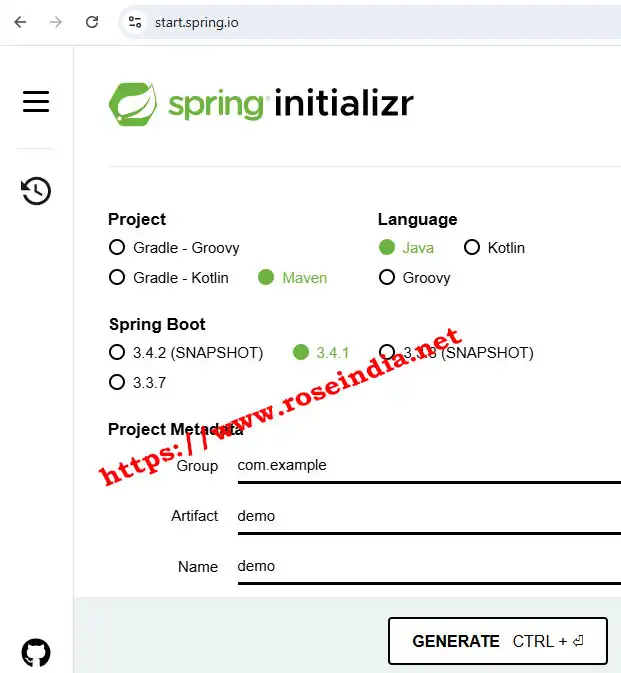
b) Selecting various options
Write Group, Arifact, Name, Description and Package Name. Select Maven, Spring Boot 4.3.1 (Or latest), Packaging -jar, Java (17 or Above) and then select following libraries:
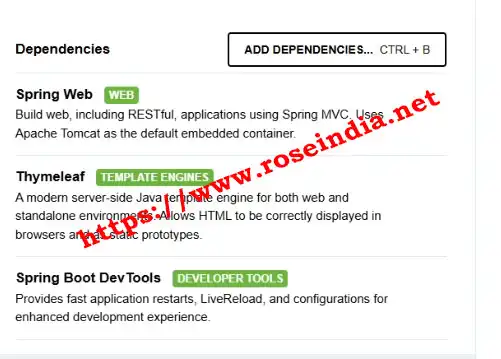
and finally click on the "GENERATE" button. This will generate a zip file and you have to extract this zip file into a directory in your machine. The next step will be to import the project in Eclipse.
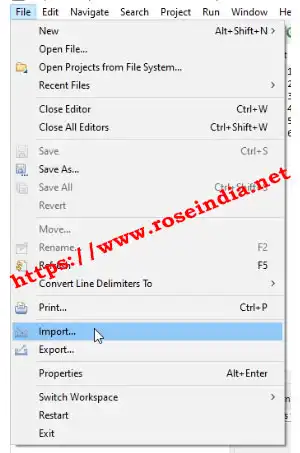
Import Project in Eclipse
The step is to import the project in Eclipse as Maven project. Select File -> Import -> Existing Maven Project as shown below:
After clicking "Import" Following screen is displayed:
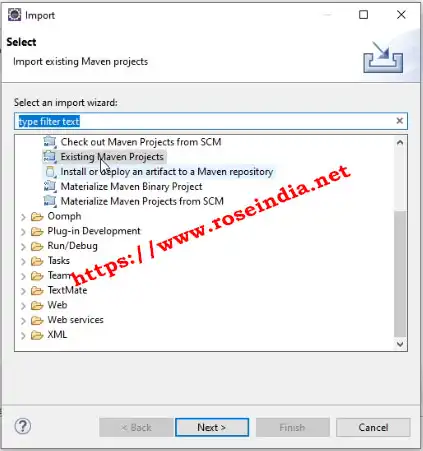
Select "Existing Maven Projects" and click on the "Next >" button. Next screen is shown as shown below where you have to select the project directory where you have extracted the download file:

Browse the Maven project directory and finally click on the "Finish" button. After clicking on the Finish button Eclipse will import Spring Boot Web Application Project and after you will be able to work on the project.
After completion of import process you will be able to see the Spring Boot Web Application in Eclipse as shown below:

Spring Boot Web Application pom.xml File
The pom.xml file is main file for managing the project using Maven and here is the code of the pom.xml file:
<?xml version="1.0" encoding="UTF-8"?>
<project xmlns="http://maven.apache.org/POM/4.0.0" xmlns:xsi="http://www.w3.org/2001/XMLSchema-instance"
	xsi:schemaLocation="http://maven.apache.org/POM/4.0.0 https://maven.apache.org/xsd/maven-4.0.0.xsd">
	<modelVersion>4.0.0</modelVersion>
	<parent>
		<groupId>org.springframework.boot</groupId>
		<artifactId>spring-boot-starter-parent</artifactId>
		<version>3.4.1</version>
		<relativePath/> <!-- lookup parent from repository -->
	</parent>
	<groupId>net.roseindia</groupId>
	<artifactId>webapp</artifactId>
	<version>0.0.1-SNAPSHOT</version>
	<name>webapp</name>
	<description>This is my first spring boot web application</description>
	<url/>
	<licenses>
		<license/>
	</licenses>
	<developers>
		<developer/>
	</developers>
	<scm>
		<connection/>
		<developerConnection/>
		<tag/>
		<url/>
	</scm>
	<properties>
		<java.version>17</java.version>
	</properties>
	<dependencies>
		<dependency>
			<groupId>org.springframework.boot</groupId>
			<artifactId>spring-boot-starter-thymeleaf</artifactId>
		</dependency>
		<dependency>
			<groupId>org.springframework.boot</groupId>
			<artifactId>spring-boot-starter-web</artifactId>
		</dependency>

		<dependency>
			<groupId>org.springframework.boot</groupId>
			<artifactId>spring-boot-devtools</artifactId>
			<scope>runtime</scope>
			<optional>true</optional>
		</dependency>
		<dependency>
			<groupId>org.springframework.boot</groupId>
			<artifactId>spring-boot-starter-test</artifactId>
			<scope>test</scope>
		</dependency>
	</dependencies>

	<build>
		<plugins>
			<plugin>
				<groupId>org.springframework.boot</groupId>
				<artifactId>spring-boot-maven-plugin</artifactId>
			</plugin>
		</plugins>
	</build>

</project>
You can see we have used Spring Boot 3.4.1, which is latest Spring Boot at the time of writing of this tutorial.
Adding Rest Controller
Open WebappApplication.java in editor and add following controller class:
@RestController
class HelloController{

	@RequestMapping("/hello/{name}")
	String hello (@PathVariable String name) {
		return "Hello, " + name + "!";
	}
}
In the above class we are creating a RestController class by adding @RestController annotation to the calls. The we have add hello() method to handle the request by adding @RequestMapping("/hello/{name}"). The @RequestMapping annotation registers the request handler for the Spring Boot Web application. Finally we are returning the Hello message to back.
0About @RequestMapping Annotation
The @RequestMapping is a Spring MVC annotations which is used to map requests to controller method. This annotation can be use in many ways but in this tutorial we have just use this for mapping a simple request.
Here is complete code of the WebappApplication.java class:
package net.roseindia.webapp;

import org.springframework.boot.SpringApplication;
import org.springframework.boot.autoconfigure.SpringBootApplication;
import org.springframework.web.bind.annotation.PathVariable;
import org.springframework.web.bind.annotation.RequestMapping;
import org.springframework.web.bind.annotation.RestController;

@SpringBootApplication
public class WebappApplication {

	public static void main(String[] args) {
		SpringApplication.run(WebappApplication.class, args);
	}

}

@RestController
class HelloController{

	@RequestMapping("/hello/{name}")
	String hello (@PathVariable String name) {
		return "Hello, " + name + "!";
	}
}
Now our Spring Boot First Web application is ready and we can run this application.
1Running First Spring Boot Web Application
Right click in the WebappApplication.java file in the editor and select run as Java Application as shown below:

Now open the browser and http://localhost:8080/hello/World. Your browser should display Following message.
2
Congratulataions you have completed your first Spring Boot Web Application.
3Related Tutorials