
Install Java 25, write your first program the traditional way and the new beginner-friendly way, avoid common errors, and follow a real learning roadmap.
Getting Started with Java in 2026: The Complete Beginner's Guide
Most tutorials for Java beginners still stick to the path and norms they have preached for decades. The common script they follow is to install a JDK, then write a public class HelloWorld, and after that, explain what is meant by public static void main(String[] args). Once this is done, learners are guided to loops and variables.
The biggest flaw in most tutorials is that they have not updated the learning path with the beginner-friendly syntax beginning with Java 25. This guide to get started with Java will explain both the traditional and the simplified new path after Java 25. We will also provide a complete list of IDEs and text editors you need, and the learning path from beginner to the advanced stage.
What You Need to Start?
Learning Java requires a very basic setup. You only need a machine with a reasonably recent configuration and any of the three major operating systems, such as Windows, macOS, or Linux. To begin with, you need to install a Java Development Kit (JDK) and, for writing the code, a notebook or text editor.
Step 1: Knowing what you install
Every JDK has three different components, and you should have some basic knowledge about them before you install it. Read about the three components here:
- JDK (Java Development Kit): This refers to the comprehensive toolkit with everything you need to write Java code and build Java programs. Every JDK is equipped with a compiler, Java Virtual Machine(JVM), Java Runtime Environment (JRE), and other tools.
- JRE (Java Runtime Environment): To run your compiled program code, you need the Java Runtime Environment. Since Java 11, it is included in the JDK; you don’t need to install it separately..
- JVM (Java Virtual Machine): The Java Virtual Machine (JVM) actually executes your compiled Java code in an OS environment. JVM is also included in the JDK, and you don’t need to install it separately.
So, when you install the JDK, you get access to all Java components and tools right in your computer, and you are all set to learn Java.
Step 2: Choosing JDK Version & Build
You need to know about JDK versions and builds before installing. Let’s understand them one by one.
Choosing the right JDK version: Java 25 currently stands as the latest Long-Term Support (LTS) version. Naturally, the vast majority of guides and tutorials mostly take this version into consideration. So, the JDK 25 version is likely to be your first choice. As an additional value proposition, it also offers a highly beginner-friendly syntax, making it even more irreplaceable as a Java version
Choosing the right JDK build: On the internet, you have two build choices for JDK downloads, such as Oracle JDK and OpenJDK. Though both are built using the same source codebase, the first one needs a commercial license to use in production environments, while the other is completely free for any deployment. For learning your first steps with Java, just opt for any well-known OpenJDK build such as Eclipse Temurin.
Step 3: Installing in Different Operating Systems
Now a few words of guidance are needed to help you install the JDK in different operating systems.
Windows
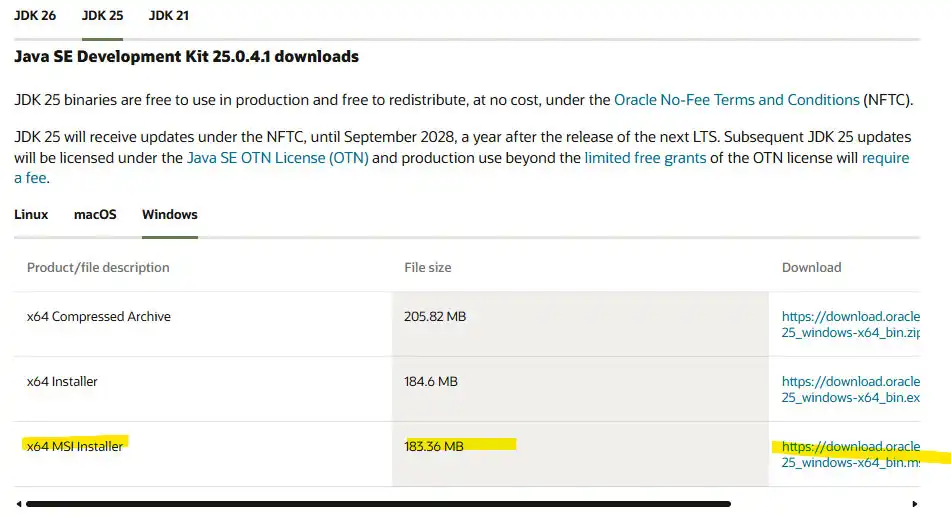
Before downloading the JDK build, download the Windows installer (.msi) for Java 25. You can download it either from the Oracle website or any other OpenJDK websites like Eclipse Temurin. Make sure during the setup you tick the checkbox to set the PATH environment variable automatically. This will prevent you from facing a common error during installation.
macOS
In macOS, the easiest installation is done through Homebrew. Just opt for brew install followed by cask temurin. Another path is to download the .pkg installer directly from any OpenJDK website like Adoptium and then run it just as you do with any other macOS app.
Linux
For the Linux operating system, most OpenJDK distributors provide a specified package manager route, such as the following:
sudo apt update
sudo apt install openjdk-25-jdk # Debian/Ubuntu-based
Now the availability of the package may vary to a certain extent from one distributor to another, or it can also vary based on release timing. So if you find that openjdk-25-jdk is still not available in a particular repository, as the next reliable choices you can opt for the Adoptium .tar.gz archive or SDKMAN.
SDKMAN
What if you want to work with multiple JDKs after a certain time? Well, for them, SDKMAN comes as a great tool. This is why developers who work in real projects and require access to multiple JDKs prefer SDKMAN. It is a robust command-line tool to help install multiple JDKs and switch from one version to another. Follow the installation path below for SDKMAN on macOS and Linux:
curl -s "https://get.sdkman.io" | bash
sdk install java 25-tem
Installing SDKMAN is not imperative for beginners, but if you install it early, later on it can save you from the friction of JDK versions at a later stage. Whenever in your learning path or later on during an actual project you need a different JDK version, this tool will save you from many struggles.
Verifying the installation
When it comes to verifying the installed JDK, it works in the same way across all operating systems. All you need is to open a terminal or start Command Prompt and run the following:
java -version
javac -version
After giving both commands, it should report back version 25. If the 'java' or 'javac' command variables are not recognized, it is likely that the PATH environment variable was not set properly during installation.
Step 4: Choosing an IDE or Editor
| Tool | Best For | Notes |
| IntelliJ IDEA (Community Edition) | Most beginners | It is free, focused only on Java, great for error detection, and offers an autocomplete feature |
| Eclipse | Traditional enterprise environments | it is free, already established, and used widely across legacy enterprise Java teams |
| VS Code + Extension Pack for Java | Developers who also work in other languages | It is a lightweight option, allows flexible configurations, and works great for projects involving multiple languages |
| Plain text editor + terminal | Understanding the compile and run process itself | This doesn’t offer any autocomplete and error-checking features, but allows developers to see exactly what javac and java do |
If you are choosing Java to learn as the core language on which you will build your developer career, IntelliJ IDEA Community Edition comes as the best starting point. The best thing about this IDE is that it is free, built specifically for Java, and it highlights errors in real time, which is a huge boon for beginners. As a beginner, it is common to miss semicolons, mismatch the braces, and make typing errors. This IDE will constantly help you correct these errors by highlighting them in real time.
Step 5: Write and Run Your First Java Program
While most versions at this juncture just show a single "Hello, World" version, we will rather show two separate paths. From Java 25, we have two valid ways to write a program, and you should learn both.
Traditional Version
public class HelloWorld {
  public static void main(String[] args) {
     System.out.println("Hello, World!");
  }
}
Breaking this down line by line:
- public class HelloWorld declares a class named HelloWorld. The file must be saved as java, because Java needs both the file name and the public class name to match completely, including the case.
- public static void main(String[] args) comes as the entry point of the program. This is how the JVM finds and runs first, static means it belongs to the class itself rather than an instance of it; String[] args makes way for the command-line arguments to be passed.
- out.println("Hello, World!") prints text to the console, and the println adds a line break after the output.
Now, to compile this code and run it, follow the command below:
javac HelloWorld.java # produces HelloWorld.class (bytecode)
java HelloWorld # runs it
Beginner-Friendly Version from Java 25
The JDK Enhancement Proposal 512 (JEP 512) proposed two new features, such as Compact Source Files and Instance Main Methods. JEP 512 made these features available only as a preview in all four JDK versions starting from Java 21 to 24, and finalized JEP 512 features at last in Java 25. These features gave Java 25 a distinct edge as they reduced the load of unfamiliar syntax a complete beginner has to learn. Thus, Java 25, to a great extent, simplified the learning path, and the same program that we have written following the traditional method can now be written like the following:
void main() {
   IO.println("Hello, World!");
}
Look closely, and you can see that there is no public class wrapper, no static, no String[] args. In fact, you don’t need a separate compile step as well. It is saved just as Hello.java, and you can run it directly with the following command:
0
java Hello.java
Despite making the entry point simple, it doesn’t deviate from the real Java at all, because the compiler still wraps this in an implicit class, and IO.println works as a new console helper method within the java.lang package to help with this easy method. Naturally, when the code grows and needs to incorporate multiple classes, make imports, or adopt the traditional structure, it can easily convert to the standard traditional path without needing to reset the core concept.
Now let us spare a few words on why this new method is not just about ensuring convenience. This new simplified approach ensures that a learner building their first-day Java program in 2026 no longer needs to explain the static, arrays, or class visibility modifiers before the first output shows up before their eyes.
This new simplified approach stresses on helping the beginners to be familiar with basic sequencing and logic first, since concepts like static, arrays or class visibility can be introduced at a later stage. The vast majority of the tutorials and guides right now are still stuck with the traditional path and do not help learners to explore this new simplified option.
1A Quick Look at Common Beginner Errors and Respective Fixes
Let’s now have a brief look at the common errors that beginners frequently make and ways to fix these errors. Let’s have a look at the requirements vs the errors.
- The class HelloWorld is public, and it is declared in a file named HelloWorld.java. This error is very common among new learners. The error is about a mismatch of the file name and the public class name. There should be an exact match, including capitalization. If this occurs, you need to rename the file to match the public class name.
- 'javac' is not recognized as an internal or external command in the case of Windows or "command not found" in the case of macOS or Linux. This error happens because the bin directory of the JDK does not follow the system PATH. To rectify these errors, you need to reinstall the JDK and check the "Add to PATH" checkbox. As an alternative, you can also manually edit the PATH variable to resolve this issue.
- Inconsistent capitalization & case-sensitivity are another common source of errors. Since Main and main are identified by Java as completely different identifiers, you need to rectify these mistakes with capitalization.
- During compilation, beginners miss a lot of semicolons or mismatch the braces. It is one of the most common errors beginners frequently make. Such errors can be easily avoided by using a proper IDE like IntelliJ since it highlights these errors when writing code.
- The confusion of ClassNotFoundException with NoClassDefFoundError, which means that the class is really not on the classpath. It also means that between compile and run time something important changed. These changes can be a missing dependency or just moving a file.
Step 6: Sequence of Learning the Fundamentals
After running your first program successfully, you can easily be lured to embrace frameworks like Spring Boot. You need to resist that temptation at all costs and instead learn the core fundamentals one by one in a proper sequential manner.
- Variables and data types: primitives (int, double, boolean, etc.) versus reference types.
- Operators and control flow: if/else, switch, for, while loops.
- Methods: Organizing code into reusable blocks with names.
- Arrays: Fixed-size collections of a single data type.
- Object-oriented programming: Classes, objects, and the four pillars such as encapsulation, inheritance, polymorphism, and abstraction. By learning these concepts, you finally have a better grasp of the core design philosophy of Java, the key concepts, and their value propositions.
- Exception handling: Learning try/catch/finally and learning the checked and unchecked exceptions and their effects.
- The Collections Framework: Learning collection frameworks like ArrayList, HashMap, HashSet, and the interfaces they represent.
When, as a beginner, you feel perfectly comfortable and familiar with all the above core fundamentals, you can progress to the latest and modern additions like lambda expressions, the Streams API, and records that are directly built on OOP and collections fundamentals.
2A Realistic Learning Roadmap
| Stage | Focus Areas | Typical Timeframe |
| Beginner | Syntax, control flow, methods, arrays, basic OOP | 3 to 6 weeks of regular practice |
| Intermediate | Full OOP including inheritance and interfaces, exception handling, Collections, file I/O, basic Maven/Gradle, JUnit testing | 2 to 3 months |
| Advanced / Real Project-Ready | Spring Boot, JDBC and databases, REST APIs, concurrency, build and deployment basics | 3 to 6 months, often alongside project work |
Final Thoughts
So, your journey with Java is not the same as what many tutorials describe and prescribe. While the core fundamentals of Java remain the same, the entry-level learning curve is reduced to a great extent from Java 25. Now you are better positioned to start with Java than your predecessors thanks to the compact source files provided by Java 25. Installation of the right JDK, choice of a great IDE, option of much simplified first-program syntax besides the traditional path, and a tried & tested sequence of learning fundamentals before you move to any framework.
Related Tutorials
- About Java Programming Language?
- Why Java as Programming Language?
- How I can start developing program with Java?
- Write first Java Program, compile and test
- Understanding public static void main function
- Java Tutorials home page
Last Updated: 26-Aug-2026