Java bean example in JSP
![]()
![]()
![]()
In this Tutorial we want to describe you a code that help in understanding Java bean example in JSP.This code illustrates the procedure of handling session and print a Hello world using Java Bean. The Bean is reusable code, portable and platform independent component written in a java programming language. The given below code helps you to understand the concept of Java bean.
Understand with Example
In this example we want to describe you a code that explain JavaBeans in JSP.For this we have to create a package my, Inside this package, we define a class My Bean. The class define a newly created instance of String class.
- get Name ( ) - This method is used to return name of the entity i.e.
class,interface,array class, void represented by the Class object as a String.
- set Name ( )- This method is used to hold the value of the Class object as a String.
The next step is to create a JSP page. This JSP page uses My bean package . Let us go through the list of steps to be carried out to call a My bean class.
<jsp.useBean>- This is used to locate or instantiates a java bean component. An attempt is made to locate an instance of the bean.
- An attempt is made to search the bean with the scope.
Attributes used in use bean-
- id - This is used to identify the bean in the scope as per specify.
- scope - This is used to specify that bean can be called in any jsp page in the same session as the page created the bean. The Bean exists across the entire session. Any JSP page participating in the session can use that bean.
- class - This is used to specify the package. class and instantiate a bean from class.
<jsp.set Property>
The <jsp:useBean> element contains a <jsp:setProperty> element that is used to sets property values in the Bean. The <set Property> is used to set Property values in various way like-
- Passing all the values enter by a user stored as parameter request matches the properties of bean.
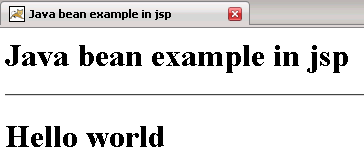
- Passing a specific value like" Hello World" the user enters to a specific property in the bean
<jsp:get Property>
The <jsp:useBean>element contains a <jsp:getProperty> element that is used to return the value stored in the set property.
The Jsp page is saved as UseBean.jsp,To run Use Bean .jsp,we have to place this file inside TOMCAT HOME\webapps\Use Bean and start Tomcat. Once Tomcat is started, type the URL in the browser and run your application.
MyBean.java
| package my; public class MyBean { private String name=new String(); public String getName() { return name; } public void setName(String name) { this.name = name; } } |
UseBean.jsp
<html>
|
Output of the program