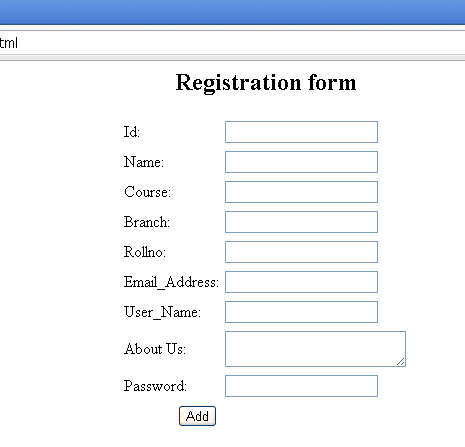
Here is an example of Registration form using HTML. Here a programmer can display as many "Text Field" as he/she wants. The name in front of Text Field is called "Label". At the end of the registration form their is a "ADD" button behnd which any desired link can be used. Once clicked it will redirect to that particular destination.

HTML Code for registration form
Here is an example of Registration form using HTML. Here a programmer can display as many "Text Field" as he/she wants. The name in front of Text Field is called "Label". At the end of the registration form their is a "ADD" button behind which any desired link can be used. Once clicked it will redirect to that particular destination.
HTML online forms are used in the dynamic web applications to take the input from the users. Developers create html forms for their website applications. These forms are used to take the input for the user. The most basic and frequently used form is the HTML registration forms, which is used by the websites for enabling the users to register on their website. The registration form is presented to the user where the website input their details and submits the form. Registration form performs the data validation on the form submitted. If it passes all the validation then the data is sent to the backend server and a user account is generated for the website. There are many ways HTML forms are developed by the developers of websites.
In this tutorial we are going to provide you the code for the most basic form of the HTML from. We can use the JavaScript to validate the user input on the browser side and the data can also be validated on the server-side. It is advisable to validate the user both in browser and on server-side. This helps website owners to save only validated data into the database.
In this example we have shown 9 "Text Field". Size of the Text Box can also be changed as per the requirement.
Steps of creating HTML Code for registration form
Step 1: Create a HTML file.
In this step we create a text file with .html extension, for example registration.html. You should open this file in a text editor for writing HTML code.
Step 2: Writing HTML code for registration form.
You should add following code into your registration.html file:
<html>
<head>
<title>registration form</title>
</head>

<h2 ALIGN="CENTER">Registration form</h2>

<form action="Welcome.html" method="post">
<table border="0" align="center">
<tbody>

<tr>
<td><label for="id">Id: </label></td>
<td><input id="id" maxlength="50" name="name" type="text" /></td>
</tr>

<tr>
<td><label for="name">Name: </label></td>
<td><input id="name" maxlength="50" name="name" type="text" /></td>
</tr>

<tr>
<td><label for="course">Course: </label></td>
<td><input id="course" maxlength="50" name="course" type="text" /></td>
</tr>

<tr>
<td><label for="branch">Branch: </label></td>
<td><input id="branch" maxlength="50" name="branch" type="text" /></td>
</tr>

<tr>
<td><label for="rolln0">Rollno: </label></td>
<td><input id="rollno" maxlength="50" name="rollno" type="text" /></td>
</tr>

<tr>
<td><label for="email">Email_Address:</label></td>
<td><input id="email" maxlength="50" name="email" type="text" /></td>
</tr>

<tr>
<td><label for="username">User_Name:</label></td>
<td><input id="username" maxlength="50" name="username" type="text" /></td>
</tr>

<tr>
<td><label for="aboutus">About Us:</label></td>
<td valign="middle" align="center"><textarea></textarea></td>
</tr>

<tr>
<td><label for="password">Password:</label></td>
<td><input id="password" maxlength="50" name="password"
type="password" /></td>
</tr>

<tr>
<td align="right"><input name="Submit" type="Submit" value="Add" /></td>
</tr>

</tbody>
</table>
</form>
</html>
After adding above code save the file.
Step 3: Testing the page in web browser.
Web browser are used to run the HTML file. When ever you visit a website then the HTML code is served from the server to your browser. HTML code contains the logic to render the UI on your web page. So, for our application also we will use chrome browser to test our registration page.
Now open the file in web browser such as chrome. This will show you following output.

In this tutorial we learned how to create HTML code for registration form.
