
WebService with database Mysql - A database driven webservice


User Registration WebServices Example
In this tutorial we will develop a simple user registration Webservices. The user registration/account registration form will be presented to the user. Once user fills in the form and clicks on the "OK" button, the serverside JSP will call the webservice to register the user.
This webservices will expose the insert user operation which will be used by the JSP client to register the user. We will use the NetBeans 6.1 IDE to develop and test the application.
The MySQL database is used to save the user registration data. You can modify the code to use any database of your choice. The existing webservices can also be modified to use the Hibernate or any other ORM technologies. You can also use the Entity beans to persist the data into database.
Software required to develop and run this example:
- JDK 1.6
- NetBeans 6.1
- MySQL Database 5 or above
MySql Database Configuration In NetBeans
Let's configure MySQL database in teh NetBeans IDE and then create the required table into database.
Step 1:
- Click on the service tab in NetBeans as shown below in Fig 1.

Step 2:
- Right Click on the Databases
- Select New Connection as shown below in Fig 2.

Fig. 2.
Step 3:
- It opens a dialog box for the mysql configuration.
- Type the driver name, url , user name and password as shown
below in Fig. 3.

Fig. 3
Step 4:
- Click on the Ok button .
- Now expand the Newly created database connection.
- It shows the all the tables of the database test as shown
below in Fig 4.

Fig. 4
Step 5:
- Create a table named login.
- Right Click on the Tables and select Create table
as shown below in Fig 5

Fig. 5
Step 6:
- It opens a dialog box for giving the fields name of the table
- Now give the field name and data type as shown below in Fig
6.

Fig. 6
Step 7:
- Click on the Ok
- It creates the table login in the test database.
Creating the WebService program for Account creation
Step 8:
- Open the netbeans 6.1
- Creat a new web project as shown below in Fig 7.

Fig. 7
Step 9:
- Type the project Name as MyAccount
- Click on the next button as shown below in Fig 8.

Fig. 8
Step 10:
- Select the server as Glassfish
- Click on the Next and then finish button as shown below in
Fig 9.

Fig. 9
Step 11:
- It creates a Web Project named MyAccount.
Creating the WebService
Step 12:
- Right Click on the project MyAccount
- Select New-->WebService as shown below in
Fig 10.

Fig. 10
Step 13:
- Type the name of the WebService as myaccount with the package as mypack.
- Click on the Finish button as shown below in Fig 11.

Fig. 11
Step 14:
- It creates a WebService application in
design view
- Click on the Add operation as shown below in Fig 12.

Fig. 12
Step 15:
- In the dialog box type all parameter names.
- Also select the appropriate data type.
- Click on Ok as shown below in Fig 13.

Fig. 13
Step 16:
- It creates a WebService application
- Click on the source tab as shown below in the Fig 14.

Fig. 14
Step 17:
- Now create the database source
- Right Click in the source code of myaccount.java
- Select the Enterprise Resources-->Use Database as
shown below in Fig 15.

Fig. 15
Step 18:
- In the choose database select the Add button as
shown below in Fig 16.

Fig. 16
- It opens a Add Data Source Reference.
- Type the Reference Name as data1
- For Project Data Sources Click on the Add button
as shown below in Fig 17.

Fig. 17
Step 20:
- In the Crea Data Source type thye jndi name as jndi1
- In the database connection select the newly
created database connction for the mysql.
as shown below in Fig 18.

Fig. 18
Step 21:
- Click on the Ok button
- It creates the database connection gives the dialog box as shown below.
- Click on the Ok button as shown below in Fig 19.
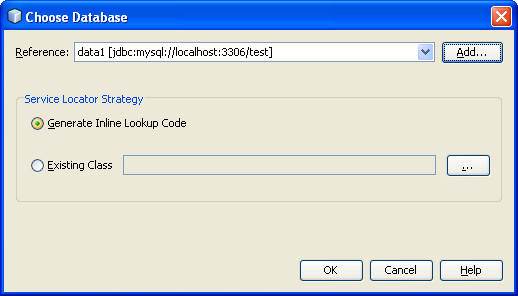
Fig. 19
Step 22:
- It creates the datasource data1 with the resource name as data1 in the code
- Edit the code and give the database connection, statement
for the mysql connectivity
as shown below.
package mypack;


import java.sql.Connection;

import java.sql.DriverManager;

import java.sql.PreparedStatement;

import javax.annotation.Resource;

import javax.jws.WebMethod;

import javax.jws.WebParam;

import javax.jws.WebService;

import javax.sql.DataSource;


@WebService()

public class myaccount {


  @Resource(name = "data1")

  private DataSource data1;


  @WebMethod(operationName = "insert")

  public String insert(@WebParam(name = "uname") String uname,

		 @WebParam(name = "fname") String fname,

		@WebParam(name = "lname") String lname,

		@WebParam(name = "location") String location,


		@WebParam(name = "phone") String phone,

		@WebParam(name = "credit") String credit,

  @WebParam(name = "dl") String dl) {

  try {

  Class.forName("com.mysql.jdbc.Driver");

  Connection con =

		DriverManager.getConnection("jdbc:mysql://localhost:3306/test",

		"root", "");

  PreparedStatement st =

		con.prepareStatement("insert into login values(?,?,?,?,?,?,?)");

  st.setString(1, uname);

  st.setString(2, fname);

  st.setString(3, lname);

  st.setString(4, location);

  int ph = Integer.parseInt(phone);

  st.setInt(5, ph);

  int cr = Integer.parseInt(credit);

  st.setInt(6, cr);

  int d1 = Integer.parseInt(dl);

  st.setInt(7, d1);

  st.executeUpdate();

  } catch (Exception e) {

  System.out.println(e.getMessage());

  }

  return "record inserted";

  }

}
Step 23:
- Now deploy the project
- Right click on the project
- Select Undeploy and Deploy as shown below in Fig 20.
- It builds and deploys the MyAccount Web project on the
glassfish server.

Fig. 20
Step 24:
- After deploying now we can test the Web Service created
- Right click on the myaccount webservice
- Select Test Web Service as shown below in Fig 21.

Step 25:
- It runs the deployed webservice in the firefox browser.
- Type the value and click on the insert button as shown below in Fig 22.

Step 26:
- After clicking on the insert button it insert the values into the login table
- It open new window and displays the Metrhod parameters,
SOAP request and response
as shown below in Fig 23.

Fig. 23
Step 27:
Check the data in the database table
- In the service tab select the mysql connection
- In its table node right click on the table login
- Select the view data as shown below in Fig 24.

Fig. 24
Step 27:
- It opens a new window
- Then displas the data as shown below in Fig. 25.

Fig. 25
Making the client of the WebService
Step 28:
- Create a new Web Project
- Type the name as MyAccountClient as shown below
in Fig.26.

Fig. 26
- Click on the next button
- Select the server as glassfish as shown below in Fig. 27.
Fig. 27
Step 30:
- Click on the finish button
- It creates a web rpoject with a index.jsp file
- In the index.jsp design it with form and all its fileds
- Give the form action as Client.jsp as shown below in Fig 28.
Create WebService Client
Step 1:
- Right Click on the MyAccountClient
- Select WebService Client as shown below in Fig.28.

Fig. 28
Step 2:
- In the dialog box click on the browse button
as shown below in Fig 29.

Fig. 29
Step 3:
- Select the myaccount webservice.
- Click on the OK button as shown below in Fig 30.

Fig. 30
Step 4:
- Now project is containing the WSDL file url.
- Click on the Ok button as shown below in Fig 31.

Fig. 31
Step 5:
- Right Click in the Client.jsp
- Select Web Service Client Resources-->Call
WebService Operation
as shown below in Fig 32.

Fig. 32
Step 5:
- Select the insert operation as shown below in Fig .33.

Fig. 33
Step 6:
- After insert opoeration the code becomes like as shown
below in Fig 34.

Fig. 34
Step 7:
- Deploy the MyAccountClient
- Right Click and select Undeplo and Deploy as shown below in
Fig.35.

Fig. 35
Step 8:
- After deployment run the project.
- Right Click and select the run as shown below in Fig 36.

Fig. 36
Step 9:
- It runs the index.jsp in the browser as shown below in Fig 37.
- Put the data and click on the ok button

Fig. 37
Step 10:
- After this click values get inserted in the database table
- The message comes as record inserted as shown below in
Fig.38

Fig. 38
Step 11:
- See the data inserted in the table.
- In the service tab select the connection created for mysql.
- In the table node select the login
- Right Click and select the view data as shown below in Fig.
39.
Fig. 39
Step 12:
- It displays the record inserted as shown below in Fig 40.

Fig. 40
Download1
Download2
