Developing web component
![]()
![]()
![]()
Introduction To Java Beans
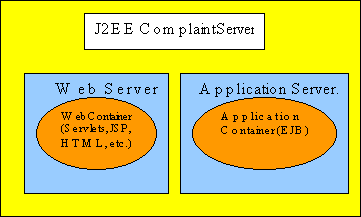
J2EE specification defines the structure of a J2EE application. According to the specification J2EE application consists of two components, web component and the enterprise bean.
Web component consists of all the programs and the files used to provide the user interface and these may contain JSP, Servlets, images, html files etc. These files are archived into .war file and deployed on the web server.
Enterprise Bean consists of all the program necessary to provide the business to the application. These files are archived into .jar file and are deployed on the application server such as WebLogic 6.0.
You can deploy the web component and the ejb components separately on the web server and the application server respectively. J2EE specification also provide a way to package these files into one archive .ear file and then deploy on the server.
Writing and deploying the web component
In this section we are going to describe you how to write and deploy the web component on the WebLogic 6.0 web server.
Web component follows the standard
directory structure defined in the J2EE specification.
| Directory Structure of Web Component | |
| / | |
| index.htm, JSP, Images etc.. | |
|
|
|
| web.xml | |
| servlet classes | |
| jar files | |
Root directory of the web archive ('.war' file) contains all the html, jsp, images files and the additional directories containing these files. In the root directory there is a special directory 'Web-inf' which contains the web deployment descriptor (web.xml), classes and the lib directory.
To download the code for this lesson click here. To deploy this web component download the code and then extract it in you favorite directory. One directory will be created with the name of lesson1, go to the leson1 directory and to create the war file issue the following command from dos prompt:
c:\mydir\lesson1> jar cf lesson1.war *
Web component file with the name of lesson1.war will be created. You can deploy it to the WebLogic 6.0 server using console. After deploying it using the WebLogic 6.0's console type http://localhost:7001/lesson1/ to view. Server will serve index.jsp to your browser.
Now let's see the web.xml file which describes the content of the web component. Here is the content of web.xml file.
| <?xml version="1.0" encoding="ISO-8859-1"?> <!DOCTYPE web-app PUBLIC "-//Sun Microsystems, Inc.//DTD Web Application 2.2//EN" "http://java.sun.com/j2ee/dtds/web-app_2.2.dtd"> <web-app> <welcome-file> index.jsp </welcome-file> <session-config> <session-timeout>54</session-timeout> </session-config> </web-app> |
web.xml file start with xml declaration and after the document type declaration <web-app> tag starts. All the information regarding the content of the .war file are written between <web-app> and </web-app> tags in the xml format.
In the first lesson we are setting index.jsp as our welcome page and the following lines of the web.xml file is used to accomplish this.
<welcome-file>
index.jsp
</welcome-file>
and the following code sets the session time:
<session-config>
<session-timeout>54</session-timeout>
</session-config>
To learn more about writing the web.xml file and deploying the web application on WebLogic 6.0 please visit:
http://e-docs.bea.com/wls/docs60/adminguide/config_web_app.html
In the next lesson we will write stateless session bean and then deploy on the WebLogic 6.0 Server.
Tutorials
- Application Servers Available in Market. Web Servers. J2EE server.
- Developing Distributed application using Enterprise Java Beans, J2EE Architecture, EJB Tutorial, WebLogic Tutorial.
- The J2EE Architecture allows the programmers to divide their work into two major categories Business Logic Presentation
- Introduction To Enterprise Java Bean(EJB). WebLogic 6.0 Tutorial.
- Introduction To Enterprise Java Bean(EJB). Developing web component.
- Downloading and Installing WebLogic server 6.0
- Application Servers Available in Market. Web Servers. J2EE server.
- Writing Calculator Stateless Session Bean
- Deploying and testing Stateless Session Bean
- Developing Distributed application using Enterprise Java Beans, J2EE Architecture, EJB Tutorial, WebLogic Tutorial.
- EJB, Enterprise java bean, EJB Intoduction- Enterprise Java Beans (EJB) - An Introduction
- The J2EE Architecture allows the programmers to divide their work into two major categories Business Logic Presentation Logic
- Introduction To Enterprise Java Bean(EJB). WebLogic 6.0 Tutorial.
- Stateful and Stateless Session Bean Life Cycle
- Writing Session bean - Session Bean Example with Source Code
- Writing Deployment Descriptor of Stateless Session Bean
- Introduction To Enterprise Java Bean(EJB). Developing web component.
- Downloading and Installing WebLogic server 6.0
- EJB, Enterprise java bean- Why EJB (Enterprise Java Beans)?