
Displaying Hello World using GWT
![]()

![]()
This example describes the process for displaying Hello World using GWT in java. By GWT we mean Google Web Toolkit,Google Web Toolkit is a toolkit launched by goggle that eases the burden of time working around browser quirks by allowing developers to quickly build and maintain complex JavaScript front-end applications in the Java programming language. The steps involved in displaying the Hello World message using Net Beans IDE 6.1 are described below:-
Step1:- Download the Google Web Toolkit package for your operating system.
You can
download this Tool from the following url:-http://code.google.com/webtoolkit/download.html
Step2:-For Windows, extract the files from gwt-windows-1.5.2.zip
For Linux and
Mac, extract the files from gwt-mac-1.5.2.tar.gz
Step3:-Place the extracted files in the directory where the operating
system is installed.
Step4:-Install the Net Beans GWT plug into the IDE by going to the Plugging
Manager (Tools > Plugins from the main menu) and install the Plugins, as shown
below in the figure:-

Step5:-Choose File > New Project .Under Categories, select
Web. Under Projects, select Web Application. Click Next.
Step6:-In the Name and Location panel, type GwtHelloworld in Project Name.
Step7:-Change Java EE Version to 1.4, since GWT does not support Java EE.Click Next.
Step8:-In the Frameworks panel, choose GWT, as shown below in the figure:
-

Note:-In the GWT Installation Folder, specify the path of the folder where you
have extracted the Google Web Toolkit package.
Step9:-Click Finish.
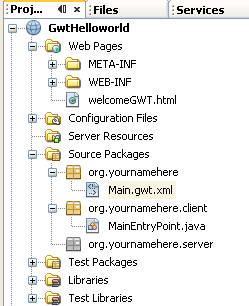
After doing the above steps the IDE creates the HelloGWT project. The project contains all of your sources, libraries, and project metadata
as shown in the figure given below:-
Step10:-Open the MainEntryPoint.java by double clicking on it. Write the message you want to display on the browser by editing the following line final Label label = new Label("Hello World");
Step11:-Right-click on the project name and choose Run. Your computer's default browser opens and the
following page is to be displayed:
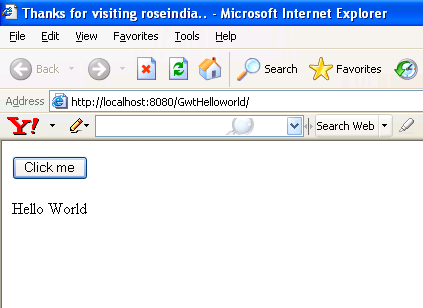
This is the final output.
![]()
![]()