
In this video tutorial I have explained you the steps to download the JDK 8 and then install on the Windows 10 operating System.

Installing JDK 8 on Windows 10 and configuring the settings
Installing the JDK 8 on the Windows 10 operating system is the first step to learn the Java 8 programming on the Windows 10 computer. In this video tutorial I am explaining the steps to download the JDK 8 and then install on the Windows 10 computer.
After installing the JDK it is necessary to set the environment variables so that Java compiler and interpreter is available to the command prompt and other programs. This video tutorial also shows you how to make the necessary settings in the System Environment variables of the Windows 10 computer.
First of all you have to download the JDK from http://www.oracle.com/technetwork/java/javase/downloads/index.html and then save it on your computer. You should save the connect installer for you computer, for example you are using Windows 10 32-bit then download the 32-bit installer and if your Windows 10 is 64-bit then download the 64-bit installer.
After downloading the installer double click it and then following the installer to install the JDK. Here is the video instruction of downloading and installing the JDK 8 on Windows 10 computer:
Here is the video tutorial of "Installing JDK 8 on Windows 10":
After the installation set the JAVA_HOME variable and add the path of bin directory of JDK in the path variable of Windows 10 system.
Here are the steps to download JDK 8 and install on Windows 10
Step 1: Download the JDK from Oracle website
Visit the Oracle website's Java section and then download the JDK for your Windows 10, before selecting the 32-bit or 64-bit version of installed check your computer architecture and download the correct version.

Now you should click on the "JDK Download" link and the screen with the following options will be displayed:
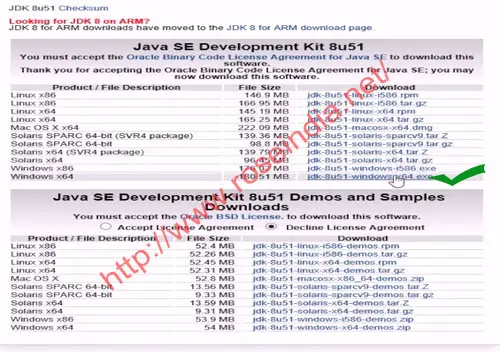
Now you should click on the appropriate installer file and download the JDK 8 installer.
Step 2: Installing the JDK 8 on Windows 10
Now you should double click the downloaded file and the installer will start installing the JDK on your computer. It will ask you to select the directory to install as shown below:

Now click next and follow the installer as explained in the video to complete the installation proces.
Step 3: Configuring the System Environment Variables
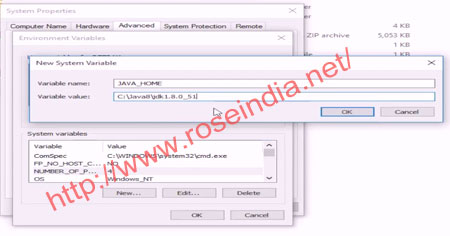
Now you should first set the JAVA_HOME in System Variable as explained in the video, following screen shot shows how to set the JAVA_HOME in System Variable:
Now you should set the path of bin directory JDK installation as shown below:

Then click on the ok button.
Step 4: Verify the installation
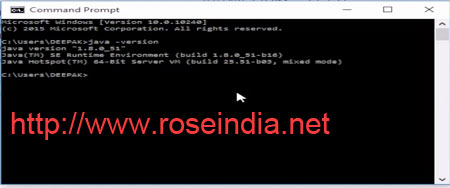
Now open the command prompt and then type:
java -version
The above command should display the version of JDK installed as shown below:
In this tutorial at roseindia.net you have learned how to get and install JDK on Windows 10 64-bit computer. You can check the following links to learn more about the Java programming at out website roseindia.net.
0Check more tutorials at http://www.roseindia.net/java/training/index.shtml and http://www.roseindia.net/java/