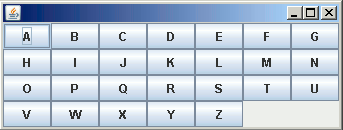
In this section, you will learn how to create multiple buttons labeled with the letters from A to Z respectively.

Create Multiple Buttons using Java Swing


In this section, you will learn how to create multiple buttons labeled with the letters from A to Z respectively. To display them, we have created an array of letters. Using this array, we have labeled the buttons. Now to perform an action on these buttons, we have used the following code:
| buttons[i].setActionCommand(b[i]); buttons[i].addActionListener(new ActionListener(){ public void actionPerformed(ActionEvent e) { String choice = e.getActionCommand(); JOptionPane.showMessageDialog(null, "You have clicked: "+choice); } }); |
Here is the code of DisplayButtonMessage.java
|
import java.awt.*; import javax.swing.*; import java.awt.event.*; public class DisplayButtonMessage extends JFrame { int i=0; static JPanel panel; public DisplayButtonMessage(){ JButton[] buttons = new JButton[26]; panel=new JPanel(new GridLayout(4,6)); String b[]={"A","B","C","D","E","F","G","H","I","J","K","L","M","N", "O","P","Q","R","S","T","U","V","W","X","Y","Z"}; for(i = 0; i < buttons.length; i++) { buttons[i] = new JButton(b[i]); buttons[i].setSize(80, 80); buttons[i].setActionCommand(b[i]); buttons[i].addActionListener(new ActionListener(){ public void actionPerformed(ActionEvent e) { String choice = e.getActionCommand(); JOptionPane.showMessageDialog(null, "You have clicked: "+choice); } }); panel.add(buttons[i]); } } public static void main(String[]args){ DisplayButtonMessage frame=new DisplayButtonMessage(); frame.add(panel); frame.pack(); frame.setVisible(true); } } |
Output will be displayed as:
On clicking the button 'A', it will show a message:
