Chaining ViewResolvers Example


Chaining ViewResolvers example in Spring 2.5 MVC
Spring provides functioning that supports more then view resolvers in the application. If user want to use more then one view resolver in the application, it can be used Chaining view resolvers. The Chaining view resolver is a technique that implements more then one view resolvers to your application context and set the order property to set order for the view resolver. In this example we will used two view resolvers first is XmlViewResolver and second is InternalResourceViewResolver. The main task of the chaining view resolvers to use more then one view resolvers in the application.
Step 1:
Now we will create a index.jsp that will have two links that generate the user requests. The code of the index,jsp is:
|
<%@page contentType="text/html" pageEncoding="UTF-8"%> <html> <head> <title>Chaining of View Resolvers</title> </head> <body> <center> <a
href="internalresourceviewresolver.html"> <a href="xmlviewresolver.html">XML View Resolver</a> </center> </body> </html> |
Step 2:
Now we will configured the web.xml for DispatcherServlet and set index.jsp as welcome file. We will also used spring tags library by setting in the web.xml. The code of the web.xml is:
|
<?xml version="1.0" encoding="UTF-8"?> <web-app xmlns:xsi="http://www.w3.org/2001/XMLSchema-instance" xmlns="http://java.sun.com/xml/ns/j2ee" xmlns:web="http://java.sun.com/xml/ns/javaee/web-app_2_5.xsd" xsi:schemaLocation="http://java.sun.com/xml/ns/j2ee http://java.sun.com/xml/ns/j2ee/web-app_2_5.xsd" version="2.5"> <servlet> <servlet-name>dispatcher</servlet-name> <servlet-class>org.springframework.web.servlet.DispatcherServlet <load-on-startup>1</load-on-startup> </servlet> <servlet-mapping> <servlet-name>dispatcher</servlet-name> <url-pattern>*.html</url-pattern> </servlet-mapping> <welcome-file-list> <welcome-file>index.jsp</welcome-file> </welcome-file-list> <taglib> <taglib-uri>/spring</taglib-uri> <taglib-location>/WEB-INF/spring.tld</taglib-location> </taglib> </web-app> |
Step 3:
Now we will create dispatcher-servlet.xml file inside the /WEB-INF/ folder that will have all configuration code for the application. We will create two view Resolvers in this xml file, first for InternalResourceViewresolver and second for XmlViewResolver. The code for InternalResourceViewResolver in the dispatcher-servlet.xml is:
|
<bean id="jspViewResolver" class="org.springframework.web.servlet.view.InternalResourceViewResolver" > <property name="order" value="0"/> <property name="viewClass" value="org.springframework.web.servlet.view.JstlView"/> <property name="prefix"> <value>/WEB-INF/jsp/</value> </property> <property name="suffix"> <value>.jsp</value> </property> </bean> |
And the code for the XmlViewresolver in the dispatcher-servlet.xml is:
|
<bean id="viewResolver" class="org.springframework.web.servlet.view.XmlViewResolver"> <property name="order" value="1"/> <property name="location"> <value>/WEB-INF/spring-views.xml</value> </property> </bean> |
The XmlViewResolver required a xml file that have bean definitions for the view so we will create a spring-views.xml file inside the /WEB-INF/ folder and set the location of this file in the XmlViewResolver configuration code. The code of the spring-views.xml is:
|
<?xml version="1.0" encoding="UTF-8"?> <beans xmlns="http://www.springframework.org/schema/beans" xmlns:xsi="http://www.w3.org/2001/XMLSchema-instance" xsi:schemaLocation="http://www.springframework.org/schema/beans http://www.springframework.org/schema/beans/spring-beans-2.5.xsd"> <bean id="xmlviewresolver" class="org.springframework.web.servlet.view.JstlView"> <property name="url" value="/WEB-INF/jsp/xmlviewresolver.jsp" /> </bean> </beans> |
The spring-views.xml file provide the actual view for the particular request. The full code of the dispatcher-servlet.xml is:
|
<?xml version="1.0" encoding="UTF-8"?> <beans xmlns="http://www.springframework.org/schema/beans" xmlns:xsi="http://www.w3.org/2001/XMLSchema-instance" xsi:schemaLocation="http://www.springframework.org/schema/beans
http: xmlns:p="http://www.springframework.org/schema/p"> <bean
id="viewResolver"
class= <property name="order" value="1"/> <property name="location"> <value>/WEB-INF/spring-views.xml</value> </property> </bean> <bean id="jspViewResolver" class="org.springframework.web.servlet.view.InternalResourceViewResolver" > <property name="order" value="0"/> <property
name="viewClass"
value= <property name="prefix"> <value>/WEB-INF/jsp/</value> </property> <property name="suffix"> <value>.jsp</value> </property> </bean> <bean id="urlMapping" class="org.springframework.web.servlet.handler.SimpleUrlHandlerMapping"> <property name="interceptors"> <list> <ref local="localeChangeInterceptor"/> </list> </property> <property name="urlMap"> <map> <entry key="/xmlviewresolver.html"> <ref bean="xmlviewresolverController"/> </entry> <entry key="/internalresourceviewresolver.html"> <ref bean="internalResourceViewResolverController"/> </entry> </map> </property> </bean> <bean
id="xmlviewresolverController"
class= </bean> <bean name="internalResourceViewResolverController" class="org.springframework.web.servlet.mvc.ParameterizableViewController"> <property name="viewName" value="message" /> </bean> <bean
id="localeChangeInterceptor"
class= <property name="paramName" value="hl"/> </bean> <bean
id="localeResolver"
class= </beans> |
In this code we will used two view resolvers for the different view.
Step 4:
Now we will create a message.jsp inside the /WEB-INF/jsp/ folder that provide view for the InternalResourceViewResolver. The code of the message.jsp is:
|
<%@ page language="java" contentType="text/html; charset=ISO-8859-1" pageEncoding="ISO-8859-1"%> <html> <head> <meta
http-equiv="Content-Type"
content= <title>Internal Resource View Resolver Example</title> </head> <body> <center> <table> <tr> <td> <b>This is Internal Resource View Resolver Example.</b> </td> </tr> </table> </center> </body> </html> |
Step 5:
Now we will create a xmlviewresolver.jsp inside the /WEB-INF/jsp/ folder that provide view for the XmlViewResolver. The code of the xmlviewresolver.jsp is:
|
<%@ page language="java" contentType="text/html; charset=ISO-8859-1" pageEncoding="ISO-8859-1"%> <html> <head> <meta http-equiv="Content-Type" content="text/html; charset=ISO-8859-1"> <title>XML View Resolver Example</title> </head> <body> <center> <table> <tr> <td> <b>This is XML View Resolver Example.</b> </td> </tr> </table> </center> </body> </html> |
Step 6:
Now we will create a XmlViewResolverController.java class for control the request. This java class implement AbstractController and return ModelAndView. The code of the XmlViewResolverController.java class is:
package net.roseindia.web;

import javax.servlet.http.HttpServletRequest;

import javax.servlet.http.HttpServletResponse;

import org.springframework.web.servlet.ModelAndView;
import org.springframework.web.servlet.mvc.AbstractController;
public class XmlViewResolverController extends AbstractController {
@Override

protected ModelAndView handleRequestInternal(HttpServletRequest request, HttpServletResponse response) throws Exception {

String Mess = "XmlViewResolver Example";
System.out.println("------>" + Mess);
ModelAndView modelAndView = new ModelAndView("xmlviewresolver");

return modelAndView;

	}

}
Step 7:
Now we will run this application and see the output like:
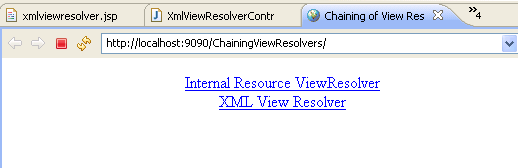
If user click on upper link then output is:
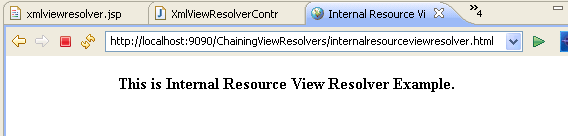
If user click on lower link then output is:

This is the complete example with using two view resolvers in spring 2.5.
Download code