iPhone Simple Table View
In this tutorial will learn how to use Table View and also how to add object to table view, to insert the object into the table view we have to take an array and through that will add or insert the object into the Table View.
In this tutorial will learn how to use Table View and also how to add object to table view, to insert the object into the table view we have to take an array and through that will add or insert the object into the Table View.Simple Table View
In this tutorial will learn how to use Table View and also how to add object to table view, to insert the object into the table view we have to take an array and through that will add or insert the object into the Table View. After that will set the title name for the navigation controller which is used to display the title of the table view, then will set the number of rows and the component into the Table View.
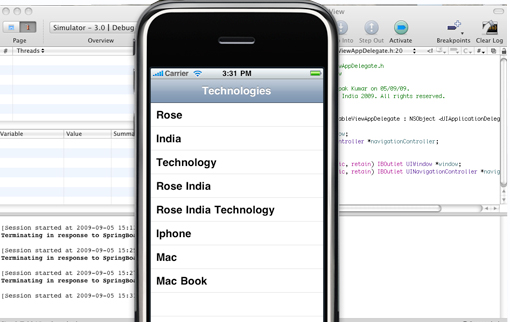
Final view will look like this:
Before starting will tell you why we are using the Navigation Based Application, this is chosen because the title of that Table should be displayed.
My Project name is Simple TableView and is Based on Navigation Application so it will show you Navigation bar on view so there is no need to add any navigation controller into the application because it already exist.As we know that in Navigation Based application will have RootViewController file and will add our code to that file.First will declare an array into the .h file.
RootViewController.h file will look like this:
@interface RootViewController : UITableViewController {
NSMutableArray *mobject;
}
@end
Now that we declared Array into .h file will initialize and add object into - (void)viewDidLoad method and also will set the title for the Navigation.
mobject = [[NSMutableArray alloc] init];
//Add items
[mobject addObject:@"Rose"];
[mobject addObject:@"India"];
[mobject addObject:@"Technology"];
[mobject addObject:@"Rose India"];
[mobject addObject:@"Rose India Technology"];
[mobject addObject:@"Iphone"];
[mobject addObject:@"Mac"];
[mobject addObject:@"Mac Book"];
//Set the title
self.navigationItem.title = @"Technologies";
Will set Number of rows into the Table View or Customize the Number of rows in the table view
- (NSInteger)tableView:(UITableView *)tableView numberOfRowsInSection:(NSInteger)section {
return [mobject count];
}
Now that Table view Knows how many rows to be set into Table, will display the actual text which prints in a table view cell. The table View is made of rows and rows contain cells, will set up the cell value into the table by the following code.
// Customize the appearance of table view cells.
- (UITableViewCell *)tableView:(UITableView *)tableView cellForRowAtIndexPath:(NSIndexPath *)indexPath {
static NSString *CellIdentifier = @"Cell";
UITableViewCell *cell = [tableView dequeueReusableCellWithIdentifier:CellIdentifier];
if (cell == nil) {
cell = [[[UITableViewCell alloc] initWithFrame:CGRectZero reuseIdentifier:CellIdentifier] autorelease];
}
NSString *cellValue = [mobject objectAtIndex:indexPath.row];
cell.textLabel.text = cellValue;
return cell;
}
RootViewController.h file will look like this:
#import "RootViewController.h"
#import "SimpleTableViewAppDelegate.h"
@implementation RootViewController
- (void)viewDidLoad {
[super viewDidLoad];
//Initialize the array.
mobject = [[NSMutableArray alloc] init];
//Add items
[mobject addObject:@"Rose"];
[mobject addObject:@"India"];
[mobject addObject:@"Technology"];
[mobject addObject:@"Rose India"];
[mobject addObject:@"Rose India Technology"];
[mobject addObject:@"Iphone"];
[mobject addObject:@"Mac"];
[mobject addObject:@"Mac Book"];
//Set the title
self.navigationItem.title = @"Technologies";
}
- (void)didReceiveMemoryWarning {
[super didReceiveMemoryWarning]; // Releases the view if it doesn't have a superview
// Release anything that's not essential, such as cached data
}
#pragma mark Table view methods
- (NSInteger)numberOfSectionsInTableView:(UITableView *)tableView {
return 1;
}
// Customize the number of rows in the table view.
- (NSInteger)tableView:(UITableView *)tableView numberOfRowsInSection:(NSInteger)section {
return [mobject count];
}
// Customize the appearance of table view cells.
- (UITableViewCell *)tableView:(UITableView *)tableView cellForRowAtIndexPath:(NSIndexPath *)indexPath {
static NSString *CellIdentifier = @"Cell";
UITableViewCell *cell = [tableView dequeueReusableCellWithIdentifier:CellIdentifier];
if (cell == nil) {
cell = [[[UITableViewCell alloc] initWithFrame:CGRectZero reuseIdentifier:CellIdentifier] autorelease];
}
NSString *cellValue = [mobject objectAtIndex:indexPath.row];
cell.textLabel.text = cellValue;
return cell;
}
- (void)tableView:(UITableView *)tableView didSelectRowAtIndexPath:(NSIndexPath *)indexPath {
// [self.navigationController pushViewController:anotherViewController];
// [anotherViewController release];
}
- (void)dealloc {
[mobject release];
[super dealloc];
}
@end
Check connection into Interface Builder:

Finally Press Build And Go Button