Simple Table View With Next View
In this tutorial will learn how to use Table View iphone and also how to add object to table view, to insert the object into the table view we have to take an array and through that will add or insert the object into the Table View.
In this tutorial will learn how to use Table View iphone and also how to add object to table view, to insert the object into the table view we have to take an array and through that will add or insert the object into the Table View.Simple Table View With Next View
In this iphone tutorial will learn how to use Table View and also how to add object to table view, to insert the object into the table view we have to take an array and through that will add or insert the object into the Table View. After that will set the title name for the navigation controller which is used to display the title of the table view, then will set the number of rows and the component into the Table View, when you click on the object will take you to the next view.
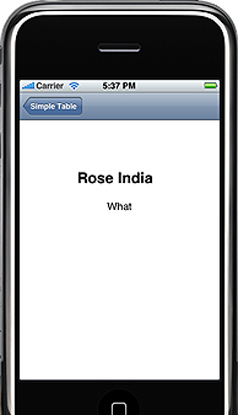
Final view will look like this:

My Project name is SimpleTable and the application is View Based Application, here you will find two .h and .m file SimpleTableAppDelegate.h, SimpleTableAppDelegate.m, SimpleTableViewController.h, SimpleTableViewController.m and to that will add Another ViewController so when the object is clicked will move to another View and ViewController name is NextViewController.
SimpleTableAppDelegate.h file will look like this:
|
#import <UIKit/UIKit.h> @class SimpleTableViewController; @interface SimpleTableAppDelegate : NSObject <UIApplicationDelegate> { UIWindow *window; SimpleTableViewController *viewController;// creating a variable to ViewController } @property (nonatomic, retain) IBOutlet UIWindow *window; @property (nonatomic, retain) IBOutlet SimpleTableViewController *viewController; @end |
SimpleTableAppDelegate.m file will look like this:
|
#import "SimpleTableAppDelegate.h" #import "SimpleTableViewController.h" @implementation SimpleTableAppDelegate @synthesize window, viewController; - (void)applicationDidFinishLaunching:(UIApplication *)application { UINavigationController *navController = [[UINavigationController alloc] initWithRootViewController:viewController]; // Override point for customization after app launch [window addSubview:navController.view]; [window makeKeyAndVisible]; } - (void)dealloc { [viewController release]; [window release]; [super dealloc]; } @end |
In this will declare variable for TableView and also an Array through which will insert or add object to the table view after adding our file will be
SimpleTableViewController.h file will look like this:
|
#import <UIKit/UIKit.h> @interface SimpleTableViewController : UIViewController <UITableViewDelegate, UITableViewDataSource> { IBOutlet UITableView *tblSimpleTable; NSArray *arry; } @end |
And in .m file will add object to tableView and title to the object into Table View. After this will set number of sections into tableview and also number of rows in section, this is done by counting the arrayData, will display the actual text which prints in a table view cell. The table View is made of rows and rows contain cells, will set up the cell value into the table by the code.
The method which is used to show another view when you select an object on the Table View is shown below, in this we creating variable for our NextViewController and loading that nib file.
- (void)tableView:(UITableView *)tableView didSelectRowAtIndexPath:(NSIndexPath *)indexPath
{
NextViewController *nextController = [[NextViewController alloc] initWithNibName:@"NextView" bundle:nil];
[self.navigationController pushViewController:nextController animated:YES];
[nextController changeProductText:[arry objectAtIndex:indexPath.row]];
}
SimpleTableViewController.m file will look like this:
|
#import "SimpleTableViewController.h" #import "NextViewController.h" @implementation SimpleTableViewController - (void)viewDidLoad { arry = [[NSArray alloc] initWithObjects:@"iPhone",@"iPod",@"MacBook",@"MacBook Pro",nil]; self.title = @"Simple Table Exmaple"; [super viewDidLoad]; } - (void)didReceiveMemoryWarning { [super didReceiveMemoryWarning]; // Release anything that's not essential, such as cached data } - (void)dealloc { [super dealloc]; } #pragma mark Table view methods - (NSInteger)numberOfSectionsInTableView:(UITableView *)tableView { return 1; } - (NSInteger)tableView:(UITableView *)tableView numberOfRowsInSection:(NSInteger)section { return [arryData count]; } - (UITableViewCell *)tableView:(UITableView *)tableView cellForRowAtIndexPath:(NSIndexPath *)indexPath { static NSString *CellIdentifier = @"Cell"; UITableViewCell *cell = [tableView dequeueReusableCellWithIdentifier:CellIdentifier]; if (cell == nil) { cell = [[[UITableViewCell alloc] initWithFrame:CGRectZero reuseIdentifier:CellIdentifier] autorelease]; } cell.text = [arry objectAtIndex:indexPath.row]; return cell; } - (void)tableView:(UITableView *)tableView didSelectRowAtIndexPath:(NSIndexPath *)indexPath { NextViewController *nextController = [[NextViewController alloc] initWithNibName:@"NextView" bundle:nil]; [self.navigationController pushViewController:nextController animated:YES]; [nextController changeProductText:[arry objectAtIndex:indexPath.row]]; } @end |
In NextViewController will declare label as IBOutlet to show the product text on next view and to show will write an action and action method will be declared into .m file.
NextViewController.h file is:
|
#import <UIKit/UIKit.h> @interface NextViewController : UIViewController { IBOutlet UILabel *Txt; } - (IBAction) changeProductText:(NSString *)ptr; @end |
In .m file will add method to action and will print the selected object on next view with the help of action.
NextViewController.m file is:
|
#import "NextViewController.h" @implementation NextViewController - (void)didReceiveMemoryWarning { [super didReceiveMemoryWarning]; } - (void)dealloc { [super dealloc]; } - (IBAction) changeProductText:(NSString *)ptr { Txt.text = ptr; } @end |
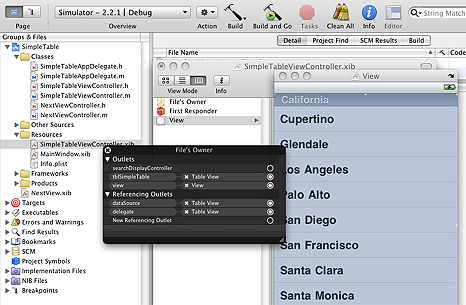
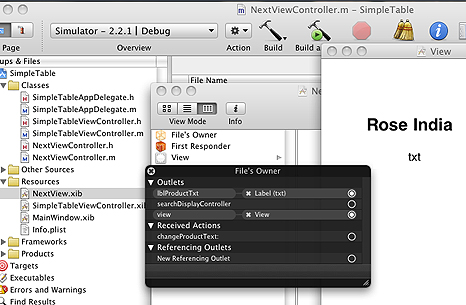
Check connection into Interface Builder:
Finally Press Build And Go Button