iPhone Picker Object On Toolbar Button
In this tutorial will learn how to use Picker view, also the Toolbar and on that will place Toolbar button and the selected object in Picker view can be seen on Tool bar button.
In this tutorial will learn how to use Picker view, also the Toolbar and on that will place Toolbar button and the selected object in Picker view can be seen on Tool bar button.iPhone Picker Object On Toolbar Button
In this tutorial will learn how to use Picker view, also the Toolbar and on that will place Toolbar button and the selected object in Picker view can be seen on Tool bar button. Here Picker view is added to view from Library and Toolbar is created using code not by Interface Builder and also the Toolbar button, which is used to show the selected object in Picker View, this application is based on View Application.
Final View will look like this:

My project name is PickerViewItem and is based on View Application. In PickerViewItemViewController.h file will create variable for the PickerView, Toolbar, an Array and BarButtonSystemItem to add the data and also the controller on the view, after that we are writing the property for the PickerView, Toolbar and for the Array, will synthesize the variable in .m file so that the getter and setter of that variable is created automatically. We will add UIPickerViewDelegate and UIPickerViewDataSource as shown below.
Add this to ViewController.h:
|
< UIPickerViewDelegate, UIPickerViewDataSource> // add @interface after UIViewController UIPickerView *picker; UIToolbar *toolbar; NSArray *marray; UIBarButtonSystemItem mItem; @property (nonatomic, retain) IBOutlet UIPickerView *picker; @property (nonatomic, retain) UIToolbar *toolbar; |
After declaring the property of each variable will synthesize all variable in .m file and then will release the variable which we created. Now will create Toolbar Items i.e. will create the system defined Ok or Done button and is added to the Toolbar.
Then is viewDidLoad method will add all the actions which is done in iphone programming using an array variable which we created in .h file, and will set the title for the navigation controller which we added into the AppDelegate.m file. After that we are going to create Toolbar at the bottom of view, as is done by coding so will set the size of the Toolbar as well as the frame of the Toolbar and then is added to the view. In viewDidUnload method will release and will set it to nil value and also will write one action method for the button on Toolbar so that when u click button you can see something on debug. After doing all will write the PickerView Delegate and in that will change the left most bar item to what's in Picker view and will re create all the items or objects and in PickerView DataSource will set the no of rows in the Picker View by counting the number of array and also the number of rows in each component and at last number of components in picker view.
Add this to ViewController.m:
|
@synthesize picker, toolbar, marray ; - (void)dealloc{ [toolbar release]; [marray release]; [picker release]; [super dealloc]; } - (void)createToolbarItems{ UIBarButtonItem *systemItem = [[UIBarButtonItem alloc] initWithBarButtonSystemItem:mItem target:self action:@selector(action:)]; NSArray *items = [NSArray arrayWithObjects: systemItem, nil]; [self.toolbar setItems:items animated:NO]; [systemItem release]; } - (void)viewDidLoad{ [super viewDidLoad]; self.marray = [NSArray arrayWithObjects: @"Done",@"Cancel",@"Edit",@"Save",@"Add",@"FlexibleSpace",@"FixedSpace",@"Compose",@"Reply", @"Action",@"Organize",@"Bookmarks",@"Search",@"Refresh",@"Stop",@"Camera",@"Trash",@"Play", @"Pause",@"Rewind",@"FastForward",@"Undo",@"Redo",nil]; self.title = NSLocalizedString(@"Picker Object On Toolbar", @""); toolbar = [UIToolbar new]; toolbar.barStyle = UIBarStyleBlackTranslucent; [toolbar sizeToFit]; CGFloat toolbarHeight = [toolbar frame].size.height; CGRect mainViewBounds = self.view.bounds; [toolbar setFrame:CGRectMake(CGRectGetMinX(mainViewBounds),CGRectGetMinY(mainViewBounds) + CGRectGetHeight(mainViewBounds) - (toolbarHeight * 2.0) + 2.0, CGRectGetWidth(mainViewBounds), toolbarHeight)]; [self.view addSubview:toolbar]; [self createToolbarItems]; } - (void)viewDidUnload{ [super viewDidUnload]; self.marray = nil; self.toolbar = nil; } - (void)action:(id)sender{ NSLog(@" Stop Doing "); } #pragma mark UIPickerViewDelegate - (void)pickerView:(UIPickerView *)pickerView didSelectRow:(NSInteger)row inComponent:(NSInteger)component{ mItem = [pickerView selectedRowInComponent:0]; [self createToolbarItems]; } #pragma mark UIPickerViewDataSource - (NSString *)pickerView:(UIPickerView *)pickerView titleForRow:(NSInteger)row forComponent:(NSInteger)component{ return [marray objectAtIndex:row]; } - (NSInteger)pickerView:(UIPickerView *)pickerView numberOfRowsInComponent:(NSInteger)component{ return [marray count]; } - (NSInteger)numberOfComponentsInPickerView:(UIPickerView *)pickerView{ return 1; } @end |
After everything the thing which we have to do is, will make the connection with the Interface Builder and then save it.
Make connection with Interface Builder:
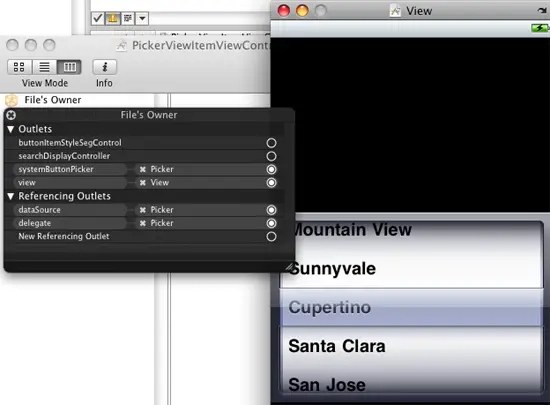
Finally press Build And Go Button