Flex Trace Method, Trace function in Flex
In this tutorial we have illustrate about trace method in flex and explain how to use it.
In this tutorial we have illustrate about trace method in flex and explain how to use it.Flex Trace Function
Trace function is used for debugging the application which prints the message on the console when application runs in debugging mode. The developer can see how the application flows. He can understand the problem and fix the problem. The message can be seen on the console tab which is at the bottom of the flex builder. Clicking the debug button starts the debugging of the application and terminate button stops the debugging session.
Flex Trace Method Example: (traceexample.mxml)
<?xml version="1.0" encoding="utf-8"?>
<mx:Application
xmlns:mx="http://www.adobe.com/2006/mxml" layout="absolute"> <mx:Script><![CDATA[
import mx.controls.Alert; public function init():void{ trace("Init started.....");myText.text =
"Button Clicked."; trace("Init ended.....");}
]]>
</mx:Script>
<mx:Button
label="Click Me" click="init()" x="132" y="10"/><mx:Text
id="myText" x="132" y="40"/></mx:Application>
In flex builder, the above application can be debug by clicking debug button (you can see a bug like symbol at the top of the picture below).
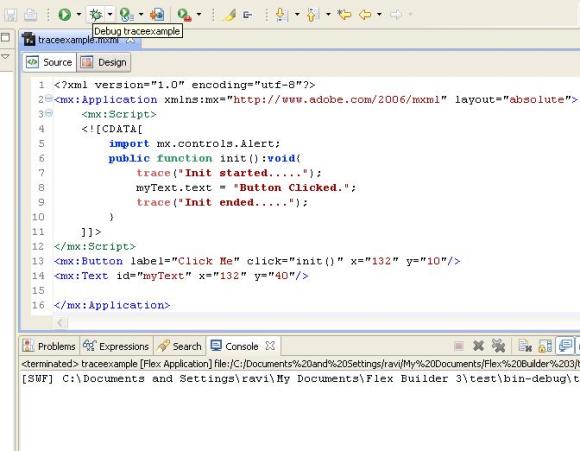
Clicking the debug button opens the browser and runs the application like below. Clicking the button calls the init() method which calls two trace methods.

The message will be printed by trace() method can be seen at the bottom of the flex builder. You can see the picture below.
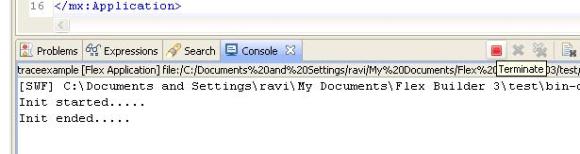
You can stop the debugging by clicking the terminate the button. You can see the red button in the picture above. You can also stop it by closing the browser window also.