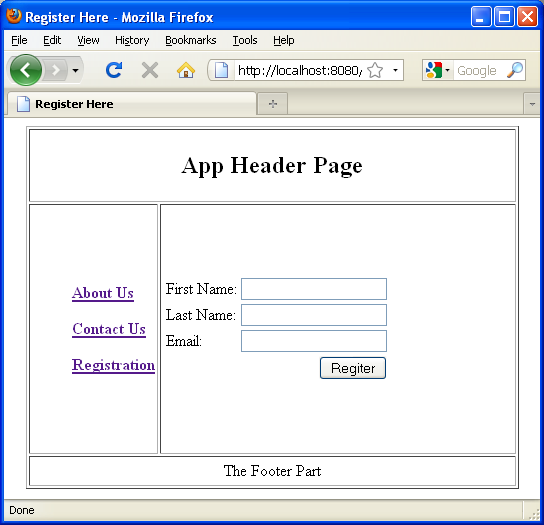
The Following are the steps for Stuts tiles plugin
1. Map the Tiles Listener class deployment descriptor(web.xml) file<listener> <listener-class>org.apache.struts2.tiles.StrutsTilesListener</listener-class> </listener>
<%@ taglib uri="http://tiles.apache.org/tags-tiles" prefix="tiles" %>
<!DOCTYPE HTML PUBLIC "-//W3C//DTD HTML 4.01 Transitional//EN"
"http://www.w3.org/TR/html4/loose.dtd">

<html>
     <head>
	<meta http-equiv="Content-Type" content="text/html; charset=UTF-8">
	<title><tiles:insertAttribute name="title" ignore="true" /></title>
     </head>
	<body>
	     <table border="1" cellpadding="2" cellspacing="2" align="center">
		<tr>
		    <td height="30" colspan="2">
			<tiles:insertAttribute name="header" />
		    </td>
		</tr>
		<tr>
		    <td height="250">
			<tiles:insertAttribute name="menu" />
		    </td>
		    <td width="350">
			<tiles:insertAttribute name="body" />
		    </td>
		</tr>
		<tr>
		    <td height="30" colspan="2">
			<tiles:insertAttribute name="footer" />
		    </td>
		</tr>
	   </table>
	</body>
</html>
<?xml version="1.0" encoding="UTF-8" ?>
<!DOCTYPE tiles-definitions PUBLIC
"-//Apache Software Foundation//DTD Tiles Configuration 2.0//EN"
"http://tiles.apache.org/dtds/tiles-config_2_0.dtd">
<tiles-definitions>
	<definition name="baseLayout" template="/layouts/baseLayout.jsp">
		<put-attribute name="title" value="Template" />
		<put-attribute name="header" value="/templates/header.jsp" />
		<put-attribute name="menu" value="/templates/menu.jsp" />
		<put-attribute name="body" value="/templates/body.jsp" />
		<put-attribute name="footer" value="/templates/footer.jsp" />
	</definition>

	<definition name="home" extends="baseLayout">
		<put-attribute name="title" value="Home Page" />
		<put-attribute name="body" value="/pages/home.jsp" />
	</definition>
	<definition name="aboutUs" extends="baseLayout">
		<put-attribute name="title" value="About Us Page" />
		<put-attribute name="body" value="/pages/aboutUs.jsp" />
	</definition>
</tiles-definitions>
package net.roseindia.action;

import com.opensymphony.xwork2.ActionSupport;

public class TilesAction extends ActionSupport {

	public String home() {
		return "home";
	}

	public String aboutUs() {
		return "aboutUs";
	}

}
<!DOCTYPE struts PUBLIC
"-//Apache Software Foundation//DTD Struts Configuration 2.0//EN"
"http://struts.apache.org/dtds/struts-2.0.dtd">

<struts>
	<package name="default" extends="struts-default">
		<result-types>
			<result-type name="tiles"
			class="org.apache.struts2.views.tiles.TilesResult" />
		</result-types>
		<action name="*Page" method="{1}" class="net.roseindia.action.TilesAction">
			<result name="home" type="tiles">home</result>
			<result name="aboutUs" type="tiles">aboutUs</result>
			<result name="contactUs" type="tiles">contactUs</result>
			<result name="registration" type="tiles">registration</result>
		</action>
	</package>
</struts>
 |
 |
Download The Sample Application
Advertisements
Ads
Ads