ZF Hello World
In this tutorial we will learn how to display "Hello World" in ZF, though it sounds quite easy but this is the first step towards learning any language.
In this tutorial we will learn how to display "Hello World" in ZF, though it sounds quite easy but this is the first step towards learning any language.My First Program in ZF:
"A journey of a thousand miles begins with a single step". Like this proverb we start learning every computer language with "Hello World" program. This tutorial is not an exception, but before we get started, we shall discuss about the directory structure of ZF.
The Application Directory:
This directory contains the codes which are required to run any project and these codes can not be accessed directly by the web server. Since this framework is based on MVC design pattern, it separates the business logic, view logic, control logic. There are different directories are present in the application directory to handle these files. As per requirement we can add few more directories as well.
The Library Directory: This directory holds the library files (e.g. ZF's library files etc.) and we can reuse those files. Any other libraries such as Smarty, Propel, Doctrine or any other library file could be placed in this directory.The Test Directory:
The purpose of test directory is to store the Unit tests. The basic need of unit testing is to ensure that the code (of the entire project) is continues to work as it grows or changes with the time. Sometimes the previously developed code need to change with new requirements (and it is known as refractored).
The Public Directory:
The security feature is also maintained by the Zend Framework. ZF does not allow any server to access directly it's application directory's file and a server can only access those files which are present in public directory. In this directory we put those files which are less important like JavaScript file, CSS file, and HTML file etc.
Requirements:
To run ZF (version 1.7.0) we need PHP 5.2.4 or later. ZF Programmer's Reference Guide strongly recommends to use PHP 5.2.3 or later for security and for other reasons. To run unit test we need PHPUnit 3.0 or later
All we need to download the Zend Framework from http://framework.zend.com/download. Unzip the folder and copy the bin and library folder from the unzipped folder and place it in c:\program files\ZendFramework folder. Since most of the works in ZF is done from command prompt, so we need to do some preliminary settings, so right click on the My Computer icon, select properties, select Advanced tab, click on Environment Variables, now under the System Variables select Path and click edit button, now select the c:\program files\ZendFramework folder, put double quote around it (optional) and two semicolons before and after the path, reboot your system.
Now after that go to command prompt (WIN key + R=Run, Window=> type cmd and press enter key). Type zf show version and press enter, it should display like this.

Now we will create the directory structure using zf command, which will save our time and effort and create a fully functional MVC based project. Now type the following command which will create the directory structure automatically:

We are using XAMPP, and the root folder here is htdocs, use the same commands mentioned above for your header folder. After executing the command a directory structure will be like (HelloWorld is the name of the project):
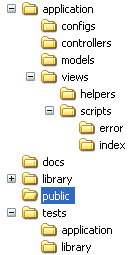
Application is our main directory in which we will put all the source code of the application, in this directory model, view and controller are different folders in which we place the respective files. The use of public directory is the public facing root of the website, that means to access the application's root page we need to type: http://localhost:81/public/ and by doing this we will make our website more secure because most of the files of the application are not accessible by Apache.
Images, CSS files will be stored in separate directories in public directory. Library files will be stored in library folder, in the current example we will copy the zend folder, (from the unzipped folder (ZendFramework<version>/library/zend) ) to the library folder of the project.
Now we can make small changes in C:\xampp\apache\conf\httpd.conf file as follows and change the default page, basically the changes mentioned below is for creating a virtual host:
<VirtualHost *:81>
DocumentRoot "C:/xampp/htdocs/HelloWorld/public"
ServerName .local
# This should be omitted in the production environment
SetEnv APPLICATION_ENV development
<Directory "C:/xampp/htdocs/HelloWorld/public">
Options Indexes MultiViews FollowSymLinks
AllowOverride All
Order allow,deny
Allow from all
</Directory>
</VirtualHost>
In the above lines # is used to make lines as comments and since our XAMPP server is running in 81 we have mentioned it in the first line, the alternative way to change the default page is pretty simple and we need to make a small change as follows:
DocumentRoot "C:/xampp/htdocs/HelloWorld/public"
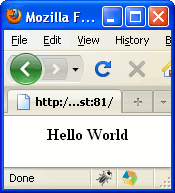
Now type http://localhost:81/public/ in the address bar of the browser and press return key, the output in the browser should be like this:
Now go to C:\xampp\htdocs\HelloWorld\application\views\scripts\index folder and in the index.phtml (built by ZF at the time of project creation) and change the existing code with the following:
<?php
echo "<center><b>Hello World</b></center>";
Save it and refresh the page, output will be as follows:
In the next applications we will learn a how to develop a small project using ZF.