How to design a remote of the game.


Hey, do you want to brush up your designing skill? Then come forward to design a video game remote by using Photoshop. This tutorial will give you step by step designing tips to learn this and surely this will be easy to learn.
Follow now
Take a New File: First take a new file and set size as of your wish.

Ellipse Tool: Select ellipse tool (U key) selected "E2E2E2" color and drag a circle, now select pen tool (P key) and point on the line of the circle then make adjustment with selected direct selection tool (A key) as I have done here.

Gradient Overlay: To add gradient overlay go to Layer Menu > Layer Style >Apply Gradient Overlay and use setting as given below pop up menu.

Legs of the Remote:
1. Select Ellipse tool (U key) and drag a circle
2. Select pen tool (P key) and point on the line of the circle
3. Select direct selection tool (A key) and make adjustment as given in
the below image.

Make another Let:
1. Select first let, pull the leg with holding mouse
2. Go to Edit Menu > Free Transparent > Transparent (Ctrl + T, and
right click )
3. Select flip horizontal, set flipped leg as given below image


Ellipse Tool:
1. Select Ellipse tool with selected "5163B0" color and drag a
circle
2. Select Pen tool (P key) and point on the line of the circle
3. Select Direct selection tool (A key) and make adjustment as given
below image.

Make Another:
1. Select and pull holding mouse
2. Go to Edit Menu > Free Transparent > Transparent (Ctrl + T, and
right click )
3. Select flip horizontal, set flipped design as given below image

Inner Shadow: Go to Layer Menu > Layer Style> Inner Shadow and use setting as given below pop up menu.

Your image will look like this.

Ellipse tool:
1. Select Ellipse tool and drag a circle
2. Select Pen tool (P key) and point on the line of the circle
3. Select direct selection tool (A key) and make adjustment as given
below image.

Inner Shadow: Go to Layer Menu > Layer Style> Inner Shadow and use setting as given below pop up menu.

Your image will look like the below one.

Make Another:
1. Select and pull by holding mouse
2. Go to Edit Menu > Free Transparent > Transparent (Ctrl + T, and
right click )
3. Select flip horizontal, set flipped design as given below image
 0
0
Buttons: Select Ellipse tool (U key) and drag a circle with black color.

Bevel and Emboss: Go to Layer Menu >Layer Style >Bevel and Emboss and use setting as given below pop up menu. 1

Your image will look as given below.
 2
2
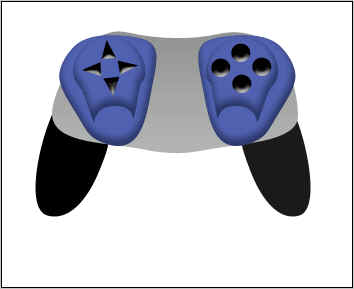
Use upper step to make four buttons as I have done here.

Rectangle Tool:
1. Select Rectangle tool (U key) and make rectangle shape
2. Select Direct selection tool (A key) and convert into a arrow shape as
I have done here.
3

Use upper step to make four arrow buttons for instruction.
 4
4
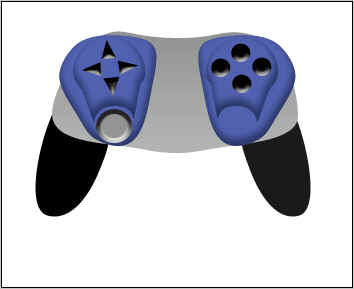
Button: Select ellipse tool (U key) and make circle shape for button.

Bevel and Emboss: Go to Layer Menu > Layer Style > Bevel and Emboss and use setting as given below popup menu. 5

Your image will look as I have done here.
 6
6
Next Button: Select and pull holding mouse and add adjust as I have done here.

Design Middle Portion:
1. Select ellipse tool and drag a circle
2. Select pen tool (P key) and point on the line of the circle
3. Select direct selection tool (A key) and make adjustment as given
below image.
7

Arrow:
1. Select rectangle tool and make rectangle shape.
2. Select direct selection tool and make an arrow.
 8
8
Use upper step to make another three arrows.
 9
9