
How to make a teddy bear


You all have played with the teddy bear when you were a child. In this tutorial we are going to make a teddy bear design and follow the simple steps to learn it completely, I have used here equal setting for every part of it that makes it easy and understandable.
New File: Take a new file with appropriate size for your design.
Head: Select Pen Tool (P key) and point a circle then select Direct Selection Tool (A key) and make adjustment as similar this image.

Color: Choose "BE7F37" color to fill in the head, I have used this color for whole design so you need not worry about different color.
Gaussian Blur: Go to Filter Menu > Blur > Gaussian Blur and make adjustment.

Add Noise: Go to Filter Menu > Noise > Add Noise and make similar setting.

Motion Blur: Go to Filter Menu > Blur > Motion Blur and make setting as given below popup menu.

Eyes: Now make eyes, select Ellipse Tool (U key) and draw two little circle with black color just like eyes shape as given below.

Mouth: Select Pen Tool (P key) and point then select Direct Selection Tool (A key) and adjust the points as a mouth shape.

Use same settings of the Gaussian Blur, Add Noise and Motion Blur as I have used up.
You will get it..

Nose and Lips: Select Ellipse Tool (U key) and draw a circle with black color then select Pencil (B key) and draw lines like lips.

Pen Tool: Select Pen Tool (P key) and point inside of the ear then select Direct Selection Tool (A key) and adjust the shape as I have done here.

Another Ear: Select pen tool then direct
selection tool and adjustment as given below image.
Use same settings of the Gaussian Blur, Add Noise and Motion Blur as I have
used up.

Pen Tool: Select Pen Tool (P key) and select
Direct Selection Tool (A key) and adjust.
Use same settings of the Gaussian Blur, Add Noise and Motion Blur as I have
used up.

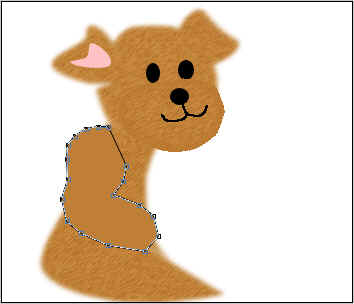
Hand: Now I am going to make hand, select Pen
Tool (P key) and point then select Direct Selection Tool (A key) make adjustment
as given below image.
Use same settings of the Gaussian Blur, Add Noise and Motion Blur as I have
used up.
Inner Shadow: Go to Layer Menu > Layer Style
> Inner Shadow and use same setting.
Use same settings of the Gaussian Blur, Add Noise and Motion Blur as I have
used up.
0

Your image will look like this.
 1
1
Ellipse Tool: Select Ellipse Tool (U key) and
make a circle then select Direct Selection tool (A key), click on the surface of
the circle and make adjustment as I have done here.
Use same settings of the Gaussian Blur, Add Noise, Motion Blur and Inner Shadow as
I have used up.

Your image will look like this. 2

Ellipse Tool: Select Ellipse Tool (U key) and draw a circle with selected this "FEC1C3" color.
 3
3
Belly: Select Pen Tool (P key) with selected "FEC1C3" color and point then select Direct Selection Tool (A key) and adjust as a belly.

Another Leg: Select Pen Tool (P key) and point
then make adjustment with selected Direct Selection Tool (A key).
Use same settings of the Gaussian Blur, Add Noise, Motion Blur, Inner Shadow as
I have used up.
4

You will have similar here.
 5
5
Ellipse Tool: Select Ellipse Tool (U key) and
draw a circle then select direct selection tool and make adjustment as given
below image.
Use same settings of the Gaussian Blur, Add Noise, Motion Blur, Inner Shadow as
I have used up.

Ellipse Tool: Select Ellipse Tool (U key) with selected "FEC1C3" color and draw a circle then make adjustment with selected Direct Selection Tool (A key). 6

Another hand: Select pen tool and make
selection then make adjustment as given below image.
Use same settings of the Gaussian Blur, Add Noise, Motion Blur, Inner Shadow as
I have used up.
 7
7
Ellipse Tool: Select Ellipse Tool with selected "FEC1C3" color and make a circle as given below image.
