Assembling web.xml from fragments
This section contains detailed description on assembling web.xml from web fragments with an example.
What is web fragment ?
The web fragment introduces in Servlet 3.0. It offers less configuration and improved pluggability to developers. A web fragment is a portion or all of the deployment descriptor(web.xml). It can be defined and enclosed in the jar file's META-INF of a framework or library. The container employs the configuration as describe in the web fragment.
A web fragment provide logical division of the web application so that the frameworks used within the web application can specify all the artifacts without requiring developers to edit or add any info in the web.xml. It employed nearly all the elements of the deployment descriptor(web.xml).
More than one web fragment can be employed. Each web fragment describe logical division. All these web fragment should be considered as complete web.xml(deployment descriptor). The web fragment provide capability to the frameworks to auto register to the web container.
Rules for utilizing web fragment
Following things should be keep in the mind before implementing web fragment :
- The web fragment must reside in a file having name web-fragment.xml.
- The top level descriptor in web-fragment.xml must be
<web-fragment>.
- The web fragment must put inside framework's JAR file's
META-INF directory. This jar file must placed inside the web
application's WEB-INF/lib directory.
- The web application's deployment descriptor have a new <metadata-complete> property . If it is sets true, annotations present in application's classes , and web fragments is ignore by the deployment tool. If it sets false or not described , annotations present in application's classes , and web fragments is examine by the deployment tool.
EXAMPLE
In the given below example, you will learn assembling web.xml from web fragments using absolute ordering :
Note : If you are unaware of absolute ordering. click here.
The project hierarchy is given below :

STEP 1 : First you need to create Servlets, Listeners and Filters :
MyListener.java
package roseindia;

import javax.servlet.ServletContextEvent;
import javax.servlet.ServletContextListener;

public class MyListener implements ServletContextListener {
@Override
public void contextDestroyed(ServletContextEvent arg0) {
System.out.println("ServletContextListener destroyed");
}

@Override
public void contextInitialized(ServletContextEvent arg0) {
System.out.println("ServletContextListener started");

}
}
MyFilter.java
package roseindia;

import java.io.IOException;
import java.util.Date;

import javax.servlet.Filter;
import javax.servlet.FilterChain;
import javax.servlet.FilterConfig;
import javax.servlet.ServletException;
import javax.servlet.ServletRequest;
import javax.servlet.ServletResponse;
import javax.servlet.http.HttpServletRequest;

public class MyFilter implements Filter {
public void doFilter(ServletRequest req, ServletResponse res,
FilterChain chain) throws IOException, ServletException {

HttpServletRequest request = (HttpServletRequest) req;

// Get the IP address of client machine.
String ipAddress = request.getRemoteAddr();

// Log the IP address and current timestamp.
System.out.println("IP " + ipAddress + ", Time "
+ new Date().toString());

chain.doFilter(req, res);
}

public void init(FilterConfig config) throws ServletException {

// Get init parameter
String testParam = config.getInitParameter("param1");

// Print the init parameter
System.out.println("Init Param Name : " + testParam);
}

public void destroy() {
// add code to release any resource
}
}
WelcomeServlet.java
package roseindia;

import java.io.IOException;
import java.io.PrintWriter;

import javax.servlet.ServletException;
import javax.servlet.http.HttpServlet;
import javax.servlet.http.HttpServletRequest;
import javax.servlet.http.HttpServletResponse;

public class WelcomeServlet extends HttpServlet {
public void doGet(HttpServletRequest req, HttpServletResponse res)
throws ServletException, IOException {
res.setContentType("text/html");

PrintWriter out = res.getWriter();

// Writing response to display on page
out.write("<html><head><title>Servlet Web Fragment Example</title></head>");
out.write("<body>");
out.write("<h2>Servlet Web Fragment Example</h2>");
out.write("<h3>WELCOME TO <font color='RED'>ROSEINDIA </font>!!!!</h3>");
out.write("<p>This is the welcome page!!</p>");
out.write("<p><a href='MyServlet'>Click here to go to next page</a></p>");
out.write("</body>");
out.write("</html>");
}
}
MyServlet.java
package roseindia;

import java.io.IOException;
import java.io.PrintWriter;

import javax.servlet.ServletException;
import javax.servlet.http.HttpServlet;
import javax.servlet.http.HttpServletRequest;
import javax.servlet.http.HttpServletResponse;

public class MyServlet extends HttpServlet {
public void doGet(HttpServletRequest req, HttpServletResponse res)
throws ServletException, IOException {
res.setContentType("text/html");

PrintWriter out = res.getWriter();

// Writing response to display on page
out.write("<html><head><title>Servlet Web Fragment Example</title></head>");
out.write("<body>");
out.write("<h2>Servlet Web Fragment Example</h2>");
out.write("<h3>This page will trigger Filter. See Console..</h3>");
out.write("<p><a href='WelcomeServlet'>Click here to go back</a></p>");
out.write("</body>");
out.write("</html>");
}
}
STEP 2 : Create web fragment(web-fragment.xml) as follows :
<?xml version="1.0" encoding="UTF-8"?>
<web-fragment xmlns:xsi="http://www.w3.org/2001/XMLSchema-instance" xmlns="http://java.sun.com/xml/ns/javaee" xmlns:web="http://java.sun.com/xml/ns/javaee/web-app_2_5.xsd" xsi:schemaLocation="http://java.sun.com/xml/ns/javaee http://java.sun.com/xml/ns/javaee/web-fragment_3_0.xsd" id="WebAppFragment_ID" version="3.0">
<name>webfragment1</name>
<filter>
<filter-name>MyFilter</filter-name>
<filter-class>roseindia.MyFilter</filter-class>
<init-param>
<param-name>param1</param-name>
<param-value>Roseindia</param-value>
</init-param>
</filter>
<filter-mapping>
<filter-name>MyFilter</filter-name>
<url-pattern>/*</url-pattern>
</filter-mapping>

</web-fragment>
STEP 3 : Create a jar file jarfile.jar (whatever name you want) and add web-fragment.xml under META-INF directory :

Add this jar under WEB-INF/lib directory as shown in the project hierarchy.
STEP 4 : Create web.xml and order the web fragments using absolute ordering as follows :
If you are unaware of ordering of web fragments click here.
<?xml version="1.0" encoding="UTF-8"?>
<web-app xmlns:xsi="http://www.w3.org/2001/XMLSchema-instance"
xmlns="http://java.sun.com/xml/ns/javaee" xmlns:web="http://java.sun.com/xml/ns/javaee/web-app_2_5.xsd"
xsi:schemaLocation="http://java.sun.com/xml/ns/javaee http://java.sun.com/xml/ns/javaee/web-app_3_0.xsd"
id="WebApp_ID" version="3.0">
<display-name>Servlet3WebFragment</display-name>

<absolute-ordering>
<name>webfragment1</name>
</absolute-ordering>
<listener>
<listener-class>roseindia.MyListener</listener-class>
</listener>
<servlet>
<servlet-name>WelcomeServlet</servlet-name>
<servlet-class>roseindia.WelcomeServlet</servlet-class>
</servlet>
<servlet>
<servlet-name>MyServlet</servlet-name>
<servlet-class>roseindia.MyServlet</servlet-class>
</servlet>
<servlet-mapping>
<servlet-name>MyServlet</servlet-name>
<url-pattern>/MyServlet</url-pattern>
</servlet-mapping>
<servlet-mapping>
<servlet-name>WelcomeServlet</servlet-name>
<url-pattern>/WelcomeServlet</url-pattern>
</servlet-mapping>
<welcome-file-list>
<welcome-file>WelcomeServlet</welcome-file>
</welcome-file-list>
</web-app>
OUTPUT
When you execute the above application, first page you will get is :

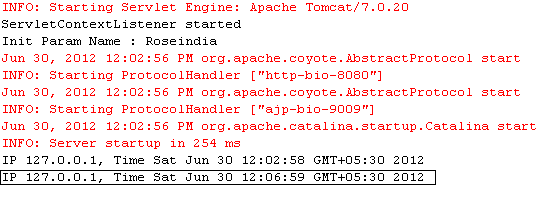
The console have following messages at start up :

When you click on hyperlink you will get the following page :

On console, you should have following message :